Kenbushi®
User Manual
HTML Edition:
7.5.0.0
Release date: 24 September 2008
Basic Operation
Special Notes
Notices
Overview
Detailed Operation
Appendices
Overview
Introduction
Kenbushi® is a powerful Digital Media
Jukebox which puts your library of movies, TV shows, music and other
media at your fingertips for easy browsing, fast searching and instant
playback. It includes a Secure Data Backup system and easy File-Sharing
over LAN or Internet.
- Digital Media Jukebox
- Full-screen media control window, with powerful
search and selection functions
- Loads multimedia players, mobile
phones and USB memory sticks with media
- Plays
movies, TV shows and music videos full-screen
- When playing music, track
title, artist and album
information is displayed
- Supports
a very wide range of media formats
including MP3, DivX and H264
- Wireless remote control using any PDA with
Wi-Fi (eg. Pocket PC, Nintendo DS, etc.)
- The Skipmark(TM) system allow segments of
movies
(such as credits) to be bypassed
- Can turn any Windows, MacOS or Linux
computer into a media center PC
- One
computer can control media playback on
multiple remote computers
- Multiple bookmarks can be set for each media
item
- Playlist shuffle and looping
- Playlists
can be created instantly
- Wireless Slideshow Viewer
- Wireless slideshows can be viewed using any
PDA with Wi-Fi (eg. Pocket PC, etc.)
- Automatic high-quality scaling of slideshow
photos to suit any PDA screen size
- Optional automatic rotation of photos to
maximize screen viewing area on a PDA
- Organize slideshows on your computer - no need
to resize and upload pictures to your PDA
- Any number of slideshows can be created and
viewed without taking up PDA storage space
- The interval between slideshow photo changes is
user selectable
- Slideshow viewing works on any PDA or computer
web browser
- Cross-Platform File Sharing
- Perfect
for home, school
or office networks
- File
access is protected by highly secure 896-bit encryption
- Works over wired and wireless LANs, as
well as over the Internet
- Swap
movies, photos or music with friends and family via the
Internet
- Transfers
between computers can be stopped and resumed at any time
- Any files,
folders or disks on your computer can be selected
for sharing
- Clear,
centralized control of shared files and folders helps improve security
- File transfers can be verified, to ensure files
are not corrupted during transfer
- Easy Internet setup of
dispersed LAN workgroups (eg. students at Universities)
- Any folder can be Web-enabled, allowing it to be accessed by
any web browser
- Users can be
set
to act as workgroup
hubs, for easy LAN workgroup segregation
- Virtual
Private Network function offers encrypted transfers
- Protects
data transfers from snoops on wireless networks
- Versions for Windows XP/Vista and MacOS X
(Linux version coming soon)
- Data Backup
- Backup plan wizard sets up a backup plan
suitable for most users in one click
- Simply drag and drop files and folders to
backup onto a backup plan
- Ready-made backup plan templates for
purchased iTunes music, photos, etc.
- An activity list shows all backups and
restores, with easy access to log files
- Incremental backup over LAN or Internet to
one or more destination computers
- Up to 256-bit AES
encryption of remotely stored backup files, to keep them secure
- The 'Clues2Key'(TM) encryption key system
allows easy encryption key recovery
- Missed automatic backups (due to computer off)
are run as soon as computer is on
- Supports automatic daily backups of laptops to
home servers when users get home
- On and offsite storage of backup data
provides excellent backup data redundancy
- Files with specified file extensions can
be excluded or only included in backups
- File data integrity is verified during
storage and recovery using MD5 digital signatures
- Backup plans can have automatic or 'Alert
Only' schedules, or be triggered manually
- 'Alert Only' mode is perfect for rolling
backups of a working folder (eg. a thesis)
- Notes eg. "Just completed thesis
abstract" can be included with 'Alert Only' backups
- The incremental backup system stores new
versions of files whilst retaining old ones
- Data is restored using a simple file
explorer interface (which accepts search criteria)
- Data can be restored to its original
location or saved to a selectable new location
- The Pro
Edition
offers unlimited data backup (the Standard Edition is limited)
- Remote Folder Sync
- Folders
can be easily synchronized
between computers eg. desktop
and laptop
- Synchronization works
over wired and wireless LANs, as
well as over the Internet
- Folder synchronization over the Internet
allows
you to perform offsite data backups
- Only updated or new files are transferred
- Miscellaneous
- Long
file names and file names with Unicode characters are supported
- Supports
the transfer of huge files, even when using dialup modems
- Safely
access files stored on your home computer from school or work
- Broken
file transfers (due to modem dropouts, etc.) can be resumed
- Automatically
renames files to ensure cross-platform file name
compatibility
- File permissions are transferred
correctly
on Unix
platforms (MacOS X and Linux)
- Sets
Macintosh type/creators correctly based on PC file name extensions
- List
of types/creators and PC file name extensions can be changed by
user
- Uses
standard Internet protocols for all operations (ie. TCP/IP)
- Offers
large file support (ie. files > 2GB in size) on most computer
platforms
- A variety of
TCP
and UDP
diagnostic functions can assist with network setup
- Easy
localization into
any Unicode-based
language eg. German, Japanese, etc.
- A compact
global floating window allows unobtrusive monitoring of file
transfers
- Fully compatible to DHCP and other
automatic IP address allocation protocols
- All incoming
remote
user connections can be viewed, and their actions monitored
The Kenbushi application must be
running on all computers you wish to
share
files between. It only uses Internet Protocol (TCP/IP) for it's
operations, so you don't need other protocols such as NETBEUI,
AppleTalk, Windows file sharing, Samba, etc. to successfully share
files.
In addition, you
don't need file sharing enabled on your computer, nor do you use the
Network Neighborhood, My Network Places, the Chooser, or any other
networking functions built into your operating system to use Kenbushi.
Why you need your
own home media/backup server
There are many
compelling reasons why you will come to love having a home server* -
it's simply the most convenient, economical and effective way for you
and your family to organize your digital life. In the following
section, you will probably discover many things about a home server
that you may not have considered before, all of which are
supported by
Kenbushi.
*A 'home
server'
is
really just a normal computer dedicated to serving your needs whilst
sitting quietly behind or next to your TV. In fact, most budget
computers you see
in specials catalogues would be suitable as a home server, as even a
budget computer nowadays is
quite powerful. You don't even need a computer monitor, as the TV is
used for display.
Provides
a central location on which to store and organize
your movies, music and photos
Most
computer users
have media files spread all over their laptop and desktop
computers, and this chaos generally increases as more media are added.
The additional problem is that some of these files are huge (especially
movies), and you could unknowingly have multiple copies of the same
file wasting valuable space on
your hard disk. Putting media onto a central
server means you can clear media from your other computers and
know the master copies will always be on your media server. Of course,
at any time, you can always download any media you want to use locally
onto your
laptop or desktop computer from the media server.
Is
always switched on and ready for action
The most
annoying
thing about wanting to play media on your normal desktop or laptop
computer is having to switch it on and wait for it to boot, do it's
anti-virus and anti-spyware scans, and then finally give
you control. Sometimes it's switched on already, so playing media is a
simple and quick process, but often it's not. A media server, on
the other hand, is always on and always ready for immediate action.
Can
Play High-Definition video and audio now
High-Definition
content is what most mediaphiles want - crisp, smooth, luscious video,
where you can see each individual blade of grass sway in the wind. With
current wireless technology, you simply can't stream High-Definition
(HD)
content, and even streaming Standard-Definition (SD) content can be a
challenge. Having a movie break up into a pixellated mozaic spoils the
whole point of setting up digital movie playback in the first place.
With a home server, you don't have to wait for some new wireless
standard to come out, nor buy new networking hardware to support the
very high data rates required for video streaming, nor suffer the
disappointment of finding your neighbors also want streaming video and
the airwaves are clogged. Why stream movies when you can simply store
them on some inexpensive, monstrously huge hard drives and play them
directly from the hard drive to your beautiful big screen TV and
surround sound system? You have to store the movie files somewhere
anyway, so why not store them next to your TV on a media server, rather
than take up valuable space on your laptop or desktop computer?
Does
all the hard work of playing the movies, leaving your
main computer free for productive tasks
Playing a movie
usually takes a lot of processor (CPU) power and often continuous hard
disk use, so streaming a movie from your main computer would leave you
with a less responsive and overworked computer when you want to do
productive work on it. For example, you might want to
play a movie for the kids to keep them entertained whilst you work. Let
the media server do all the heavy lifting involved in movie playback,
and gain the full productive use your main computer, in addition to
complete remote control of media playback. After setting up the media
server to play a movie, you could even get into some intensive 3D game
action whilst controlling movie playback remotely using your PDA with
Wi-Fi.
Allows you to play games (eg. World of
Warcraft) in a totally immersive, big screen, surround sound environment
Wireless keyboards and mice are now inexpensive and widely available,
and provide an excellent way to control immersive computer games, such
as World of Warcraft, Half-Life 2 and Counterstrike. Why play these
games on a small computer screen, when you can use your big screen TV
and surround sound system to enjoy these games to the max? Thus,
connecting a
wireless keyboard and mouse to your home server gives you the necessary
control to change computer settings, install software,
etc., but also allows you to play games from the comfort of your lounge
chair.
In contrast, laptops are not designed to play games, but are perfect
devices for work productivity and control. Having the combination of a
laptop and a home server gives you the best of all worlds: you can
conveniently set up and control media playback on the home server from
the laptop, easily and regularly backup your laptop files to the
home server, and use your laptop for productive work.
In addition, if your family likes to play casual games together on the
TV,
a home server offers an excellent way to do this is in the comfort of
your lounge room.
Gives
you 24/7 Skype, so your friends, family and distant relatives can
always
call you for free
Skype and other
free Voice-over-IP (VoIP) services are becoming a powerful benefit of
having a broadband Internet connection. These services provide an
effective replacement for normal telephones and operate between callers
anywhere in the world, for free.
The only problem with Skype is that you need your computer switched on
to make and receive calls, but normal laptop and desktop computers are
off most of
the time. However, if you have Skype installed on a home server, and
the home server is always on, you have a Skype service which is always
on. That means people can call you at any time on Skype, just like they
call you now on a normal telephone, but at no cost ... from
anywhere in the world. The value proposition of a home server just
moved up a notch.
In addition,
there are now many telephone handsets on the market which are designed
specifically for use with Skype. There are even dual-use handsets which
plug into your existing telephone socket and work as a standard
telephone, but also plug into the USB port on your computer and work
directly with Skype. When making a call, you push a button to select
whether you want to make a normal telephone call, or a call
through Skype. When receiving a call, the ringtone indicates whether
the call is a normal telephone call, or a Skype call.
Skype is currently introducing video calling to their software, and
with an appropriate TV mounted webcam connected to your home server, it
would be possible for you to
video call your friends and family from the comfort of your lounge
chair.
Get a wireless home router for free,
with simpler Internet setup, and make your home server accessible from
the Internet
Many households now connect a wireless router unit containing a
firewall to their broadband modem, and then use that router as the
gateway to the Internet for their home computers. The idea is that it
provides better security, since NAT (Network Address Translation) is
done by the router, as well as firewalling, and this protects the home
computers from hacker attacks coming from the Internet. In addition,
the router can be on 24/7, so anyone in the household can connect
without being dependent on a computer connected to the broadband modem
to be on.
In contrast, there are significant benefits in having a home server
connected directly to your broadband modem and using that as a wireless
home router.
- you don't
need to buy a wireless router unit - the wireless card in the home
server can do that job.
- the home
server is on 24/7, so anyone in the household can connect to the
Internet (and other LAN users) at any time.
- home
network configuration and administration is significantly simplified. Router
units can be difficult, if not nearly impossible, for the average home
computer user to manage. You need to know which ports are used by a
particular program, open them by configuring the router, and then test
whether it all works. Trying to serve files through a router can be
even more complex, as it involves passing ports through
the router to the server, or setting a DMZ (DeMilitarized Zone) on the
router, etc, etc. It can be a difficult and frustrating process.
However, a home server used as a wireless router is generally much
easier
to set up and manage. Good firewall software is either included with
the operating system, or freely available. For Windows users who want
full control over their firewall (rather than using the simple firewall
built into Windows XP), there is software such as ZoneAlarm (www.zonealarm.com), which simply
pops up with an alert when you try using a new port. You then just
click a button and it works. Serving files is similarly simple.
If you enjoy online games, such as World of Warcraft, Counter-Strike,
etc., then playing those games on the home server, from your lounge
chair, on your big screen TV, with wireless keyboard and mouse, with
the fastest and most streamlined
Internet connection, is what you want. Period.
- you can
access your home server over the Internet. This allows you to securely
transfer files to and from your home server with Kenbushi, as well as
remotely monitor and control your home.
Note: It's important to
keep your home server as secure as possible. If you use MacOS X or
Linux on your home server, you need to regularly install any operating
system updates released by the vendor. If you use Windows on your home
server, in addition to installing operating system updates, make sure
you have good anti-virus and anti-spyware software installed, and
that you regularly update it. This should ensure smooth operation of
your home server.
Can
backup your documents and other files, and keep them safe
The key to
effective data backup is to have copies of your valuable documents and
other files stored on a different disk to the one you work on, in
addition to an easy way to restore them from those backups when your
originals get lost or deleted. This 'different disk' may be a
writeable CD, a USB flashdrive, the hard disk of another computer
connected via the network, or a remote server connected via the
Internet.
A media server provides an ideal location for you and your family to
backup your files. It's conveniently accessible, offers fast transfer
of files via LAN, and offers large storage capacity. Generally, the
files on a media server don't need to be backed up*, since no
progressively edited sole-copy works (such as word processor documents)
are routinely stored on it by users (unlike laptops, for instance).
*many
prudent users burn movies, music and photos to CD or DVD for archiving.
Home automation and security
A home server is the perfect platform from which to control home
automation devices, such as lighting systems, heating, cooling,
garden watering systems, etc., whether controlled with a local remote
control, via remote control over the Internet, or via an automated
control system (eg. a thermostat keeping the room temperature constant).
A home server is also perfect for monitoring purposes, including baby
monitoring, home security devices (eg. still and video cameras), as
well as logging data from devices such as solar energy and wind power
collection systems, etc.
The key to effective implementation of these types of systems is to
have a computer always on and always performing it's control and
monitoring tasks. Reliability is very important, especially when there
may be problems with the supply of mains power. A home server with very
minimal energy needs would be optimal, both to be environmentally
friendly, and also to allow it to be powered from a
backup battery or
solar-powered source, when necessary.
Is
cheaper than you may think
A 'home server'
is
really just a normal computer dedicated to serving your needs whilst
sitting quietly behind or next to your TV. In fact, most budget
computers you see
in specials catalogues would be suitable as a home server, as even a
budget computer nowadays is
quite powerful.* You don't even need
a computer monitor, as the TV is used for display.
There are two
important things to look for when selecting a media
server: the computer must be quiet, and it must have a
composite video output if you have an older
TV. However, if the computer you like doesn't have composite output,
you can install an inexpensive video card with a composite
video output, or purchase a composite video output module for it. Quiet
computer cases are
now more common (some even have ball-bearing fans), as are quiet
motherboards. If you want to use your server for home automation and
security as well, low power operation is also a must.
If you are technically proficient and want to build your own computer,
you might consider installing the Ubuntu
version of Linux on it, which is free. The latest version of Ubuntu
(codenamed 'Gutsy Gibbon') installs
easily,
detects most computer hardware (including wireless network cards), and
has a simple installation system
for additional software which works via download over the Internet.
With Kenbushi installed, you can use your new Linux computer as a file
server, media server and backup server. You could also use it as a
wireless home router and Internet hub. Linux
has the substantial added benefit of not requiring anti-virus and
anti-spyware software, nor the regular scans required by this software
(unlike Windows).
Details about how to set up a Ubuntu home server can be found below.
If you wish to purchase or build an inexpensive computer running
Windows XP with the intention of playing intensive 3D games on it as
well (eg. World of Warcraft), you should look for a motherboard with
good integrated graphics. For example, motherboards with integrated GeForce 6150 GPUs make
excellent inexpensive games computers. An Intel Core Duo processor
coupled with a good video card would also be a good choice.
If you like the Apple Macintosh, the Mac Mini (with Intel Core Duo processor) would make an
excellent home server in almost all respects, including very low power
consumption. It's only downside is that it won't run intensive 3D games
well, if you need that
ability (eg. World of Warcraft works, but generally not at high enough
framerates).
*most should play Standard Definition movies
well, but High Definition movie playback and intensive 3D gaming may
require a better quality
system.
Summary
of what a home server should be:
* Compact, so it
can be conveniently located behind or next to your TV
* Low-power, so
it is environmentally friendly, and can be powered from a backup
battery or
solar-powered source, when necessary
* Wireless, to
make installation easy and to provide portability
* Offer large
storage capacity, so you can store all your media and backup data in
one central location
* Silent, to
eliminate fan noise, DVD disk grinding, etc. from spoiling the
enjoyment of media playback
* Easily
connectable, so your current and future TV and sound systems can be
plugged straight in
* Give you 24/7
Skype, so you can make and receive free local and international phone
calls anytime
* Inexpensive, to save you money
Currently,
Kenbushi plays media using the VLC media player, as VLC runs
on Windows, MacOS X, and Linux and thus supports all platforms Kenbushi
does. However, we plan to introduce support for Apple's Quicktime media
player in a future release, which will provide an alternate playback
system for media on Windows and MacOS X (including DRM protected media
purchased from the iTunes store, such as TV shows and full-length
movies). All functionality in Kenbushi is expected to be the same when
playing media with Quicktime, but we will be able to take advantage of
Quicktime's superior performance in some areas, such as mpeg 4 and H264
movie playback of High-Definition content, whilst retaining VLC's
slightly broader media compatibility (Quicktime does not support some
types of audio codec).
We also plan to introduce support for
Microsoft's Windows Media Player in a future release, which will provide
an alternate playback
system for media on Windows (including purchased DRM protected media,
such as TV shows and full-length
movies).
Cross-platform
file transfers on a LAN
You can now transfer files easily between
any Windows, Macintosh and Linux (i86) computers on your home, school
or office
network
(see
example local area network in Figure 1 below). Kenbushi
provides a bridge between different computer types without
requiring complex installation and set up procedures. Just select the
files and folders you wish to share on one computer and they can be
requested by and transferred to another computer on the network.
Figure 1. Example LAN connecting
different computer types
Conveniently
transfer files via the Internet
Friends can now easily, safely and
conveniently transfer huge files via the Internet (see Figure 2
below), irrespective of what type of connection is used (eg. dialup
modem, ADSL, cable, etc). File access is protected by highly secure
896-bit encryption, so your files are never exposed to anonymous users.
Setting up a workgroup for Internet file sharing is as easy as entering
a workgroup name and pressing the 'Join' button. All users with that
workgroup name will then connect together for file sharing. You can
protect your shared files from unauthorized access with a 'Sharing
Password'.
Figure 2. Example of connecting
computers via the Internet
Cross-platform Internet
downloading
Often one computer on a home network is
set up to access the Internet, whilst the others are only connected to
it via the Local Area Network (see Figure 3 below). Now you can
download files using the Internet-connected computer and transfer them
across the local area network to the other computers using Kenbushi.
This also means you can download PC files from the Internet
using a Macintosh or download Macintosh files (in MacBinary or BinHex
format) using a PC and then transfer them to the appropriate computer.
Figure 3. Example of
cross-platform setup with Internet connected computer
Limitations of Internet
connection sharing
Most functions in Kenbushi
will work on computers connected indirectly to the Internet via an
Internet connection sharing host (see diagram in Figure 4 below).
In this case, you will be able to connect to a remote computer via the
Internet, view it's file list and get files from it, but the remote
computer won't have access to your computer. This is simply a
side-effect of how Internet connection sharing works.
All functions in Kenbushi
will work on the Internet connection sharing host itself (eg. your home
server) when
transferring files over the Internet, since it is effectively
connected directly to the Internet.
Figure 4. Example of setup with
Internet connection sharing
Security
considerations
Kenbushi
was designed from the
ground up with security in mind. All control operations are protected
by
highly secure 896-bit encryption and no passwords are ever sent across
the network or the Internet in clear text (unlike FTP). If the user
trying to get access to your shared files doesn't know the password you
have set, they cannot access anything, including the list of files you
are sharing.
Since you are
sharing files with
friends via the Internet, rather than with anonymous users who
inherently cannot be trusted, you are much less likely to get files
carrying viruses, worms or trojan horses.
If you are using wireless networking in your home or office, it is
highly recommended that you use a password for access to that network
(using 'WEP', an acronym for Wired Equivalent Privacy). This protects
your network from intruders and eavesdroppers
getting into your network, as well as people
using your Internet connection without your knowledge or consent (and
possibly causing problems, such as making you go over your monthly
download limit).
Detailed
Operation
These
instructions apply to all
platform versions of Kenbushi,
though the focus is on the
Windows XP version and screenshots come from this version. If there are
platform-specific differences in operation or features for Macintosh or
Linux, these differences are described in the relevant sections.
The dynamic help system built into Kenbushi
displays specific help information for all
controls and textboxes. To get information about a particular control,
move the cursor over it and help information will be displayed.
Setting up
Select the Preferences panel (see Figure 5
below) and enter a Sharing Password
to ensure only authorized users
(ie. those people who know your password) can
access your
shared files and folders. You may also wish to change the default Computer Name - this is the name
that other users on the network will
see when they connect to your computer.
You can set Kenbushi to start up
automatically when your
start up your computer (or log in to your computer user account) by
checking the Launch on Startup/Login
checkbox. This is especially useful if you use Kenbushi
frequently for transferring files to other computers or doing data
backups. You can also set the Minimize
Main Window on Startup checkbox to ensure the main window
of Kenbushi
doesn't clutter your desktop when it starts up.
On Windows, the Minimize
Main Window on Startup function hides the main window (so there
is no application item in the taskbar), but leaves the Kenbushi icon in
the Windows tray (the area at the bottom right side of the desktop).
From the Kenbushi tray button, you can show the main window again, get
information about Kenbushi, and quit Kenbushi. If you close the main
window, Kenbushi will continue running in the Windows tray - you need
to select Quit from the File menu or Quit from the tray menu to quit
Kenbushi.
Further information about the
other controls on the preferences panel can be found in Transferring files to
your computer
and Localization into other languages.
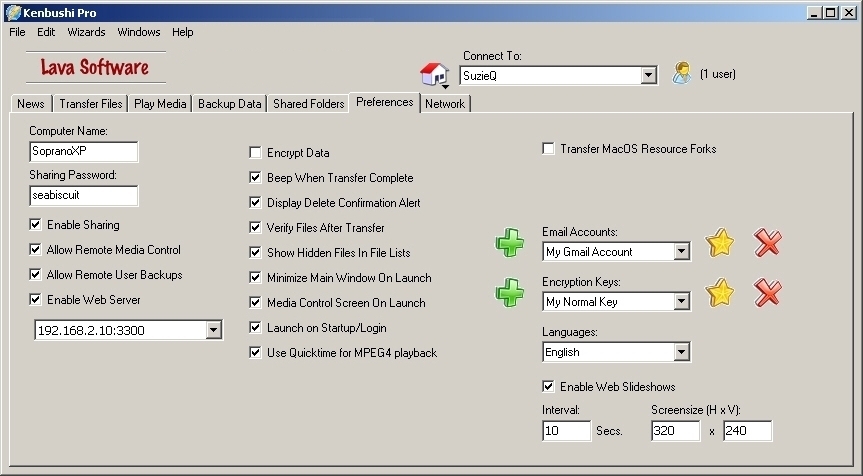
Figure 5. The Preferences
panel
Now choose the Shared
Folders
panel (see Figure
6 below)
and add all the files and folders on your computer you wish to share by
pressing the Add Folder and Add File buttons and selecting them.
Alternatively, you can add files and folders by dragging them directly
from the desktop and dropping them onto the Files/Folders To Share listbox. You
can remove shared items by selecting them in the listbox and then
pressing the Remove button.
If you wish to use
the media player functions in Kenbushi, add your computer's Music and Movies folders to the Shared Folders listbox. When you
subsequently do local or remote searches on the Play Media panel, music and movie
files will be returned. From the results of these searches, you can
build playlists and use the media player functions. Please see adding media to the media
library for
more details.
Since the
files and folders you selected for sharing on Kenbushi
are
always listed in
one central location (ie. on the Files/Folders
To Share listbox), you always know
what you are sharing. In contrast, when using Microsoft Windows file
sharing, you can have shared files and shared folders scattered all
over
your hard disks and not know what is currently accessible to others
over
the network. This presents a security problem in Microsoft Windows
file
sharing, which is eliminated
by Kenbushi.
If you wish to make
any folder shown on the list writeable, check the checkbox on the left
side of that folder. The icon will change into a folder containing a
pencil, indicating it is writeable. These writeable folders can accept
uploads, allow new folders to be created in them, and will allow files
and folders in them to be renamed (Note:
renaming is not available in the Linux version of Kenbushi).
Note: If a file or folder has been
added to the Files/Folders
To Share listbox, but is no longer available (eg. you are
sharing folders on a CDROM, zip disk, floppy disk, etc. and have
ejected it), it will be removed automatically from the list. When it is
re-inserted, it will automatically appear again in the list.
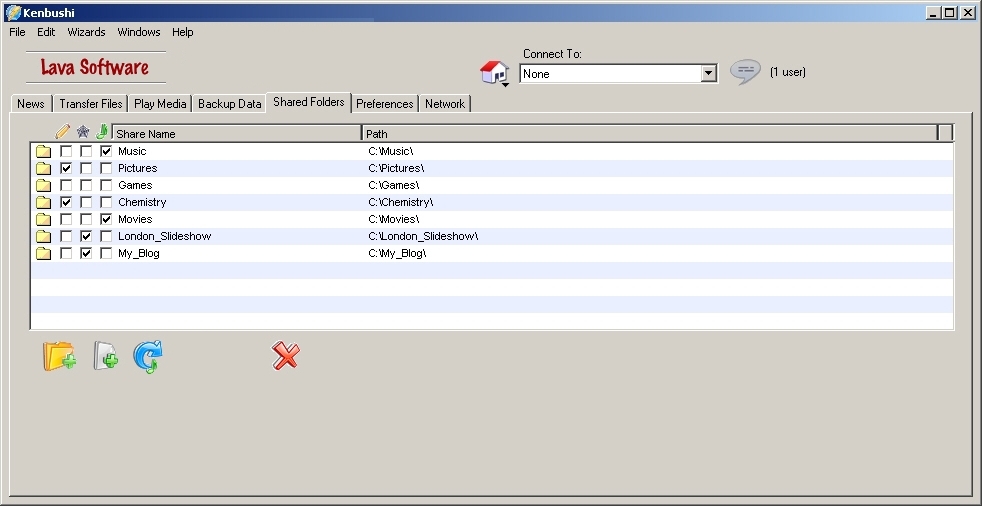
Figure 6. The Shared Folders panel
Sharing files over
the Internet
If you wish to share
files with your friends over the Internet, select Internet
(Internet Workgroup)
from
the Workgroup Setup Method
popup
menu on the Preferences panel
(see Figure 7 below).
Then enter the Workgroup Name
you and your friends have chosen to use, and press the Join button. You should see a
number of messages in the Connection
Status
textbox detailing the network operations in progress, including
connections coming in from other remote users in your workgroup. Your
friends'
computers should appear within a few seconds in the Remote
User Connection List as well as the Connect
to popup menu on the Transfer
Files panel.
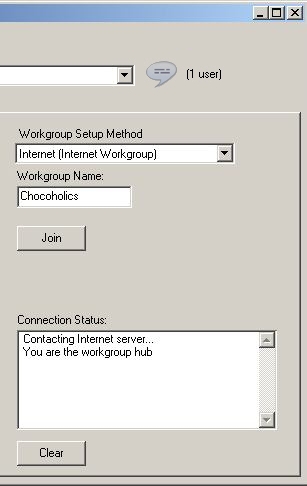
Figure 7. Joining an Internet
workgroup
See the Transferring files to your computer
section below for
details about locating and transferring files from
remote computers.
When you press the Join button, Kenbushi
actually contacts the Lava Software server on the Internet, which will
assign you to be the 'workgroup hub' for that named workgroup (if it
has not already been assigned to another user getting in before you).
Users who subsequently join that named workgroup will then be
automatically redirected by the Lava Software server to your computer
to get information about all the other users in the workgroup. When
they have this information, they will connect directly to these users.
Thus, the workgroup hub is like the axle of a wheel, with the other
users forming the spokes of the wheel.
If a computer
assigned as a workgroup hub goes offline, the first computer in the
workgroup to poll the Lava Software server after 90 seconds has elapsed
will be assigned as the new workgroup hub. Thus, a workgroup almost
always has a central and dynamically assigned workgroup hub to bring
all users of the workgroup together.
Solving Internet
connection problems
Most Internet workgroup connection problems in Kenbushi are
caused by firewalls and NAT devices, such as routers and proxy servers.
Firewalls
Firewalls
prevent other computers on the Internet from connecting to your
computer without your authorization, by blocking all network ports
except the standard ports used by web browsing (port 80), email (port
25), FTP (port 21), etc. They generally also prevent outgoing
connections on non-standard
ports, to stop malware (eg. spyware,
viruses, worms, etc.) which has found its way onto your computer from
doing nasty things, such as allowing the remote control of your
computer.
However,
the
problem with blocking all non-standard ports using a firewall is that
many online programs, particularly games, use specific non-standard
ports for their operation. For example, World of Warcraft requires
ports 3724, 6112 and 6881-6999 to be open. Counter-Strike requires port
27015 to be open. If these ports are closed, the software will not work
correctly. Thus, users must configure their firewall to be able to play
these games.
Similarly, Kenbushi requires port 3300
to be open on your Internet firewall for
both incoming
and outgoing TCP connections.
Note:
If you are only sharing files, etc. using Kenbushi over a LAN (eg. a home or office
network connected via Ethernet, wireless, etc.),
firewalls should not be causing any problems, as firewalls are designed
for controlling Internet network access only. The firewall test
system in Kenbushi tests for firewall barriers to the
Internet only.
On
Windows XP with Service Pack 2 (SP2) installed, a basic firewall is
included and switched on by default. To check this on your computer,
open the Network Connections
control panel, double-click the network device connecting your computer
to the Internet (usually an Ethernet network card) and press the Properties button. Then select the Advanced panel - you should see
a Windows Firewall groupbox
similar to Figure 8 below.
Click the Settings... button
and you will see if the firewall is on.
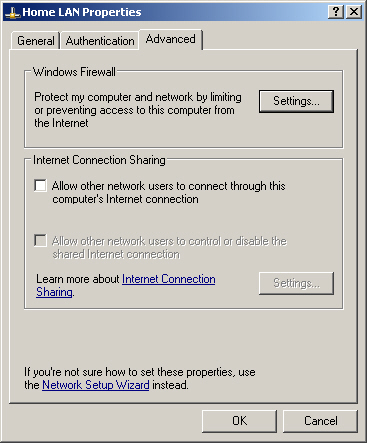 Figure 8.
 Checking for a
Windows XP
firewall
Unfortunately,
on Windows XP with Service Pack 2, you can only switch the entire
firewall on or off - you can't enable individual ports. With the
firewall
on, you'll have a more secure computer which won't support non-standard
online programs; with the firewall off, you'll have an insecure
computer which supports non-standard online programs. Though this is a
lot better than older versions of Windows (which have no built-in
firewall at all), you really need both security and online program
support. Thus, you should
purchase a firewall program, or download and install a free firewall
program, such as ZoneAlarm (www.zonealarm.com).
After installing ZoneAlarm, you can make Kenbushi
work correctly by clicking the Allow
button on the dialogs displayed by ZoneAlarm when you
run Kenbushi for the first time
(see Figure
9 below). You should probably
also click the Remember this setting
checkbox, to save you having to click the Allow button every time.
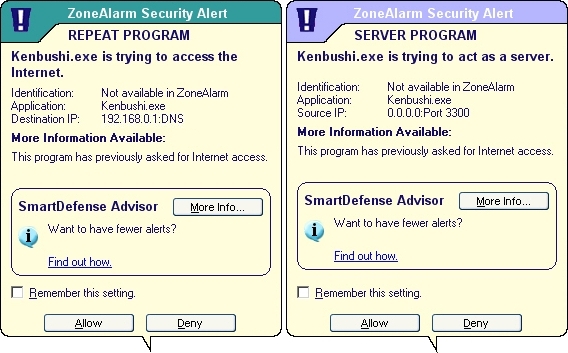 Figure 9.
 Allowing
Kenbushi
to send and receive Internet data
On MacOS X and Linux, the built-in firewall allows you to enable
individual ports. On MacOS X, the firewall settings can be found on the
Sharing control panel. Click
the Firewall panel, click the New...
button and enter the information required for Kenbushi
(see Figure 10 below).
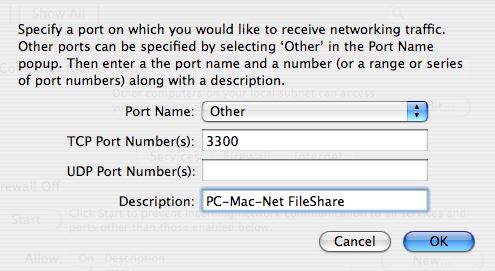 Figure 10.
 The MacOS X
firewall
setup
If you have only a software firewall (ie. not one built into a hardware
router or proxy server) and can't get Kenbushi working over the
Internet, try completely disabling your
firewall temporarily and then doing the firewall test (described below
in Diagnosing
network problems). It it works, you're
on the right track and it's a matter of configuring the firewall
settings. If it doesn't work, it's
probably not the firewall causing the problem.
Proxy
servers
Proxy servers funnel Internet traffic from various computers on a home
or office network to the computer on the network which is directly
connected to the Internet via a dialup or broadband modem.
Proxy servers generally have a built-in firewall, since all Internet
traffic comes directly through the proxy server. This built-in firewall
usually allows you to enable individual ports. Kenbushi
requires
port 3300 to be open on your firewall for both incoming
and outgoing TCP connections.
On Windows, for example, you may be using WinProxy (www.winproxy.com). To enable port
3300 in WinProxy, select Advanced
Settings from the File
menu, and then click the Firewall
panel. Press the New Application
button and enter the port information for Kenbushi
(the incoming port information is shown below in Figure 11).
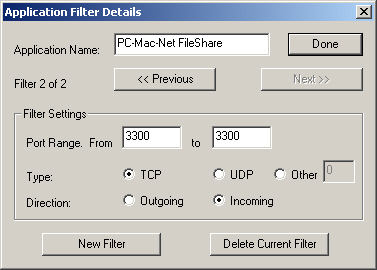 Figure 11.
 Configuring the
WinProxy
firewall
Routers
Wired or
wireless routers
generally
connect directly to a broadband modem via a USB or Ethernet connection,
and funnel
traffic from various computers on the home or office network to the
Internet. They also contain a firewall to secure the network from other
computers on the Internet.
Some
routers can be set to allow ports to 'pass through' to a computer
connected to the router, thus allowing that computer to act as a file
server (Kenbushi acts as a file
server when authorized
users get files from your computer over the Internet). Some less
expensive routers do not offer this 'pass through'
capability. Please read your router documentation for specific
information about setting up
this 'pass through' capability.
For example, on the D-Link DI-624
wireless router, you can set up a 'Virtual Server' (as shown in Figure 12 below). On this brand of
router, the 'Virtual Server' feature performs the
'pass through' function.
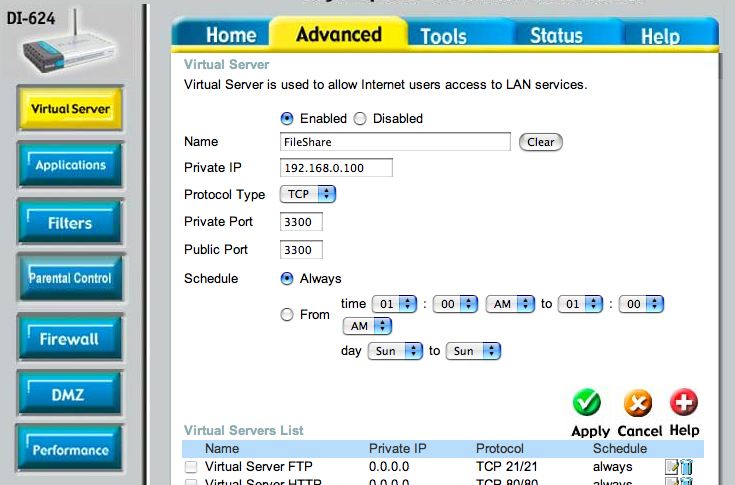 Figure 12.
 Setting up a D-Link
router for 'pass-through'
Diagnosing
network problems
If you have problems
connecting to other users on the Internet, you can diagnose the network
using the Network Monitor.
To bring up the Network Monitor,
press the Diagnostics... button
in the Advanced groupbox on
the Network panel. The
dialog shown below in Figure 13
will be displayed.
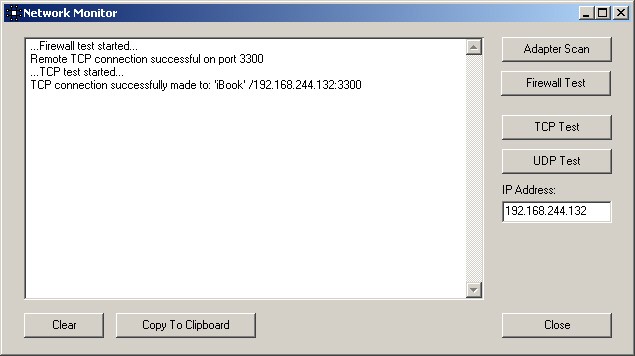
Figure 13. The Network Monitor dialog
To test if a
firewall
is stopping you connecting correctly to other Internet users, press the
Firewall Test button. A request
will be sent out to the Lava Software Internet server, which will
respond by making a test TCP connection to your computer on port 3300
(the default base port number). If the test is successful (as shown in
the test message sample in Figure 12
above), your computer can act as a file server ie. users on the
Internet can get files from your computer.
If the firewall
test fails, either you have a firewall preventing access from the
Internet, or your network topology (how the network is connected
together) is causing the problem. Please read the sections above on
firewalls, proxy servers and routers for more information about what
you can do to fix this type of problem.
With the network
diagnostic tests, you can check TCP and UDP connectivity to a remote
computer, either on a LAN or on the Internet. Simply enter the remote
computer's IP address in the IP
Address: textbox and click the TCP
Test or UDP Test
buttons. You can find out the IP address of a remote computer by
pressing the Adapter Scan
button on the Kenbushi
program running on that remote
computer.
If you have a
router in your network, the IP addresses displayed may only be LAN IP
addresses - these type of IP addresses usually are similar to
'192.168.xxx.xxx' or '10.0.xxx.xxx'. These are useful for setting up
tests for connectivity across a LAN, but are useless for testing
connectivity across the Internet. For information about setting up
routers so that you can use Kenbushi
across the Internet,
please refer to the Routers section above.
When a computer is
connected directly to the Internet (ie. with no router in the way, and
a modem plugged directly into the computer), you should get an IP
address displayed which is assigned by your ISP (Internet Service
Provider) and which identifies you uniquely on the Internet. You can
then do valid network diagnostic tests across the Internet which can be
helpful in getting Kenbushi
working. All dialup modems
offer this type of direct Internet connection, so a dialup modem can
come in handy for testing your Internet setup.
Sometimes ISPs
(Internet Service Providers) block ports to help prevent the
propagation of worms, viruses and other malware (this is a serious
problem on Windows computers). If you have tried everything to get Kenbushi
working over the Internet, including disabling all
your firewalls temporarily (as described in the Firewalls
section above), contact your ISP and ensure they are not blocking ports.
For Windows users,
an excellent free tool called SG TCP Optimizer is available,
which provides an intuitive interface for tuning and optimizing your
LAN TCP/IP setup and Internet connection. The description on the
developers website: "The program can aid both the novice and the
advanced user in tweaking related TCP/IP parameters in the Windows
Registry, making it easy to tune your system to the type of Internet
connection used. The tool uses advanced algorithms, and the
bandwidth*delay product to find the best TCP Window for your specific
connection speed. It provides for easy tuning of all related TCP/IP
parameters, such as MTU, RWIN, and even advanced ones like QoS and
ToS/Diffserv prioritization. The program works with all current
versions of Windows, and includes additional tools, such as testing
average latency over multiple hosts, and finding the largest possible
packet size (MTU)."
For MacOS X users,
Apple bundles Network Utility
with the operating system. This program "provides information and
troubleshooting tools to help you with your network" and can be found
in the Utilities folder inside
the Applications folder.
Of course, if a
remote user knows their Internet IP address (displayed when the Adaptor Scan button is pressed), and
you have an Internet chat session open with them (eg. via Microsoft
Messenger, etc.), they can give you their Internet IP address and you
can do a direct TCP Test to
that Internet IP address (ie. enter it into the IP Address textbox and then press
the TCP Test button). This is
the absolute best way to test the direct network path from your
computer to their computer over the Internet. They should do the same
test to your computer. If both computers pass this test, you should
able to share files, etc. using Kenbushi without problems.
Sharing
files over a LAN
When sharing files over a LAN, there are a number of workgroup setup
options available.
The fastest way to
set up a LAN workgroup (eg. a simple home network) is to select Auto-Discovery from
the Workgroup Setup Method
popup
menu on the Preferences panel.
All computers on the LAN should then be discovered quickly and
automatically. If you have multiple network adapters (eg. Ethernet
card, wireless network card, etc.) in your computer, you should select
the one connected directly
to your LAN. No further setup is required. See Figure 14 below.
Figure 14. Selecting auto-discovery
If you are in an
office or school and wish to set up a number of fixed workgroups,
select Workgroup
Hub from
the Workgroup Setup Method
popup
menu on the Preferences panel
(see Figure 15 below).
Allocate one computer in each workgroup (one with a fixed IP address
and which is switched on all the time) to act as a workgroup hub by
checking
it's Act as Workgroup Hub
checkbox. For all other computers in this particular workgroup, enter
the workgroup hub's IP address and sharing password and press the Join button. Once the IP address
and password are entered, whenever Kenbushi
is launched,
the user will automaticaly connect to the workgroup hub and
subsequently with all users active in the workgroup.

Figure 15. Using a workgroup hub
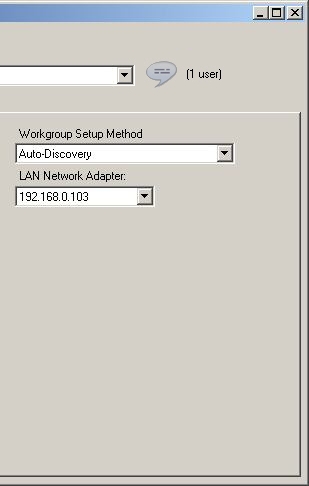
If you are in an
office, school or university, each computer can access the Internet,
and you wish to allow for any number of dynamic named workgroups,
select Internet (LAN workgroup)
from
the Workgroup Setup Method
popup
menu on the Preferences panel
(see Figure 16 below).
Then enter a Workgroup Name
and select the LAN Network Adapter
which is used for LAN access. When you press the Join button, the computer will
connect to the Lava Software Internet server and dynamically connect
all users in your named LAN workgroup. This process works through
firewalls, since only the setting up of the named LAN workgroup is done
via the Internet - all subsequent network activity between file sharing
users is done on the LAN, which is usually behind the firewall.
For example, if all
students in a particular University dormitory wanted to form a
workgroup and share files, they might select a name like 'ucla-dorm1'.
All users who join this named LAN workgroup will then be able to
connect together and share files.
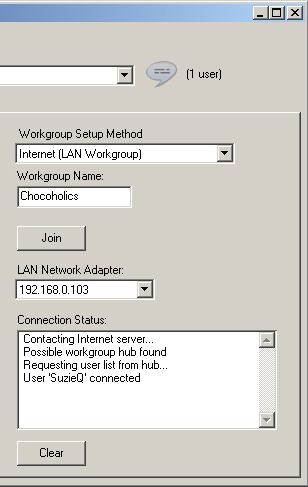
Figure 16. Using the Internet to set
up a dynamic or dispersed LAN workgroup
You can also set
up a
workgroup manually, if all computers have fixed IP addresses. To do
this, select Set
Manually from the Workgroup
Setup Method popup menu.
Then, for each workgroup member, enter their fixed IP address into the IP Address textbox and press the Add button. You can also enter IP
address ranges by making the last three characters of an IP address
"xxx". eg. 192.168.244.xxx (in this case, IP addresses 192.168.244.0 to
192.168.244.254 will be scanned). This may be useful for LANs which
have
dynamically allocated
IP addresses (eg. DHCP).
Alternatively, you
can get the 'Workgroup IP Addresses' list from another user on
the network. Start by selecting Get
From Other User from the Workgroup
Setup Method popup menu.
Then enter their IP address into the User
IP Address textbox, enter their password into the User Password textbox and press the Get button. Their list will then
be transferred and placed in the Workgroup
IP Addresses listbox. This makes it very easy to set up and
maintain workgroups containing a number of users.
Solving LAN
connection problems
If you have
problems
connecting to other users on the LAN, you can now diagnose
problems using the Network Monitor.
To bring up the Network Monitor,
press the Diagnostics... button
in the Advanced groupbox on
the Network panel. The
dialog shown in Figure 13
will be displayed.
Press the Adapter Scan button to display all
Network Adapters installed in your computer. This gives you information
about their allocated IP addresses, subnet masks and MAC addresses.
To test TCP
connectivity to another computer running Kenbushi, enter
the target computer's IP address (use the Adapter Scan button on the target
computer to find out it's possible IP addresses) and press the TCP Test button. A TCP connection
request will be made to the target computer and the results displayed.
If a connection could not be made, the most likely reason is that you
entered the IP address of the target computer incorrectly. Go to the
target computer, press the Adapter
Scan button to check the IP addresses of all the Network
Adapters it contains. If you're not sure which Network Adapter is
connecting your LAN computers together, try the different IP addresses
displayed by the scan until you find one that works.
You may unknowingly have a firewall active on your LAN (firewalls
prevent incoming and outgoing network traffic on particular ports, to
enhance computer security). If it's a firewall
problem, enable
the default base port (3300) for both outgoing and incoming TCP and UDP
using your computer's Network or TCP/IP Control Panel
and try again. See further information about Firewalls
above.
Note:
If you are only sharing files, etc. using Kenbushi over a LAN (eg. a home or office
network connected via Ethernet, wireless, etc.),
firewalls should not be causing any problems, as firewalls are designed
for controlling Internet network access only. The firewall test
system in Kenbushi tests for firewall barriers to the
Internet only.
A less likely
problem is that you accidently entered different subnet
masks on computers on your LAN. The most common subnet mask in home and
small office networks is '255.255.255.0'. You can change the subnet
mask on a computer on the Network or TCP/IP Control Panel.
A rare scenario is that there is a Network Address
Translation (NAT) device, such as a bridge, in your LAN. You should
talk to your network administrator about what may be done to change the
network topology to fix this.
To test UDP
connectivity to another computer running Kenbushi, enter
the target computer's IP address (use the Adapter Scan button on the target
computer to find out it's IP address) and press the UDP Test button. A UDP connection
request will be made to the target computer and the results displayed.
Important note: UDP connections
are used for the auto-discovery feature in Kenbushi.
Transferring
files to your computer
When you launch Kenbushi,
you
should see other computers running Kenbushi
listed in the Connect to popup
menu on the Transfer Files
panel after a few
seconds. They will also be shown in the Remote User Connection List listbox
on the Network panel, and
you can see their IP address, their computer name and what they are
doing.
Select a computer
from the Connect to popup menu
to view it's
shared files (see Figure 17 below). You may need to enter a Sharing Password to gain access to
files on this computer (once
entered, the password will be stored and automatically used for
subsequent operations).
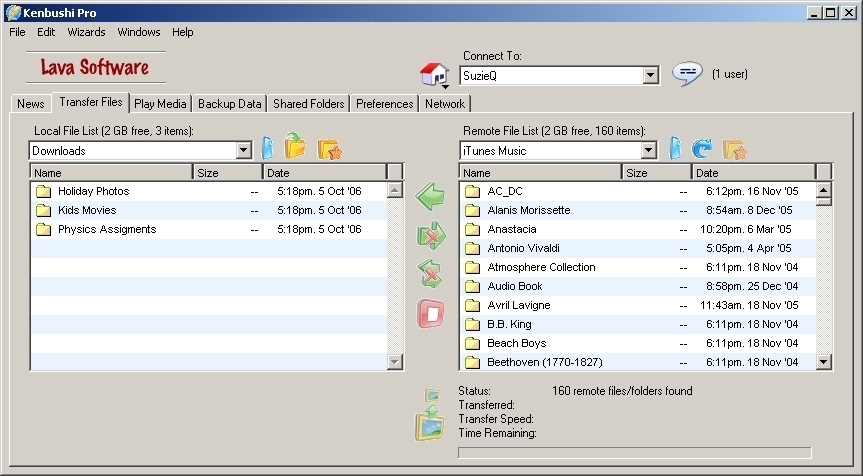
Figure 17. The Transfer
Files panel
All folders are
marked with a yellow folder icon, and all files with a grey file icon.
In addition, applications (programs) are shown with an orange diamond,
and packages as an orange folder. On MacOS, you can check the Use Custom File/Folder Icons
checkbox on the Preferences
panel. In this case, the correct custom Finder icons will be
displayed in the Local File List,
though this does slow the refresh time of the list.
All actions
available on items in the local file list and remote file list are
accessible using the context sensitive menus displayed when you
right-click the item.
On the local file
list, actions include 'Get Info', 'Get Info (With MD5
Signature)', 'Upload', 'Sync', 'Open With Default Application',
'Delete' and 'Reveal On Desktop'. Of course, actions such as 'Upload'
will only be available if the remote file list displays a writeable
folder. See Figure 18 below.
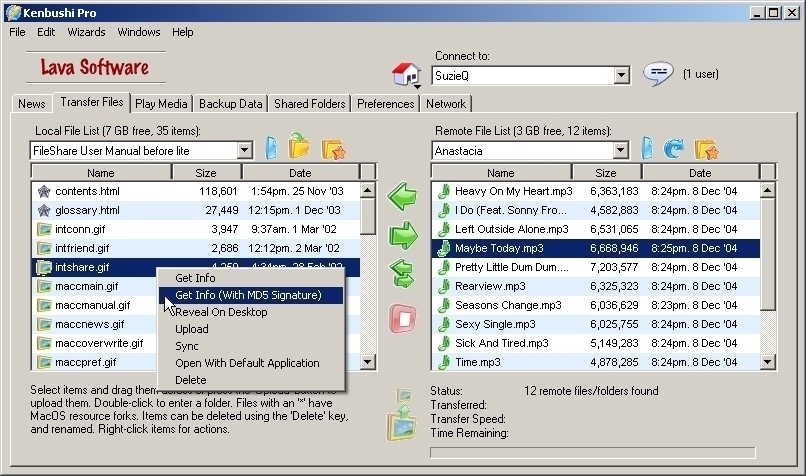
Figure 18. The local file list
contextual menu
On the remote file
list, actions include 'Get Info', 'Get Info
(With MD5 Signature)', 'Download' and 'Delete'. Of course, actions such
as 'Delete' will only be available if the remote file list displays a
writeable folder. See Figure 19
below.
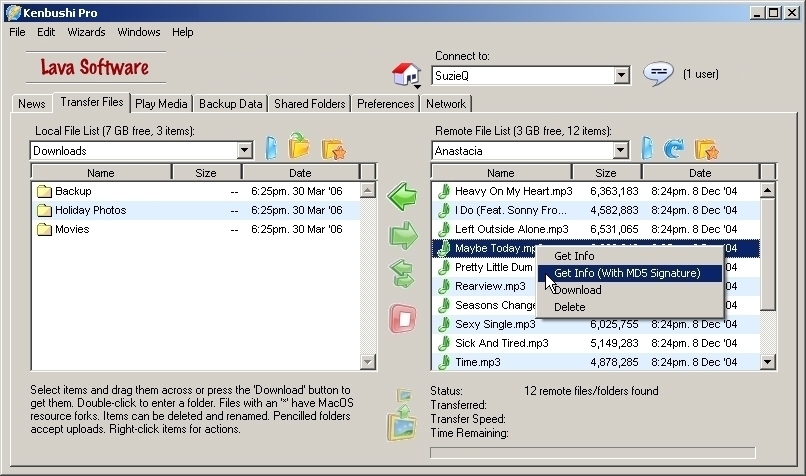
Figure 19. The remote file list
contextual menu
Files and
folders can also be dragged between the
local file list and remote file list to initiate a transfer. If you
drag files and folders from the remote file list onto the local file
list, those items will be downloaded. If you drag files and folders
from the local file list onto the remote file list, those items will be
uploaded.
If you hold down
the Shift key whilst clicking
the Download or Upload buttons, overwrite is
automatically chosen (normally, an alert will be displayed if there are
existing files and folders at the destination location). In this way,
you can conveniently force an overwrite transfer.
If you set the Verify Files After Transfer checkbox
on
the Preferences
panel, an MD5 digital signature will be created from each transferred
file's data, and this will be checked against the MD5 digital signature
of the source file. If a transmission error corrupts even a single bit
in a file, the source and destination file MD5s won't match and the
file will be automatically retransmitted. This verification is
performed on both uploads and downloads of files, and is especially
useful for transfers over the Internet as it ensures file transfer
integrity.
Folder navigation
To move into a
folder on the remote computer, double-click it in the Remote File List listbox and the
contents of the folder will be displayed. To move up the folder
hierarchy, select an item from the Remote
Folder Navigation popup menu. At the top level of this popup
menu, you
will find the root list of files and folders shared by this remote user.
To move into a
folder on the local computer, double-click it in the Local File List listbox and the
contents of the folder will be displayed. To move up the folder
hierarchy, select an item from the Local
Folder Navigation popup menu. At the top level of this popup
menu, you
will find the name of your computer and the various hard disks, DVD
drives, etc. located on it. If you insert a CD, DVD or other media,
these should be displayed in a few seconds at this top level.
The Local Folder Navigation and Remote
Folder Navigation popup menus clearly
show each of the folders in the path to the folder being displayed, so
you can navigate around quickly and consistently.
Note: Some folders on Linux cannot
be accessed. Usually these are folders for which you do not have access
permission, according to internal Linux OS settings. It's best to only
navigate through folders in your home account.
Bookmarks
This easy
navigation is further enhanced by the bookmarking system built into Kenbushi.
When you are located in a folder you wish to
bookmark, select Add Bookmark
from the bookmark menu displayed when you press the Bookmark buttons above the local and
remote file lists. To quickly go to this location in the future, simply
select it from the bookmark menu. To remove a bookmark, hold down the
Ctrl key on the keyboard whilst
selecting the bookmark, or go to the
bookmark and select Remove Bookmark
using the Bookmark button.
If you bookmark a
folder in the Local File List
located on ejectable media (eg. CDROM, zip disk, USB flash drive, etc.)
and eject the media, the bookmarks will automatically be removed from
the local bookmark list. When the media is re-inserted, the bookmarks
relating to that media will again become available.
Bookmarks to locations in the Remote File List are linked to the
user selected in the Connect to
popup menu when the bookmark was added. Thus, you will only see
bookmarks relevant to each particular user.
Creating folders
To create a new
folder on the local or remote file lists, press the Create Folder button above the list
you wish to create the folder in. A new 'untitled' folder will be
created and highlighed in the list, so you can easily name it as you
wish. If you can't create a folder in the particular folder displayed
in the local or remote files lists (ie. the Create Folder button is disabled),
it means it's not valid to create it there.
Folders can only be
created in the remote file list if the containing folder (ie. the
folder whose contents is displayed in the remote file list) is
writeable. Setting a remote shared folder to 'writeable' can only be
done on the remote computer, in the Shared
Folders panel.
Renaming files and
folders
To rename a file or
folder in the local or remote file lists, simply click on it and edit
it directly (see Figure 20
below). When you have finished editing the name, click somewhere
else in the listbox for the name to be set. If you decide not to keep
the name you are currently entering, hit the Esc key on the keyboard and the
changes will be cancelled. If you can't change a name in the list, it
means you can't change the name in the list - it may be a folder which
is not set to writeable in the remote file list, or a read-only folder
on your local hard disk, for example.
Files and folders
can only be renamed in the remote file list if the containing
folder (ie. the folder whose contents is displayed in the remote file
list) is writeable. Setting a remote shared folder to 'writeable' can
only be done on the remote computer, in the Shared Folders panel.
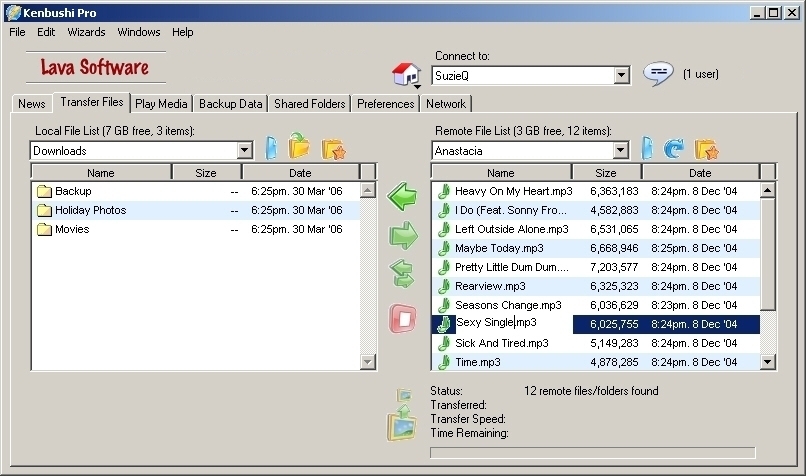
Figure 20. Renaming a remote file
Deleting files and folders
To delete a file or folder, select it in either the local file list or
remote file list and press the Delete
or Backspace key on the
keyboard. If you have the Display
Delete Confirmation Alert checkbox checked on the Preferences panel, the confirmation
alert shown below in Figure 21
is displayed before the deletion is made.
Files and folders
can only be deleted from the remote file list if the containing
folder (ie. the folder whose contents is displayed in the remote file
list) is writeable. Setting a remote shared folder to 'writeable' can
only be done on the remote computer, in the Shared Folders panel.
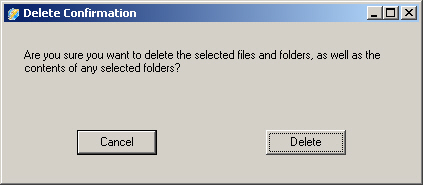
Figure 21. The delete confirmation
alert
Downloading files
When you wish
to download a file displayed in the remote file list, simply double-click
it (or highlight it and press the Download
button
- the left-pointing arrow) to begin transferring it to your computer.
After the file transfer is complete, your local file list will be
refreshed automatically and the transferred file displayed in it. A
number of files and/or folders can be selected at one time on the
remote file list, which will be downloaded when you subsequently press
the Download button.
During a transfer,
the average transfer speed as well as the instantaneous transfer speed
is displayed. The time remaining estimation is calculated using the
instantaneous transfer speed.
You can stop a
transfer at any time by pressing the Stop
button, and later resume
it. After resuming, Kenbushi
will determine which files
already exist on your computer and then display the overwrite dialog
(shown in Figure 22 below).
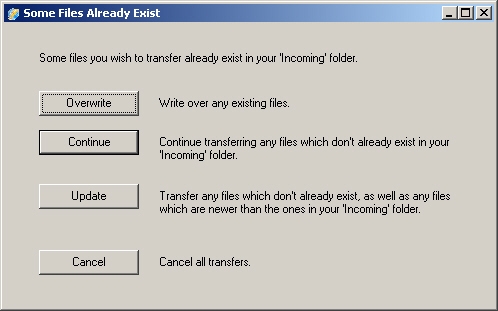
Figure 22. The overwrite dialog
If you press the Overwrite button, any existing
files shown in the Local File List
will be overwritten
with
the transferred files.
Pressing Continue will make the transfer
continue from where it left off. The Transferred
text (on the bottom right side of the Transfer Files panel) shows
information about progress, including the amount of new file data
transferred,
the amount of new file data that needs to be transferred, and the total
amount of file data selected. For example, '3.010 gb of 7.050 gb (8.763
gb)' means that 3.010 gb of file data has been transferred of a total
of
7.050 gb. The amount of file data selected was 8.763 gb. Thus, the
continue on the transfer occurred after 8.763 gb - 7.050 gb = 1.713 gb
had already been transferred.
If you are getting
a large group of files over the Internet from a remote computer
(especially via a dialup modem), then the continue function could save
you a lot of time. With Kenbushi,
you just need to
reconnect
and continue the transfer if the modem connection drops out
unexpectedly
(as they sometimes do) and transfers are not fully completed.
If you are
transferring a lot of folders and files over a LAN with Kenbushi,
the continue function can be very helpful if there are file
access problems. In contrast, if a problem occurs when transferring
files and folders using built-in Microsoft Windows file sharing, the
transfer is terminated abruptly and you have to start again from the
beginning.
In addition, very
large files, such as digital home movies, can be reliably transferred
over the Internet (even via dialup modem), making it easy for you to
share digital movies, photo collections, etc. with your family and
friends.
The Update
button
should be used if you
only want to transfer newer files between computers, overwriting
older files. This can also be
used as a simple one-way data backup function by making a copy of a set
of
files on another computer.
Note: Holding down the Shift key whilst you click the Download button will force an
overwrite and bypass the overwrite
dialog.
Uploading files
When you wish
to upload a file displayed in the local file list, simply double-click
it (or highlight it and press the Upload
button
- the right-pointing arrow) to begin sending it to the remote computer.
After the file transfer is complete, the remote file list will be
refreshed automatically and the transferred file displayed in it. A
number of files and/or folders can be selected at one time on the local
file list, which will be uploaded when you subsequently press
the Upload button.
Files and folders
can only be uploaded to 'writeable' folders in the remote file list. If
the Upload button has a red
cross through it, the selected remote folder is not writeable and you
cannot upload to it. Setting a remote shared folder to 'writeable' can
only be done on the remote computer, in the Shared Folders panel.
Note: Holding down the Shift key whilst you click the Upload button will force an
overwrite and bypass the overwrite
dialog.
Remote
folder synchronization
To synchronize two
folders with the same name in the local and remote file lists, select
the folder in the Local File List
and press the Synchronize
button (see Figure 20 below).
Any files not in
both locations will be transferred, and files with newer modification
dates will be transferred, until both folders contain the same set of
files and folders. For example, this function is particularly good if
you wish to work on a set of files at both home and work. You can be at
either location, yet be working on the latest set of files. This has
the added benefit of maintaining a remote backup of your files as well,
in case something happens to one of your computers eg. your laptop is
lost, stolen, etc.
Local folders can
only be synchronized to 'writeable' folders in the
remote file list. If the Sync
button has a red cross through it, the selected remote folder is not
writeable and you cannot synchronize to it. Setting a remote shared
folder to 'writeable' can
only be done on the remote computer, in the Shared Folders panel.
Note: You can't synchronize with
root shared folders ie. folders at the very top level of the remote
file list. You can only synchronize with folders contained within root shared folders. For
example, in the setup shown in Figure
23 below, we have already navigated into the writeable
'Chemistry' folder
and can now synchronize any local folder to it.
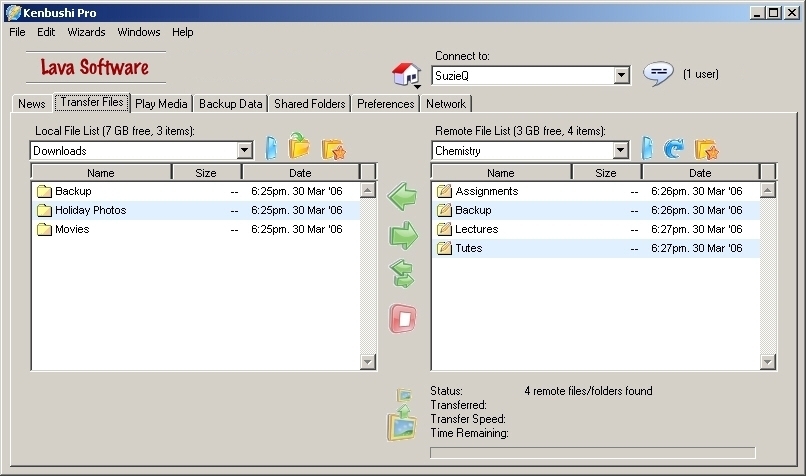
Figure 23. Synchronizing a local
with a remote folder
Getting
detailed file and folder information
To get detailed information about an item in the local file list or
remote file list, right-click that item and choose
Get Info or
Get Info (With MD5 Signature) from
the contextual menu. See the example File Information dialog shown
before in
Figure 24. You can
also select multiple items (up to 3 at a
time) and
get information about all of them at once.
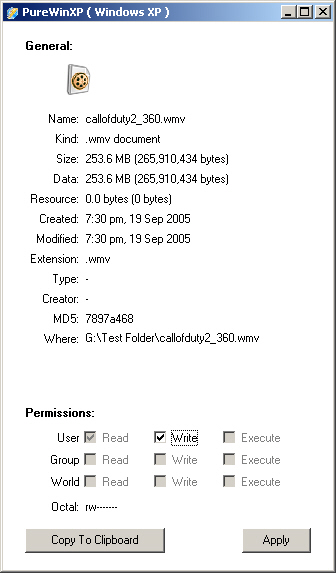 Figure 24.
 The
File Information dialog
The File Information dialog
shows various information about the file or folder. Unusual information
includes the sizes of the data and resource forks, the type, the
creator, and the MD5 signature. These are labelled Data, Resource, Type, Creator and MD5 respectively.
Only some MacOS files have
resource forks - pure Windows and Linux files do not (they only have a
data
fork). However, since you can transfer both data forks and MacOS
resource forks to Windows and Linux computers with Kenbushi
(by checking the Transfer MacOS
Resource Forks checkbox on the Preferences
panel), you may see a non-zero resource fork size. The Type and Creator values (which are generally
equivalent to a file name extension on Windows and Linux eg. ".pdf")
only exist on MacOS.
The MD5 signature is a very, very unique value generated by a special
algorithm using the contents of the file. If even a single bit or byte
of a file changes, the MD5 signature created will be completely
different. This special ability makes it a superb way to check whether
two files are identical - the files are identical only if their MD5
signatures match. This is particular useful if files are located at two
different locations, and you want to check that they are the same.
A particularly powerful feature in Kenbushi
is the ability
to generate an MD5 signature from the contents of a folder. In this
case, all the files in the folder and it's subfolders will be scanned
and a cumulative MD5 signature created from them. This makes it
possible to check that the contents of two folders match exactly.
Since MD5 signatures can be generated from items in both the local file
list and remote file list, you can check that a file or folder was
transferred correctly (ie. there was no file corruption). This is
particularly useful if you sometimes get modem dropouts, powerouts, you
can't fully complete a transfer from one location and need to resume it
at another, etc. Also, if you are located
in New York and are transferring a folder of important documents to
London, knowing that all documents were transferred correctly is very
helpful.
Note: MD5 signatures are
usually 16 bytes in length, resulting in a 32 character hexadecimal
value. The MD5 signature displayed in the File Information dialog is
calculated to 32 characters, but trimmed to 8 characters to make it
easier for users to visually compare two values.
Using the File Information
dialog, you can also change the permissions of a file or folder. After
making changes, press the Apply
button for the changes to be set.
Transfer
logs
A log file is
created during each transfer you perform, showing which files were
uploaded and downloaded, the total amount of data transferred, and
other information about the transfer. These logs files are all stored
as readable text files in the 'Transfer_Logs' folder in the Kenbushi
preferences folder. Transfer logs older than 1 week are
automatically deleted, to prevent too many from accumulating.
Note: Hold down Ctrl and Shift
on the keyboard whilst clicking the Preferences
on the main window and the preferences folder will be displayed on
your desktop (this function is not available on the Linux version).
Encrypting data during
transfers
If you wish to
get files and folders, but keep file data secure during LAN or Internet
transfer, check the Encrypt Data
checkbox on the Preferences panel.
File data will be encrypted by the remote
computer (using very strong 896-bit encryption) just before it is sent,
preventing hackers
from being able to read your file data as it passes over the network.
Enabling data encryption slows down the file transfer speed by around
25% over high-speed networks (slowdown is negligible on slower
networks).
The encrypt
data feature is especially useful for companies wishing to set up a
simple-to-use, inexpensive, highly effective Virtual Private Network
(VPN). With the continuing proliferation of wireless networking in
homes
and businesses, the point-to-point protection of sensitive or
confidential data from snooping can be critically important. Kenbushi
elegantly solves this problem.
MacOS resource forks
MacOS files
sometimes have resource forks (indicated by an asterix, '*', in the Size: column of the Local File List and Remote File List listboxes), in
addition to the normal data fork. Resource forks store additional
information, such as icons, pictures, text, etc. Windows and Linux
files traditionally only have a data fork. If you
wish to fully download MacOS files with resource forks onto Windows or
Linux computers, check
the Transfer MacOS Resource Forks
checkbox on the Preferences
panel. If you leave this checkbox unchecked, downloading any MacOS
files with resource forks to Windows or Linux computers will not
include their resource forks, possibly corrupting the file.
Each resource fork
file name is the same
as its data fork file name, except that a '._' prefix is added. The
'._' prefix is used to ensure compatibility to other cross-platform
file server applications. You may need to view hidden files to see
these '._' prefix files on Windows and Linux. On Fedora 4 Linux, for
example, check the Show Hidden Files
menu item in the View menu on
the desktop.
Note: When you upload files
from MacOS to Windows or Linux and the Macintosh files contain resource
forks, these resource forks are also transferred to the Windows or
Linux computer, irrespective of the setting of the Transfer MacOS Resource Forks
checkbox on the Windows or
Linux computer. Thus, you can correctly and safely backup all your
Macintosh files to a Windows or Linux computer.
Chatting
with remote users
If you are connected to a remote user, you can start a chat session
instantly with them by pressing the Chat
button on the top right side of the Transfer
Files panel. This allows you to send messages to the remote
user, asking them to share particular files with you, telling them
about the great new song they just heard, etc. An example chat session
is shown below in Figure 25.
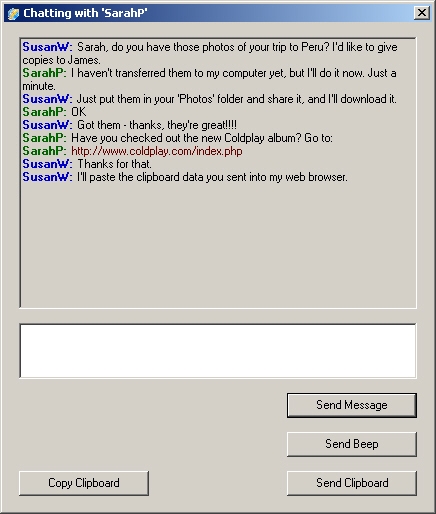
Figure 25. The Chat window
To send a
message to the user, type it into the textbox and press the Send Message button (or press
'Enter' on the keyboard). The message will be displayed automatically
in your chat window when the remote user has successfully received it.
You username will appear in blue in the chat session, and the remote
user's will appear in green.
To send text in your local clipboard to the remote user (such as web
page URL, email address, etc), copy it to your clipboard and then press
the Send Clipboard button. The
remote user's Copy Clipboard
button will become enabled when they have successfully received the
clipboard text, and they can then copy and paste it into their web
browser or other location. The clipboard is displayed in the chat
window in red, to differentiate it from the chat text.
Note: The Linux version
does
not support colored text in the chat text area. Clipboard transfers are
instead marked with three asterixes at each end of the text eg.
'***This is some transferred clipboard text.***'
To get the
remote user's attention, press the Send
Beep
button. An audible alert
will sound on the remote user's computer, and you will hear it as well.
Kenbushi
Media Center
Many homes are
now set up with home theatre systems which feature large screen LCD or
plasma TVs and high-powered
multichannel 5.1 surround sound systems. They provide a superb way to
enjoy movies, TV shows, music and other media in a highly immersive
environment.
However, storing and playing music and movies usually involves having
racks of CDs and DVDs, finding and loading disks that you wish to play,
and putting them away after use. Children can also put fingerprints and
scratches on disks (affecting their playback quality), and accidently
put them away in the wrong place (or not at all). It would be much
better to use a hard disk to store the music and movie files, and then
play these media directly from that hard disk.
Kenbushi provides the
functionality to convert existing computer
hardware (eg. an old Windows or Linux PC) into a media center and file
server. Simply install Kenbushi on the designated
media
computer and place it near a TV and sound system for easy video and
audio connection. Then use a wireless keyboard, PocketPC or another
computer (such as a laptop) to
remotely control the playback of music and movies. Typical applications
include piping movies to childrens’ rooms, playing movies and music on
the TV in the lounge, and managing music for a party.
Kenbushi works over wired and
wireless LANs, as well as over the
Internet. Thus, you can set up your media computer so it is near your
TV and sound system, and there are no wires snaking around your lounge
room. Most people try to set up media servers in this way.
However, you can control media playback with Kenbushi over the Internet as
well, allowing you to control a movie playing at your home from your
work computer or some other location. Other possibilities include
uploading a new family movie to your grandmother's computer in Florida
using Kenbushi
and then playing it for her, or remotely playing sound files (such as
the sounds of people talking) as a burglar deterent. There are many
potential applications.
Kenbushi integrates the VLC
media player (www.videolan.org)
to provide its
media playback functions. This media player can play a very wide
range of media formats, such as MP3, Ogg, AAC, Avi, DivX 5, MPEG4,
Quicktime, WMV2, Sorenson and H264. The only media types that are not
supported by VLC are those protected by DRM (Digital Rights Management)
systems, such as Apple's Fairplay.
Kenbushi now also supports Apple's Quicktime media player on MacOS
X and Windows. Quicktime provides substantial benefits over
VLC in some areas, including very fast startup time (especially for
music playback), advanced MPEG4 and H264 movie support, and playback of
Apple DRM-protected music and audio books purchased from the Apple
iTunes store. Playback of movies and TV shows purchased from the iTunes
store is not supported at this time.
If you are using
a Windows computer containing a video card with a built-in MPEG4
hardware
decoder, you should set the 'Use Quicktime For MPEG4
Playback' checkbox on the Preferences
panel (see Figure 5 above).
Without an MPEG4 hardware
decoder, Quicktime playback of
MPEG4 movies on Windows can be poor (low framerates, stalls, etc.), so
normally
VLC will be used to play this type of media (ie. files with extensions:
.mp4, .mpg, .mpeg, .mov).
If you have a dual-monitor setup on your computer (ie. one monitor is
your TV, and the other is a standard computer monitor), please assign
the primary monitor to your TV. Only the primary monitor screen will be
captured when you take screenshots with Kenbushi during media playback.
Note: Full support in
Kenbushi
for Windows Media formats is planned for the future, though some
Windows media files (such as Windows Media Player 9 files with '.wma'
and '.wmv' file extensions) can already be played using VLC. This
should include media
protected by Microsoft's DRM (Digital Rights Management) system.
Adding Media to the
Media Library
Kenbushi has a very
flexible way of dealing with the organization of your music and movie
files. Your media files can be stored in any number of different
folders (on one hard disk or several), but once they are scanned into
the Kenbushi media library, access to them is completely seamless and
consistent for search, playlist creation, etc. This allows you to
easily build very large media libraries across multiple hard drives,
which is especially useful if you have a substantial (or growing) movie
or TV show collection. To add storage capacity to your media library,
you may need to add more hard drives to your computer, and Kenbushi
fully supports this expanded storage of additional media files.
Though it's best to keep your music, movies, TV shows, etc. in separate
folders, Kenbushi will support any number of media folders you like. To
make Kenbushi aware that a particular folder on your computer is a
media folder, add that folder to the listbox on the Shared Folders panel on the main
window (see Figure 6 above)
and check it's Media-Aware
checkbox (on the left side of the listbox). This will initiate a media
scan, which will scan through all the files in the folder and extract
various details about each media item, including 'Meta information'
(such as artist, album name, etc.) and technical information (such as
audio sampling rate, codec, etc). See the example in Figure 26 below.
It's
good practice to make sure the names of full-length movies are
complete and correct ie. as they would appear on a DVD cover. This
ensures that when Amazon.com media information is subsequently
downloaded for each movie by Kenbushi, that the correct media
information is found for the movie. For example,
you should rename 'The_Fifth_Element_108539.7062.avi' to 'The Fifth
Element.avi' before it is scanned. If you do this, Kenbushi will set up
your media library very quickly and effectively, and you will be able
to browse your movies and music using gorgeous DVD and CD cover artwork.
Windows Users: it's probably best to start by adding your 'My
Music' and 'My Videos' folders to the listbox on the Shared Folders panel (these folders
can be found in your 'My Documents'
folder). This will also include your iTunes music in the media scanned
into the Kenbushi media library.
MacOS X Users: You should
probably add your 'Music' and 'Movies' folders to the listbox on the
Shared Folders panel (these folders
can be found in your 'Home' folder). This will also
include your iTunes music in the media scanned into the Kenbushi media
library.
Scanning media can
take some time - Kenbushi will scan, on average, about one media item
every 2 seconds. Thus, scanning a folder containing 300 movies will
take about 10 minutes. Scanning in 900 music files (around 80 albums)
will take about 30 minutes. However, this only needs to be done once -
adding new media files to an existing media library only requires scan
time for the new media files.
Special Notes:
- VLC is an
excellent media player, but sometimes it does crash and cause an error
message to be displayed. Please just dismiss this message and continue, if this occurs.
- Media files which are
corrupt or only partially downloaded will cause problems during media
scans. Please ensure only media files which are complete and ready for
play are contained in media folders being scanned (ie. don't make your
BitTorrent download folder a Kenbushi media folder).
- On MacOS X, the
On-Screen-Display (OSD) when playing movies with VLC is not available,
though all media playback controls work as usual.
You can stop a media
scan at any time by pressing the Close
button. To continue the scan at a later time, select the media folder
in the Shared Folder listbox
and press the Media Folder Scan
button (the blue circular arrow on Figure
6 above). Media that has already been added to the library will
be bypassed, and only new media will be added.
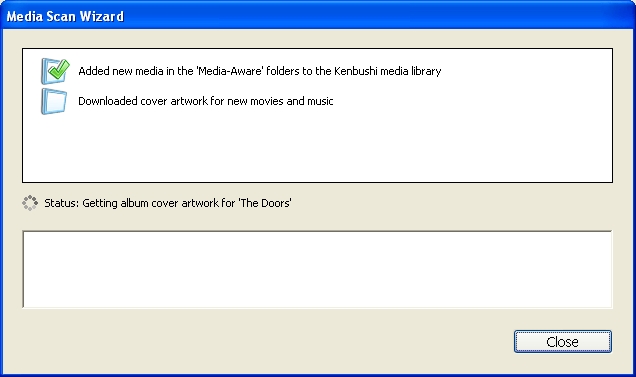 Figure 26. A media scan in progress
Kenbushi is tenacious when it scans your media. For example, MP3 music
files generally contain 'IDE tags' containing
information about the artist, album name, track order, etc. If this
information is not available, Kenbushi will do everything it can to
obtain these details. If your music library was previously organized by
iTunes, for example, there may be information stored by iTunes (and
Quicktime) which Kenbushi can extract. If this fails, Kenbushi will use
information about the folder hierarchy above the music file to deduce
the artist and album information. Normally, for example, the folder
containing a song file will be the name of the album, and the folder
containing the album folder will be the name of the artist.
Since movie type files (movies, TV shows, music videos, vidcasts, etc.)
do not contain embedded IDE tags, there is generally not very much 'Meta information' available for these
files (movie studio, episode name, etc). In this case, the meta
information that can be extracted can
only be extracted from the media file name. Kenbushi contains a
powerful file name parsing system which will extract every nuance of
meta information that is available in a file name, and it is especially
good at processing TV show files.
Most TV show files downloaded from the Internet contain a wealth of
information in their file names. However, there is no standard format
used for these files, and hence when they are added to most other media
systems, they retain their cryptic and confusing file names. Some
examples are shown below:
- Seinfeld - S2E13 -
The Statue [Repaper].avi
- Scooby Doo - it's a
wonderful scoob.avi
- S10E08 - Go God Go.avi
- S10E13 - Go God Go
XII.mp4
- Jericho S01E03.avi
- 1x03_-_Chinta_the_Baby_Chinchilla.avi
- 114 - Chito and Rita
the Spectacled Bears.avi
- 20 Dora Saves the
Prince.avi
- Dora the Explorer -
Letter for Swiper.mpg
- BBC.Life.on.Earth.12of13.LIfe.in.the.Trees.DivX5.AC3.www.mvgroup.org.avi
- BBC.Life.on.earth.Pt4.The.Swarming.Hordes.avi
- Status Anxiety 1 of
3.avi
- Ep 7 - Whinfrey's
Last case.avi
- BBC.Life.on.earth.PT5.The.Conquest.of.the.Waters.www.mvgroup.org.uk.avi
- BBC - Leonardo Da
Vinci - Pt1 - He wanted to know everything.avi
- Blade 3 - Trinity
(1of2).avi
- BBC Amazon Abyss 1 of
5.avi
Wouldn't it be great
if the episode name, episode number, season number, TV show series name,
and studio information
could be extracted from these file names? Well, the powerful file name
parsing system built into Kenbushi
can extract this information for most files, depending on what
information is contained in the file name. This makes it easy to import
your TV shows, so you can spend more time viewing them and less time
getting them set up for use.
It's always a good idea to place a series of TV show episodes into a
folder named with the series name. When Kenbushi imports these files
into the media library, it may need to use the name of the folder as
the series name. For example, the file named '1x03_-_Chinta_the_Baby_Chinchilla.avi'
does not contain the series name, and the enclosing folder name (eg.
'Dora The Explorer') would be used in this case.
The simplest and most information-rich format to use for TV shows
contains the season and episode numbers, the TV show series name, the
episode name (and possibly the uploader credit) in the following format:
TV show series name - Season No - Episode No - Episode name [uploader
credit]
An example of this format is:
Seinfeld - S2E13 -
The Statue [Repaper].avi
After the media files are scanned in, you can then edit media details, easily add a screenshot to
represent each TV show episode (captured by a single key press
during playback), and thus set up your media library in the way you
like for easy access and control. Screenshots representing episodes are
especially helpful for children's shows, as they make it much easier
for children to browse and select the TV show they want to watch.
Note: If media files are in any
way corrupt or are read as having a zero playback time (even though
they may play
correctly in other media players), they will not be added to the
Kenbushi media library. In this case, you may see them rescanned (and
rejected) each time you rescan a media folder.
Where to get movies,
TV shows and music for your media library
There are a number of common sources of movies, TV shows and music you
can use to build your media library. The media source most users start
with are their existing CD and DVD collections, and TV shows recorded
directly onto their computer from free-to-air television transmissions.
Ripping CDs (ie. inserting a music CD and converting it into music
files stored on your computer) can be done by using iTunes, as well as
a range of other software commonly available on the Internet. iTunes,
however, is free and is recommended for this purpose.
Ripping DVDs is more difficult (and in some countries illegal),
but there are a number of software programs available to do the job. Handbrake is currently available
for MacOS X, Windows and various other platforms, and is free. There
are a number of commercial products available on the Internet as
well, such as those from Xilisoft.
When ripping a DVD with these products, it is recommended that
you convert them into MPEG4 format (possibly H264, if you have a fast
computer) with a bitrate of 1200 kbps. This will ensure the highest
picture quality (comparable to the original DVD), and best playback
(hardware MPEG4 decoders are often now included on computer video
cards). Most movies ripped in this way will average about 1.2GB in
size.
Many users now record free-to-air television onto their computers for
later viewing. This usually involves special hardware, such as a TV
tuner card or USB tuner module. These are available from various
vendors, and usually record video into a commonly used format, such as
MPEG2, which is playable on Kenbushi through VLC. There are numerous
software tools available to convert MPEG2 to MPEG4 format, which will
compress the movie file significantly without any loss of picture
quality.
Many users also borrow music, movies and recorded TV shows from friends.
More and more television networks are also making their programming
available on the Internet as 'Vidcasts' (similar to 'Podcasts', but for
video). You can download these directly using your web browser and play
them in Kenbushi. A facility is planned for Kenbushi to automatically
download Vidcasts and Podcasts through RSS.
Other sources of media include peer-to-peer networks on the Internet,
especially ones which
uses the BitTorrent protocol. You can find further information about BitTorrent
client software on Wikipedia.
Adding New Media
Files
to an existing Media-Aware Folder
From time-to-time, you may wish to add more files to your media
library, or remove some files. All you need to do to add new files is
to move the files into a media-aware folder and press the Media Folder Scan button on the Shared Folders panel of the main
window (see Figure 27 below).
This will make Kenbushi scan the media folder again, ignoring files
already in your media library and adding any new files found. Any media
files which previously existed but were not found (ie. media files you
removed) will also be removed from the media library. In this way, the
media library can be kept synchronized with the media files.
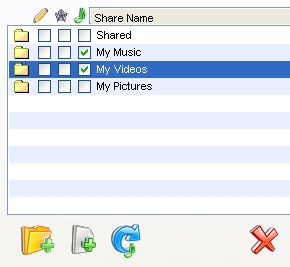 Figure 27. Adding new media files by
updating a media-aware folder
Figure 27. Adding new media files by
updating a media-aware folder
Downloading Media Details
from Amazon.com
A very fast and
easy way to obtain media information for your Kenbushi media library,
including DVD and CD cover artwork, movie director, cast (list of actors), etc., is to use the
extensive repository of data available over the Internet from
Amazon.com. Kenbushi can quickly download inform7ation on selected
individual media items from Amazon.com.
The type of media information downloaded from Amazon.com varies,
depending on whether the item is an album, or movie/TV show. For
albums, CD cover artwork, record label, release date, Amazon editorial
review, genre and composer information is downloaded. For movies/TV
shows, DVD cover artwork, cast (list of actors), movie studio, release
date, Amazon
editorial review, MPAA rating, genre and director information is
downloaded. Of course, you can update this information at any time by
downloading it again, or manually edit details in your media library
using the media
information
editing functions in Kenbushi.
Note: If you are trying to
download details for classical music CDs, Amazon.com will generally not
find very good matches for your CD cover artwork, etc. In this case, you may
wish to scan in the cover of your original DVDs or CDs. Alternatively,
there are DVD and CD cover artwork repositories on the Internet. Just
do a search on Google.com for 'cd cover art' or 'dvd cover art'.
Start by searching in your Kenbushi
media library for the album, movie
or TV show you want to get information on. When you see the movie, TV show,
or a
song from the album in the search results, right-click it and select
'Get
Album/Movie Artwork' from the context sensitive popup menu. Figure 28 below shows an example of
a song whose album will set up in this way.
Note: Only items found by
searching the media library can be used in an Amazon.com
media information download - downloads are not directly available for
items selected in playlists.
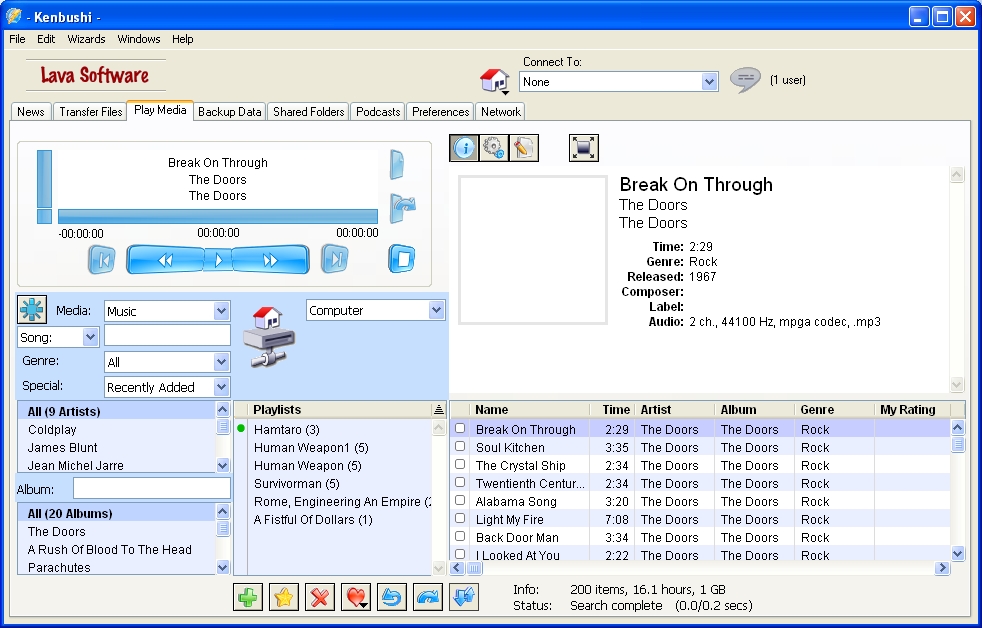 Figure 28. Amazon.com media
information will be found for the selected item
Figure 28. Amazon.com media
information will be found for the selected item
The Get Amazon.com Information
dialog will now be displayed, and a search in the Amazon.com repository for the media item
will start immediately (see Figure 29 below). This download will
build the Artwork and Item Title popup menus as items are
found, and then
allow you to select sets of information to use with your media item.
The selected information is displayed in the media information area (the area
directly below
the popup menus), in exactly the same format which will be used on the
main
window's Play Media panel.
The artwork downloaded will generally be of a higher quality
(resolution) than that displayed in the media information area. The
cover artwork picture displayed in the media information
area is automatically resized to fit. Cover artwork pictures will be
shown in larger sizes, for example, when you use the full-screen media
control
system or play music when the full-screen music backdrop is displayed.
You can set the maximum number of items that will be downloaded from
Amazon.com in the Maximum Item Count
textbox (ie. 'Download up to x items'). If less than this number of
items is found on Amazon.com, then
only the available items will be displayed. Increasing the count will
increase the time it takes to download all the information, but will
provide a wider choice of artwork and media information sets. If you
wish to stop a download in progress, press the Stop button.
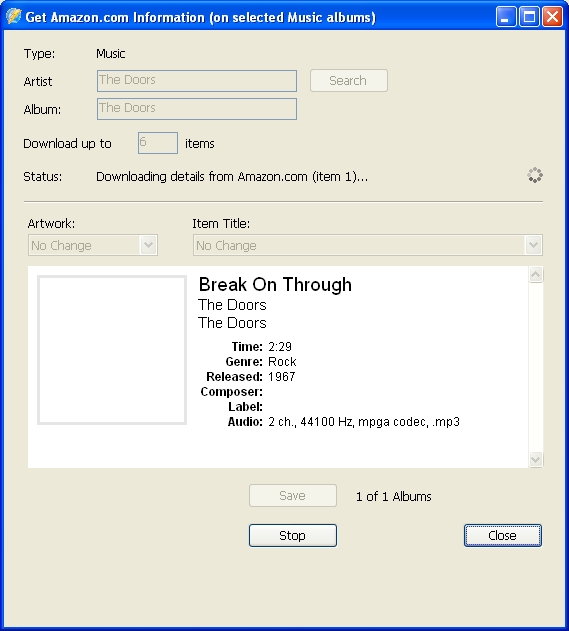 Figure 29. The Get Amazon Information window
When the details have finished downloading, you can choose the artwork
you want from the Artwork
popup menu, and the item detail set from the Item Title popup menu.
If you can't find a suitable choice in the results returned, you may
need to increase the maximum item count value and search again (by
pressing the Search button).
Sometimes it can take up to 10 results before you find the appropriate
one, but this is unusual unless the media item you are searching for is
quite old or out of production. For example, some 'collectors edition'
DVD movie information may be harder to find.
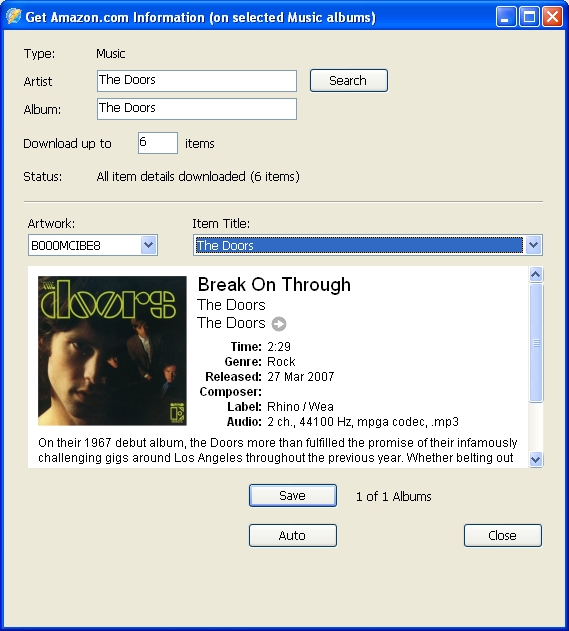 Figure 30. Results were found, and
an album cover and item detail set were chosen
Figure 30. Results were found, and
an album cover and item detail set were chosen
If you
search in Amazon.com and no results are obtained, try modifying
the name of the album or movie and search again. For example, there may
be a movie in your media library called 'Officespace'. Changing the
title to 'Office space' (ie. inserting a space) on the Get Amazon.com Information
dialog would result in movie information being found. Similarly, the
album titled 'Dark Room' (by 'The Angels') may be listed as 'Darkroom'
on Amazon.com. Thus, changing the album name to 'Darkroom' would yield
better search results. Kenbushi will always
select an exact title match during the automatic download sequence, if
it is available. If not, the first downloaded information set will be
selected. Kenbushi
will always
select an exact title match during the automatic download sequence, if
it is available. If not, the first downloaded information set will be
selected.
When you get information for the song on an album or an episode of a TV
show, the cover artwork, description, etc. will be attached to all
tracks on the album, or all episodes of the TV show. This makes it very
easy to set up the album and TV show information in one quick operation.
Note:
Only information on the first selected item in the search results will
be downloaded from Amazon.com - if you wish to get information on
multiple items, you need to get information on each in turn.
Editing Media Information
There are a number of ways that information for a particular media item
can be manually edited. The 'Genre', 'Series', 'Artists/Actors' and
'Description' column entries in
the Search
Results listbox can be edited
directly by double-clicking them (see Figure
31 below). To edit an entry, simply double-click it and a
textbox will open, allowing you to edit the entry.
When you have finished editing, click somewhere else on the listbox and
the change will be saved.
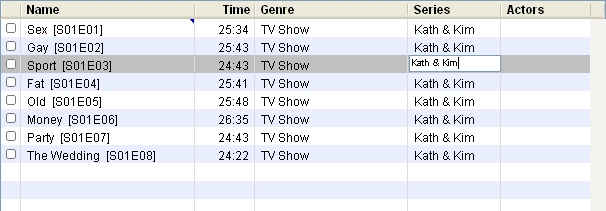 Figure 31. Inline editing of
'Series' information
Figure 31. Inline editing of
'Series' information
You can also edit
media information using the Media
Options Panel (see Figure 32)
and the Media Edit Panel (see Figure 33). These panels allow many
types of media information to be edited. On the Media Options Panel you can change
the rating of the media item (from 0 to 5 stars) by using the My Rating slider. You can also
change the relative volume of the media item using the Volume Offset slider. This may be
necessary if the volume level of the particular media item is either
too low (ie. so you want to boost it) or too high (ie. so you want to
attenuate it). This
allows you to equalize the volume of media items so they have a similar
volume level when they are played - default media volume levels are
particularly noticable when
items are arranged in a playlist.
Note: This volume offset is
applied to the master volume level set on Kenbushi, For example, if you
have turned down the Kenbushi volume to half it's
maximum level, a volume offset of 75% will produce a total volume of
0.5 x 0.75 = 0.375 of the maximum.
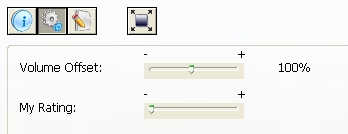 Figure 32. The Media Options Panel
You can edit a range of textual information on a media item using the Media Edit Panel (see Figure 33
below). The type of
information which can be edited depends on the type of media selected.
For example, TV shows allow you to change the episode and
season number, whilst when editing movie information, more space is
provided for the list of actors appearing in the movie. To edit
information, simply make your changes to the text and then press the Save button (this button only
becomes active when a change has been made).
There
are a number of special genres used in Kenbushi to categorize media
types, so that they can be searched for in your media library under
that category. This includes TV shows, music videos, audio books and
podcasts. Changing a movie's genre to 'TV Show' using the Media Edit Panel, for example, when
saved, will subsequently categorize the media as a TV show for
searching, editing, etc. The Sub-Genre
textbox allows you to set the genre of TV shows, music videos, etc. The
sub-genre is subsequently used for searching your media library for
genres of TV shows, etc. For example, selecting 'Sci-Fi' from the genre
search control when 'TV Shows' is selected as the media type could
display results such as 'Battlestar Galactica'.
Note: If you change the
genre of a movie to 'TV show' or 'Music Video', you should save the
change, select 'TV Show' in the Media
type popup menu, and then locate the media item to continue editing.
Some additional textboxes are available when editing TV show
information (such as 'Series' name) and information may not be saved
correctly if you do further editing of the media item as a movie.
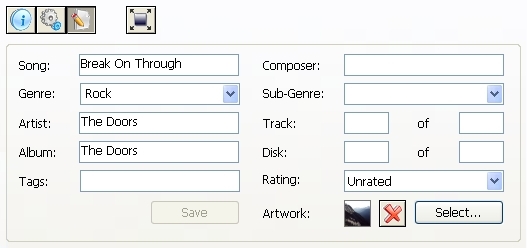 9
Figure 33. The Media Edit Panel
9
Figure 33. The Media Edit Panel
You can also attach a .jpg picture file to a media item to represent
it, by pressing the Select...
button and selecting the picture on your computer. This is usually DVD
or CD cover artwork, but can be any picture you like. Kenbushi makes a
copy of the selected .jpg file and stores this copy in it's own archive
for subsequent use. To remove an
already attached picture, simply press the Remove Picture button next to the Select... button. A small picture
icon will be displayed next the Artwork
title if a picture is attached, and will be blank if one is not.
Many computer users now have scanners, which can capture the cover
artwork of a DVD or CD directly. If no other sources of cover artwork
are available for particular DVDs or CDs in your collection (which is
often the case with classical music), you may
wish to scan in the cover of your original DVDs or CDs. Alternatively,
there are DVD and CD cover artwork repositories on the Internet. Just
do a search on Google.com for 'cd cover art' or 'dvd cover art'.
Sometimes it's convenient to edit an entire album, or TV show series in
one operation. For example, if you wish to change the genre of an
album, or the name of a TV series. This can be done easily by finding
the media in the media library, and then selecting a number of media
items in the search results. When you right-click these items, you will
have the option to 'Edit All' in the contextual menu that is displayed.
This will brings up the Edit All
dialog, an example of which is shown below in Figure 34.
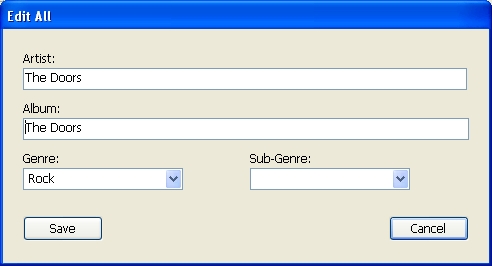 Figure 34. The Edit All dialog
Only enter text or
select a genre from the popup menu when it applies to ALL media items
you selected - leaving a textbox blank will not change it in the media
items selected, so is the safest way to ensure you don't overwrite
information unique to each media item. For example, entering actors
name will change all the actor names in all media items selected. If
only some of the media items used this cast, then they will also be
changed.
Capturing a
Screenshot
to Represent a TV Show Episode, Vidcast or Music Video
In
the situation where you wish to enrich the information in your Kenbushi
media library for TV shows, vidcasts, music videos, and other
movie-type media
for which there is no available DVD cover artwork or other information
available for download, Kenbushi offers a simple and effective way to
obtain a representative picture for each TV show episode, or movie -
you can simply press a key during playback of the video, and a
screenshot will be captured at that precise time and stored in the
media library to represent that media item.
To take a screenshot,
simply press 'Ctrl-s' during
playback. With most movie file formats on most media players supported
by Kenbushi, you will see a visual indication that a screenshot was
captured by an on-screen indicator. However, you'll always hear the
sound
of a
camera shutter, confirming that the screenshot was taken.
Note: Please allow a movie to
play for 5 seconds before taking a screenshot, and allow it to
continue playing for 5 seconds after taking a screenshot. This allows
Kenbushi time to fully process screenshots taken when playing movies
with VLC. Otherwise, in some circumstances screenshots may not be
stored with the correct movie, or may not be stored at all.
Next time you browse that particular TV show, vidcast, movie, etc. in
your media
library, it will contain the screenshot as well. This is
especially helpful for children, as they may not be able to read (or
read confidently), and they can then use the pictures to select
the TV show or movie they wish to watch.
For example, a screenshot was captured for the TV series 'Scooby Doo,
Where Are You' for the episode, 'Hassle In The Castle'. The detailed
information shown when browsing this episode (in the 'TV shows' section
in the media library) would display a screen which looks like Figure 35. Notice that the series
and episode numbers for TV shows is shown before the episode name, on
the upper right side of the screen. This
provides users with a clear idea of where the episode is placed in the
series, and, in the case where distinct episode names were not
available (not all downloaded TV show file names contain episode
information), would provide sufficient information to make a choice of
an episode for viewing.
In the case shown below, '[S01E02]' means 'season 1, episode 2'.
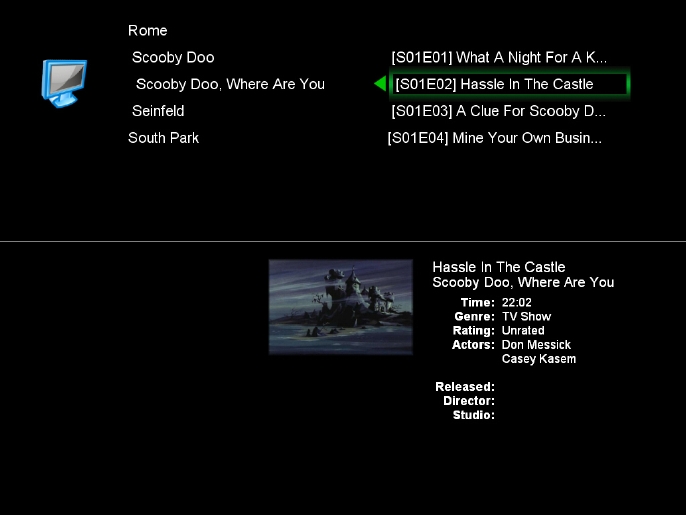 Figure 35. An example TV show
episode, showing a screenshot representing the episode
Figure 35. An example TV show
episode, showing a screenshot representing the episode
Another type of media
for which screenshot representations are very useful are music videos.
In Figure 36 below, a range of
music videos have been set up with a screenshot to provide a clearer
indication of the content of each item. This makes it easy to browse
and select music videos from your media library.
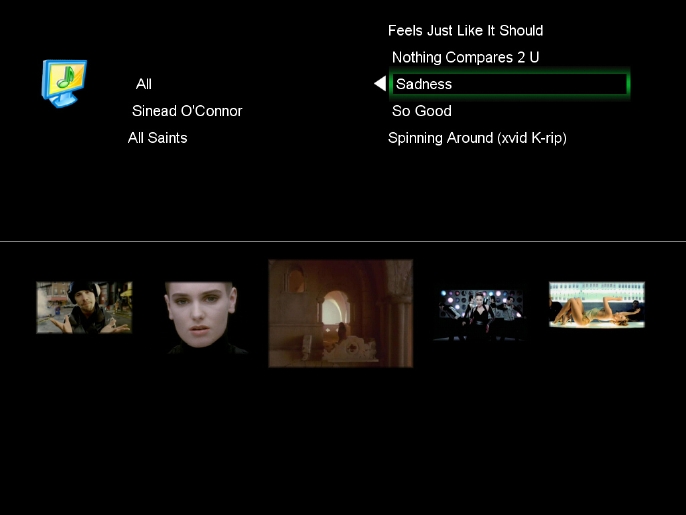 Figure 36. Browsing music videos
Note: A copy of all the screenshots
taken is also stored automatically in a
dated folder in your computer's default 'Pictures' folder (on MacOS X,
this will be the 'Pictures' folder. On Windows, this will be the 'My
Pictures' folder inside the 'My Documents' folder). Thus, you can
capture a selection of screenshots from any movies, TV shows, music
videos, home movies, etc. you like for later viewing. These pictures
are in .jpg
format, so can be transferred to other computers, placed on your PDA to
show your friends at work, added to your photo
library, used with the wireless slideshow viewer built into Kenbushi,
etc, etc.
Syncing
media to your multimedia player, mobile phone or USB stick
Kenbushi can
help you quickly and easily load your MP3 player, multimedia player,
mobile phone, USB stick, SD card (for playback on a PSP) or portable
hard disk with media from the Kenbushi media library. All types of MP3
player, movie player, PMP, mobile phone, USB stick, etc. are supported,
except for iPods (iPods use Apple proprietary formats). Multiple media
players are supported, so all members of
your family can easily load their media players from the same computer
with their own unique music and movies.
Media players containing multiple storage devices are fully supported,
so if you have a media player or mobile phone with internal memory as
well as a micro or mini SD card, Kenbushi can work with it. The media
synced to each storage device can also be uniquely controlled. For
example, you could load music onto the internal memory and movies and
TV shows onto an inserted SD card, if you wanted to organize your media
that way.
Kenbushi can also load media onto USB sticks, for subsequent insertion
into digitial picture frames (these can often play movies and music).
It can also be used to load media onto portable hard drives and similar
storage devices - you might find this useful if you wish to bring movie
and music files with you to a friend's house, or to work, etc.
Each media player
storage device can have one (or more) playlist lists associated with
it. To
create a new playlist list for a storage device, select New Device... from the Playlist List popup menu (see Figure 37 below).
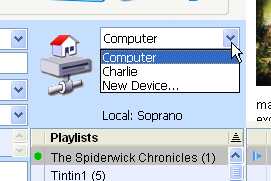 Figure 37. Selecting a playlist list
for a computer or media storage device
Figure 37. Selecting a playlist list
for a computer or media storage device
The Media Player Settings dialog will
then be displayed, so you can set up information about the media
player, such as it's playlist list name, the media types it supports,
the location where music and movies are stored, etc.
If the manufacturer of your media player has a 'Quick Player Setup' for
it, you can simply select the Manufacturer,
Model and Color of your media player from the
popup menus. A picture of your media player will be displayed, and all
technical settings of your media player will already be known and set
up. All you need to do then is simply enter the Name of Playlist List, select the
media player's storage device from the Media
Disk popup menu, and enter a Media
Space Limit (if you don't want your media to take up all space
on the storage device).
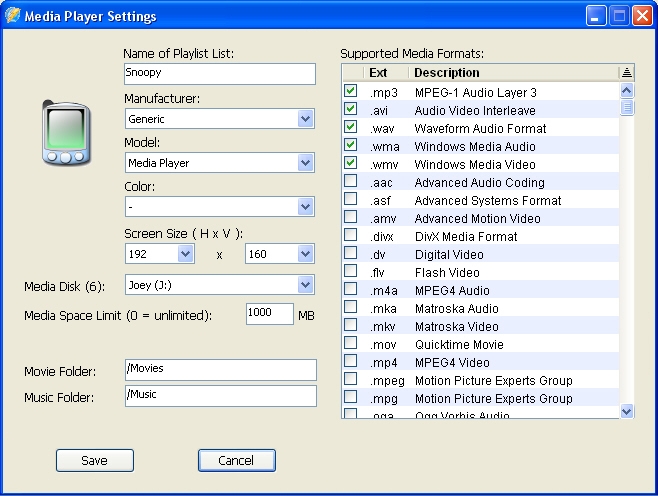 Figure 38. The Media Player Settings dialog
Name of Playlist List is simply an
identifying name for this playlist list. If you like, you can
have
more than one playlist list associated with the same media player - you
might do this if a media player is shared between users, each with
different tastes in music and movies. Alternatively, you could have one
set of albums you enjoy more when you're out hiking, and another set
when you're commuting to work.
If your
media player is generic, select 'Generic' from the Manufacturer popup menu and make a
selection from the Model popup
menu that most closely resembles your media player.
Select the resolution of the screen, in pixels, of your media player.
You can leave it as the default value (or any value) if the resolution
is not relevant to the type of movies that can be played on the media
player. However, if your media player only supports a particular movie
resolution (eg. 320x240 avi movies), you should use that resolution.
Select
the media player's storage device from the Media Disk popup menu. This links the media player's
storage device to the playlist list,
such that when you subsquently sync it, the media shown on the playlist
list will be loaded onto this storage device.
If you
don't want your media to take up all space on the media storage device,
you can specify a Media Space Limit.
When syncing media files onto the media storage device, this is the
maximum amount of space that will be used. If the playlist list
includes more media than can fit into the available space, the surplus
media will not be loaded on.
Some media players require music and movies to be located in specific
folders on the media storage device. With the Movie Folder and Music Folder textboxes, you can
ensure the media files are stored in the right places. Note that
folders in the directory path should be separated using the '/'
character on all platforms (Windows and MacOS X).
Select all of the media formats supported by your media player by
checking the appropriate checkboxes on the Supported Media Formats listbox.
Normally, the formats supported by your media player will be listed in
the media player's user manual.
When you have completed setting up your media player, press the Save button and the settings will be
saved.
Note: A small information file
(called 'MediaDiskID.xml') will be stored on the media storage device
(to uniquely identify this device) when you press the Save button. This is used to
automatically identify it when it is next connected. Changing the name
of the media storage device will not affect the ability of Kenbushi to
automatically detect and identify it.
You should now see the name of the media player's playlist list in the Playlist List popup menu (see Figure 39 below). Select it and you
will see the Media Player Settings
button, the Sync Media Player
button and Delete Playlist List
button. In the example below, we are looking at the 'Snoopy' device
playlist list created in Figure 38
above. Notice that when a media player playlist list is selected, the
playlist list area and media search results are highlighted in an aqua
color.
 Figure 39. A device playlist list
Once you have the new device playlist list selected, you can create
playlists in the usual way by searching for music and movies in your
media library, highlighting selected media and then adding them to a
playlist. Media which are not
compatible to your media player will be highlighted in red in the media
search results. Thus, you should only build playlists containing
media shown in black. In the example in Figure 39
above, 3 albums were added to the 'Snoopy' playlist list, for a total
of 244MB of media files.
When the media storage device associated with this playlist list is
connected to the computer, the Sync
Media Player button will go green and become active. If the
storage device is not
connected, the Sync Media Player
button will be brown (and thus inactive). Pressing the Sync Media Player button will start
the media synchronization process, clearing old media from the media
player and loading on new media (see Figure
40 below). If no new media exist, the sync process finishes
quickly.
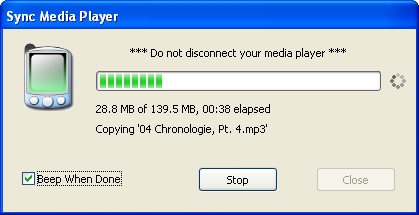 Figure 40. Synchronizing media to
the media player
Figure 40. Synchronizing media to
the media player
There is no need
to have a media player's storage device connected to your computer to
be able to add or
remove items from it's playlist list - you can do this at any time. Of
course, you can only sync the media player when it is subsequently
connected to the computer.
MacOS X users will see an Eject Media Player button located next to the Sync Media Player button. You can
use this to eject storage devices associated with a media player. If
you hold down the 'Shift' key whilst pressing this button, all storage
devices less than 20GB in size will be ejected. This may be useful if a
media player has more than one storage device on it (eg. an internal
memory as well as an SD card). Of course, you can also eject media via
the eject volume buttons in the Finder.
Windows users should always eject storage devices (USB sticks, portable
hard drives, etc.) using the Safely Remove Hardware button in the
tray on the bottom right of the task bar.
The local
computer can have only one playlist list associated with it. The local
computer represents your Kenbushi media library, whose media is stored
on your local hard disk(s). When it is selected, the playlist list
area is highlighted in blue, and a label at the bottom
of the playlist list area will show the name
of your computer (see the example in Figure
41 below). When you play
media on your local computer, the music and movies will play on your
local computer screen.
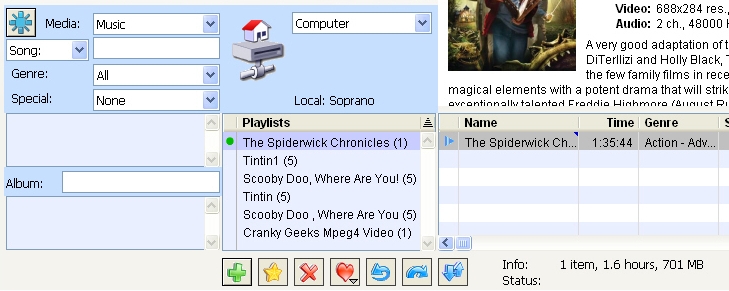 Figure 41. Managing media on a local
computer
Figure 41. Managing media on a local
computer
Each
remote computer can also have only one playlist list associated with
it. When you connect to a remote computer (using the Connect To: popup menu at the top of
the main window), the playlist list
area will be highlighted in purple and media searches will show the
media stored on that remote computer. A label at the
bottom of the playlist list area will show the name
of the remote computer (see the example in Figure 42 below). When
you play media on the remote computer, the music and movies will play
on the remote computer - this allows you to remotely control media
playback on any computer on your network.
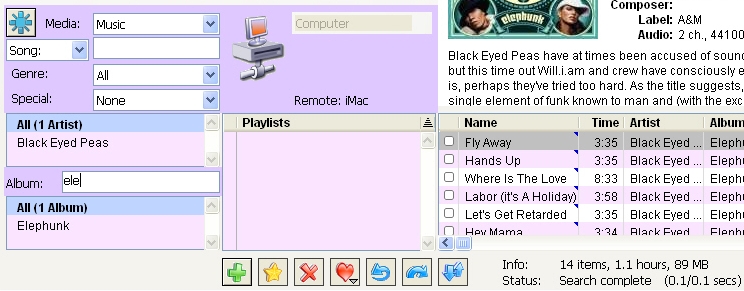 Figure 42. Managing media on a
remote computer
Figure 42. Managing media on a
remote computer
To change the playlist list from the local computer to the remote
computer (and vice versa), use the Connect To: popup menu at the top of
the main window. You can only set up playlist lists for a media storage
device using media from the local computer (ie. your local Kenbushi
media library).
Media control options
Kenbushi supports control of media playback via a variety of methods,
including local control using Kenbushi's 'Play Media' panel, remote control using
any networked computer running Kenbushi, local control using
a wired or wireless keyboard (with the full-screen media control system),
and
local control using a Wi-Fi
capable PocketPC.
Using the
'Play Media' panel
The Kenbushi 'Play
Media' panel allows you to set up playlists and play media whilst
sitting in front of a computer. This is the normal way in which many
users use media players when playing media locally in their study,
bedroom, or workplace. This methods gives users full control over media
searching, playlist management, editing of media information (eg. DVD
coverart, CD artwork, TV show episode screenshots, descriptions, etc.),
downloading information from the Amazon.com archives, and various other
facets of setting up and controlling their media libraries. See Figure 43 below.
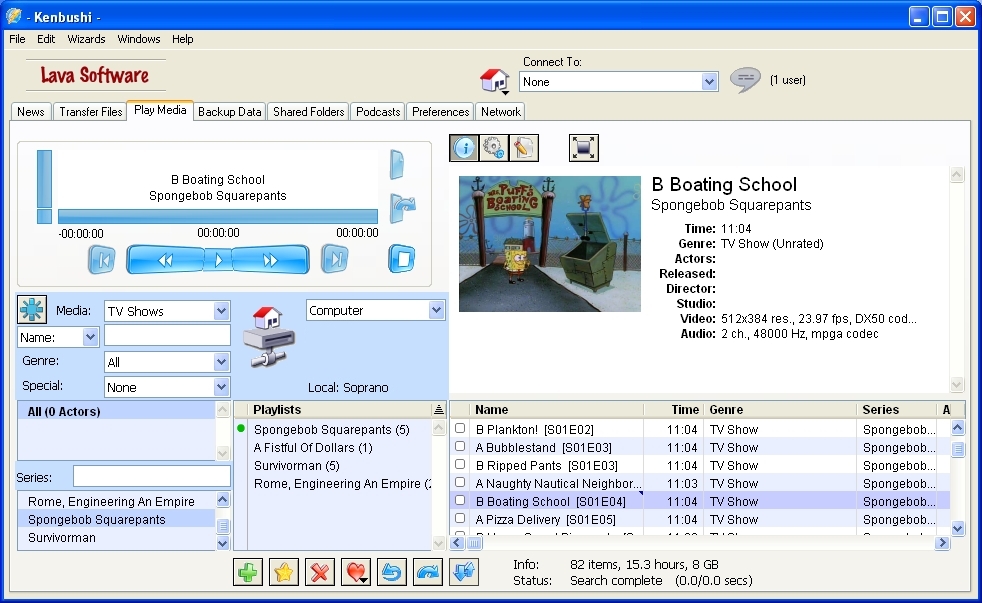 Figure
43. The Play
Media
panel
Figure
43. The Play
Media
panel
The groupbox at the top left side of the panel shows the media
currently being played, or the media which will be played when the play
button is pressed. When playing a movie, the movie title is displayed
in the center of the Media Playing
Area. When playing a TV show, the episode name is
shown in the center and the TV series name is shown at the bottom. When
playing music, the song name is displayed at the top, the artist's name
in the center, and the album name 11at the bottom.
Various play controls are located around the Media Playing Area. These include the
play, rewind, fast forward, next item, previous item, stop, bookmark
and Skipmark buttons. For more details about these buttons, please see
Local control of media
playback
below. The Full-Screen Media Control Screen
button (the green arrows pointing outwards) will bring up the
full-screen media control screen, allowing you to easily control media
playback remotely using a wireless keyboard. For more information about
full-screen media control, please see Full-screen media control below.
The controls directly below the groupbox are used for searching for media, and for creating and managing playlists.
On the right side of the Playlist List
is the Search Results listbox. The Search Results
listbox shows all the media found which match the search criteria. Details about each
media item are shown in this listbox, including the
name of the item, the play time, genre, album/series name, rating, the
number of plays of the item (audio media types only), the last time the
item was played, etc. Some column entries in the Search Results listbox can be edited
directly by double-clicking them. Please see editing media information
for further details about ways to change information stored for a
particular media item.
Note: If more
than 1000 items are found during a local search, only the first 1000
items will be displayed (for remote searches, this limit is 500 items).
However, aggregated results (such as albums, item counts, total playing
time, etc.) will always include all results.
If a TV show episode is displayed, then the season number and episode
number are included in the item name. For example, season 2 ('S02'),
episode 8 ('E08') of 'Battlestar Galactica' would be shown as 'Final
Cut
[S02E08]'. This provides a quick way to determine the position of the
current episode in the season, as well as the name of the episode. If
an episode does not have a unique name, then the season and episode
number may be the only way to determine the position of the episode in
the series.
If a media item has artwork attached, a small blue triangle will be
displayed on the top right side of the search results column containing
the media item name. In the example above in Figure 37, 'Rojo, The Fire Truck'
has artwork attached.
Above the Search Results
listbox, there are buttons which control the display of the Media Information Panel (the blue dot button), the Media Options Panel (the cog button)
and the Media Edit Panel (the
write button). Pressing one of these buttons once will display the
panel, and pressing it again will hide it (thus showing more of the
search results). Pressing one of the other panel buttons will display
it's specific information. Further information about editing media information can be
found below.
The other two buttons control the download of media information from
Amazon.com. Selecting a media item in the search results and then
pressing the Download Media Item
Details button will search Amazon.com for the specific media
item selected (or the first item, if you have a number selected). The
button with the asterix in it is the Download
Media Type Details. Pressing this button will allow you to
download all details for all media of the particular type selected in
the Media popup menu.
Further information about downloading
media details from Amazon.com can be found below.
At the very bottom of panel, below the search results listbox, you will
see the Info message and the Status messsage. The Info message shows the number of
media items in the search results, their total cumulative play time,
and the amount of storage space they use. The Status message shows a wide range of
status messages to keep you informed on the progress of searches, the
total number it items displayed, etc.
On the left side of these messages is the Shuffle Playlist button. When you
have a playlist displayed, pressing this button will randomize the
media items in the playlist.
The Media Information Panel shows
various information about the media item selected in the search
results. In the example in Figure 37
above, a TV show episode is displayed. Here, the episode name is
displayed at the top, then the series name and play time. A screenshot
has been captured for this episode, and this is shown on the left side.
Technical video and audio information is then shown at the bottom, such
as video resolution (640x480), frame rate (23.97 fps), video codec
(XVID), file type (.avi), number of audio channels (2), audio sampling
rate (48 kHz), and audio codec (mpga).
In the example below in Figure 44,
the details of a song are displayed. The song name is shown in bold
above the artist name and album name. Next to the album name is the Amazon.com Web Link button. This
button highlights in blue when the cursor is above it. Pressing this
button will open the Amazon.com web page for this specific album,
showing you further information about it and giving you the opportunity
to purchase it. Other information on the panel includes the play time,
release date, composer, music label, and technical information about
the number of audio channels (2), audio sampling rate (44.1 kHz), audio
codec (mpga) and file type (.mp3).
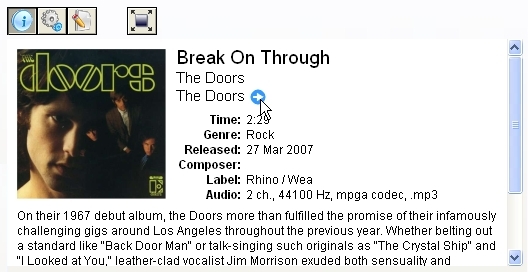 Figure 44. The Media Information Panel, showing the
Amazon.com web page link arrow
Figure 44. The Media Information Panel, showing the
Amazon.com web page link arrow
Searching
for Media
The media search
functions in Kenbushi are simple, but incredibly powerful. You can
search by the usual methods, such as the name of the movie, song or
episode name (for TV shows), the artist or
actors performing in it, the genre, etc., but you can also combine a range of search criteria
to more easily locate the media you want. In addition, once you have
found matching media, you can then refine your search further by
selecting albums, artists, series names, etc. generated by the search.
For example, to find the music of a new artist you recently added to
your media library, select 'Music' from the Media popup menu and type a few
letters of the artist's name in the Artist
textbox, then select 'Recently Added' from the Special popup menu. All songs will
be ordered by the date they were added to your media library, and even
the albums listed in the Album/Series Listbox will be ordered by
the date they were added.
The Artist/Actor Listbox and Album/Series Listbox on the left side of
the window shows
music artist/movie actor and music album/TV show series
information, respectively. These listboxes aggregate information
displayed in the Search Results
Listbox on the right side of the window. When these additional
listboxes contain entries, you can simply click an entry and the search
results will be refined based on your selection. For example, if the TV
show series 'Dora Season 2' is displayed in the Album/Series Listbox, clicking this will show all
episodes in this series in the Search Results Listbox (this is illustrated in Figure 37 above).
The Home
button (the top left button in Figure
45, shown as a little house) resets all search controls to their
default setting, and
also does a full media search for the media type selected in the Media popup menu. For the example
in Figure 45, if 'TV Shows' is
selected as the media type, all
TV show series will be displayed, as well as all actors listed in all
TV shows displayed. If you subsequently click one of the TV show series
shown in the Album/Series Listbox on the bottom left, only episodes of
that series will be displayed in the search results.16
The Special popup menu allows
you to have search results filtered or sorted by additional criteria.
Results can be sorted by the date they were added to your media library
(using the 'Recently Added' item), the number of times an item has been
played ('Most Played' and 'Least Played'), the personal rating you have
set for that media item (0 to 5 stars), and the MPAA (Motion Picture
Association of
America) rating or OFLC (The Office of Film and Literature
Classification) rating.
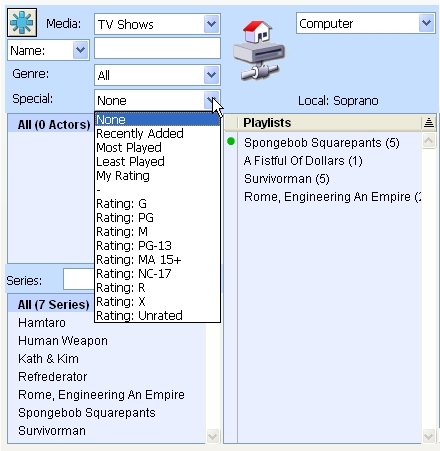 Figure 45. The media search
controls, showing the contents of the Special
popup menu
Figure 45. The media search
controls, showing the contents of the Special
popup menu
The textbox used to enter Artist
and Actor information can be
also be used for other types of search, depending on the setting of the
Auxiliary popup menu. Normally
the Auxiliary popup menu searches for
actor or artist, but it can also be set to 'Composer' (when searching
for music), 'Director' (when searching for movies), 'Narrator' (when
searching for audio books), and collection tags. When the same tag
is stored for different media items, these items can be then be found
as a group at a later time by searching using this tag.
The Genre popup menu allows
you to select a genre of the music, movie,
TV show, etc. For example, music genres include Funk, Electronic,
Country, Rock, Hip-Hop, etc. Genres for TV shows include Comedy,
Animation, Romance, Sci-Fi, etc. To include all media genres to be
included during a search, select the 'All' item in the Genre popup menu.
The Source label identifies the source
of the media library (in the example above in Figure 45, it's the 'Local).
You can just as easily search and locate media on a
remote computer as you can on the local computer. You can also create
playlists for both remote or local playback. To change the source media
library used for a search, simply select another networked computer
also running Kenbushi. This network computer can have an icon set
for it, to clearly identify it when you
search. An example
is shown below in Figure 46,
where an icon representing a remote computer is set as a 'ladybird'.
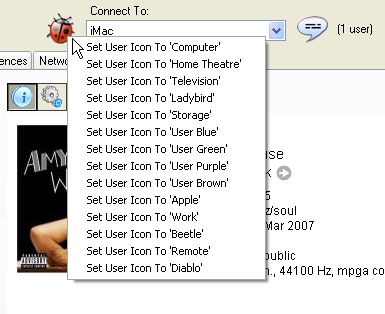 Figure 46. A 'ladybird' icon used to
represent a remote computer, and icon options
Figure 46. A 'ladybird' icon used to
represent a remote computer, and icon options
The remote computer's identifying icon will also replace the normal Home button (use this button to reset all search
controls to their default setting and trigger a global search in the
same way).
This makes it clear which computer you are actually doing your search
on.
Creating and Managing
Playlists
Playlists are
simply lists of music or movies which you wish to play in order from
the top down. Setting up playlists involves searching for media
in the media library, and then using the search results to fill
the playlist with media.
The
Playlists
listbox shows the name of all playlists which have been created, and on
the right side of each playlist name is the number of media items
contained in
that playlist (See Figure 47 below). Below the listbox
are controls to add, edit and delete
playlists, as well as controls for selecting a media player to use for
a particular playlist, and Playlist
Loop Enable and Playlist
Skipmark Enable controls.
A playlist can be created instantly by right-clicking an item (or
items) in the search
results and selecting 'Create Instant Playlist' from the resulting
contextual menu. In this case, the first media item selected in the
search results will be used to create the playlist name. You can also manually create
playlists by pressing the Add Playlist button, or by simply
double-clicking the name of a media item you wish to play in the search
results.
Double-clicking a media item in the search results is the simplest way
to play media. When browsing music, double-clicking an item will create
a special playlist named 'On-The-Fly Music'. This is a normal playlist
in
most senses: you can rename it (do this, for example, if you wish to
keep a
particular on-the-fly music playlist), and you can continue playing the
music on that
playlist by going back to it at any later time. When browsing movies,
TV shows and similar media, double-clicking an item will automatically
create a playlist whose name is derived from the first item selected.
Note: The special playlist named
'On-The-Fly Music' is used to minimize the number of playlists created
when
you browse your music collection. If a fresh playlist name was created
each time you sampled a song whilst browsing, the number of playlists
created would quickly become unmanageable.
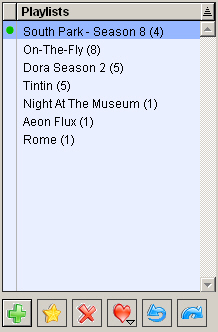 Figure 47. The Playlist list and playlist controls
You can manually create a new playlist by pressing the Add Playlist button (the green plus
button at the bottom of the playlist list) - a new playlist will be
created in the Playlists
listbox with an 'Untitled' name. You can edit a playlist's name
by selecting it and pressing the Edit
Playlist Name
button (the star button). A
textbox will then replace the text, allowing you to make any changes.
To save changes, simply press the 'Return' key or click somewhere else
on the
listbox. To remove a playlist, select it and press the Remove Playlist button (the red
cross button).
To add media to a playlist, you can select the media in the search
results (all the usual multiple selection controls work in the search
results listbox), and drag it directly across onto a playlist.
Alternatively, you can right-click the selected media and add the items
to a playlist using the 'Add To Playlist' menu items on the resulting
popup menu.
Special Note: You can
only edit playlists which aren't currently playing.
The Media Player popup menu
allows you to set Kenbushi to automatically choose the optimal media
player to play the media on the playlist (the 'Auto' option,
represented by a heart), but you can manually set a playlist to play
using either VLC or Quicktime. Each of these media players are
represented by it's icon in this popup menu. Kenbushi currently
supports the playback of media using VLC and
Quicktime. Full support for
Windows Media formats is planned for the future, though some
Windows media files (such as Windows Media Player 9 files with '.wma'
and '.wmv' file extensions) will be playable using VLC.
It
is highly
recommended that you leave the media player choice as 'Auto', as
this will provide you with the best playback experience for all the
media in your media library.
The
Playlist Loop button is a
press-on/press-off toggle button, and will loop a playlist when pressed
in
(ie. playback will continue again from the top of the playlist after it
finishes playing the last item on the playlist).
The Enable Skipmarks button is a
press-on/press-off toggle button, and provides Skipmark on/off control
for the playlist. Further details about skipping segments
during playback using Skipmarks can be found below. Skipmarks allow
you to automatically bypass commercials, credits, etc. when playing
media such as TV shows and movies.
Note: Playlists shown in the Playlists listbox are regularly
sorted by the last play date when playing media using full-screen media control.
Thus, playlists you play regularly will
always stay at the top of the Playlists
listbox, and older (or unplayed) playlists will sink down in the list
until they are eliminated. The playlist listbox generally keeps up to
50 active playlists and automatically removes playlists which are too
old. For example, if you are watching a movie, but your viewing is
broken into two or more sessions, the playlist for that movie will
remain near the top of the list until you have finished watching it
(the position within the movie is always saved automatically when you
stop play, and it will resume playing from this location). Similarly,
if you are watching a series of TV shows, the episode you are currently
watching as well as the play position will be saved automatically.
Using
iTunes Music With Kenbushi
Kenbushi can
play all music files stored in your iTunes media library (including
music purchased from the iTunes music store) because it uses Apple's
Quicktime media player for music playback. Thus, if you have music
which can be played with iTunes, Kenbushi can play it too.
The key thing to keep in mind if you plan on playing purchased iTunes
music on a computer, is to ensure that that computer is 'Authorized' to
play your purchased music. If it's not authorized, iTunes can't play
it, nor can Kenbushi. To authorize a computer, make sure you have
iTunes installed and select 'Authorize Computer...' from the 'Store'
menu when running iTunes. After this process is complete, you can add
the iTunes music folder (ie. the folder actually containing all the
music files) to the shared folders list on the Shared Folders panel
of Kenbushi and then scan the files into the Kenbushi media library (by
checking the Media-Aware
checkbox on the left side of the shared folders listbox).
Of course, once
this is done, you can control playback of music on this computer in any
way supported by Kenbushi, including controlling it over the network
using another computer running Kenbushi, via full-screen media control
with a wireless keyboard, or via a Wi-Fi enabled PDA (such as a
PocketPC).
Local control of media
playback
Media playback can be controlled, on both the local
computer or
a remote computer, using the set of
controls on the top left of the Play
Media
panel. With these controls, you can view and change the play position
of the music or movie currently playing, adjust the volume, rewind and
fast forward the play position, and stop playback (see Figure 48 below).
Note: To allow the remote
control of media playback from another computer, make sure
the Allow Remote Media Control
checkbox
on the Preferences panel is
checked. This setting is usually made on a computer used as a media
server.
The three time values shown on the top of this area are the amount of
time required to finish playing the current media item, the current
play
position, and the length of the media item respectively. You can drag the position
slider to
move directly to a particular play position in the media item.
Kenbushi contains an
innovative new control system which consists of
composite play/pause, rewind and fast forward controls, called Progressive Media ControlTM. The center
part of the control contains the Play
button. Pressing the Play
button will start media playback, and the Pause button will then appear,
replacing the Play button.
Pressing the Pause button will
pause playback. Pressing it again will continue play.
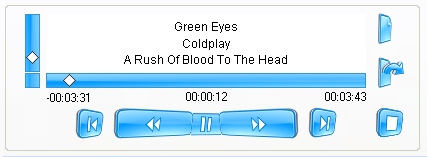 Figure 48.
 The
Progressive Media ControlTM
The rewind and fast forward controls are progressive - they actually
provide a continuum of rate control from very fine to very fast in both
directions. You use fine control when you are close to the position in
the movie you're interested in, and very fast movement when you need to
move to a new position some way away (of course, you can also drag the Position Slider directly to make
coarse changes to play position).
For example, if you hold the Rewind
button down at the outer end, the rewind rate of the media currently
being played is very fast. As you drag the mouse pointer towards the
center, the rewind rate slows down progressively until you have very
fine control over rewind. If you rewind past the position you wanted,
just drag further across to the Fast
Forward control and the position will slowly increase instead.
Dragging to the outer end of the Fast
Forward button will make the fast forward rate very fast.
Thus, during playback of media files, you can drag across the entire Progressive
Media ControlTM to set the exact playback position
you want.
Note: When rewinding and fast
forwarding media (particularly movies), using slow rewind and slow fast
forward rates can cause scenes to appear to be replayed repeatedly.
However, if you hold the control down longer, it will move to new
scenes as it should. This is simply a characteristic of how some types
of compressed movies are encoded (ie. using periodic keyframes).
Underneath the vertical sliding volume control is the Mute button,
which is used to immediately silence the media currently playing.
Pressing the Mute
button a second time will return the
volume to it's previous level. The mute control is used when you need
to immediately
silence a
playing movie without stopping or pausing it, such as when you need to
take a telephone call.
On the bottom right side, you will find the Stop button. Pressing the Stop button immediately stops the
media playing and closes down the media player. However, an automatic
continue bookmark is placed at the position at which the media was
stopped - this is indicated by a 'Pause Icon' next to the media item
which had been playing. If you subsequently press the Play button again, the media will
begin playing from where it left off. Pressing the Stop button twice clears the
automatic continue bookmark - this is a good way to force playback to
begin again from the first item on the playlist.
On the right side of the Progressive
Media ControlTM are controls to set
bookmarks and Skipmarks(TM) - these controls are only active
when media is currently
playing.
The top right button is the Bookmark
button, and pressing this brings up the Bookmark popup menu, allowing you to
jump to, set and remove bookmarks. Bookmarks allow you to move quickly
to locations you previously set, such as the beginning of an important
scene, your last playback position, etc., as well as save your position
in a movie if you wish to play something else first (eg. music) and
then go back to it. Bookmarks are each linked to a
specific media file, so if you set a bookmark on a particular movie and
then subsequently add that movie to another playlist, your bookmarks
will be available in that new playlist as well.
The next button down is the Skipmark
button, and pressing this brings up the Skipmark popup menu, allowing you to
jump to, set, edit and remove Skipmarks. A Skipmark is a
section of a movie which will be skipped during playback, and it thus
provides a very powerful way to control how a movie is played back
without actually modifying the movie file itself. Skipmarks allow you
to easily
set up a movie
so that credits, advertisements, sections unsuitable for children, etc.
are
automatically and seamlessly bypassed. Skipmarks are each
linked to a
specific media file, so if you set a Skipmark on a particular movie and
then subsequently add that movie to another playlist, your Skipmarks
will be available in that new playlist as well.
For parents of young children, Kenbushi provides a perfect way to
manage the children's movie entertainment. Children enjoy watching DVD
movies, and many like to insert DVDs into DVD players themselves, with
the result that DVDs become coated with fingermarks, scratched, and
sometimes get jammed in the DVD player. With Kenbushi, all movies are
stored on the computer hard disk, so no DVD disk swapping is required.
In addition, Skipmarks allow parents to bypass movie credits,
preventing children getting bored watching several minutes of movie
credits roll by. Searching for and setting up movies for playback is
also very easy, which is especially useful because children often want
to watch the same movie many times.
Skipmarks also allow parents to non-destructively control exactly which
parts of the movie their children see, allowing children to watch
movies they normally could not watch because of certain embedded
violent or adult-oriented scenes. For example, Jurassic Park III is an
excellent dinosaur adventure movie, but it contains some
violent/scary/bloody scenes which are unsuitable for children (eg. the
skeleton hanging on the parachute).
For video
material recorded off TV, advertisements can also be skipped using
Skipmarks, if desired. Skipmarks make it easy to modify the playback of
video without actually modifying the movie file itself, saving you a
great deal of time and effort compared to using a movie editor to
effectively do the same job.
When playing a movie on a local computer (without setting it to
full-screen display), you can change the movie size using the number
keys when the movie window is the front window on the desktop:
Key
|
Window
size
|
1
|
1/2 size |
2
|
3/4 size |
3
|
Normal size |
4
|
Double size |
5
|
Triple size |
Table 3. Setting the (not
full-screen) window size of a locally playing movie
Skipping Segments
During Playback With Skipmarks
You can enable and disable
Skipmark operation using the Enable
Skipmarks checkbox, thus giving you control over whether you see
the
full movie, or the movie played with skipmarks.
To set a
Skipmark start position,
simply select Add
Skipmark from the Skipmark
popup menu when movie playback is at the position you want to set. To
set the end position, select the open Skipmark item from
the Skipmark popup menu when movie playback
is at the position you want to set. You will then
see a range displayed in the Skipmark popup menu eg. 00:34:23-00:36:04.
Selecting this Skipmark from the Skipmark popup menu will jump to a
position 15 seconds before the Skipmark start position, so you can view
how well the Skipmark skips the section you wish to cut. Make sure you
have the Enable Skipmarks
checkbox checked so that Skipmarks are
actually enabled (otherwise the marked section won't be skipped, but
will play through as usual).
The best
way to set Skipmarks is to first set a rough start and end position,
and then
edit the Skipmark to tweak it so it exactly skips the section you want.
To tweak a rough Skipmark, select it from the Skipmark
popup menu and pay careful attention to the displayed play position as
it plays
the movie. Note the play position of the start and end you want,
and then edit the Skipmark to these values. Selecting Edit Skipmarks... from the Skipmark popup menu will bring up
the Edit Skipmarks dialog,
shown in Figure 49 below.
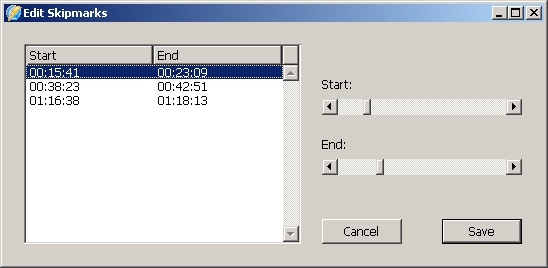 Figure 49. The Edit Skipmarks dialog
The start and end position of each Skipmark in the currently playing
movie will be displayed in the list. Select the Skipmark you wish to
edit and then move the sliders to make the necessary adjustments. If
you set a Skipmark start position from 0 to 15 seconds from the
beginning of a movie, the movie will always start playing from the end
of the first Skipmark - this allows you to bypass a section at the
beginning of the movie. Likewise, if you set a Skipmark end position
within 10 seconds of the the end of a movie, movie playback will only
run until that Skipmark's start position.
Press the Save button when you
are finished making changes and wish to save them.
Usually, you would only jump to a skipmark when checking that the exact
desired section of the movie has been correctly marked. You may need
to do this a few times when editing skipmarks (ie. modifying
the start and end positions of a Skipmark) to ensure the results work
as you expect. One thing to keep in mind is that some types
of compressed movies are encoded using periodic keyframes, so making
small adjustments to Skipmark start and end positions may not produce
exact results.
You can also use Skipmarks to set up a movie to only play certain
segments. For example, if you had a large home movie and you only
wanted to play certain parts for a visiting friend or relative, you
could set up Skipmarks so that only the segments you wanted would be
played, in sequence. In this case, you would probably set a Skipmark to
bypass the beginning and skip directly to the first segment of
interest. After that segment played, a skipmark would move playback to
the next segment of interest, and so on. You could set the last
Skipmark to bypass the end of the movie by setting the last Skipmark's
end position to the end of the movie.
With looping, you can repeatedly play only the
selected segments of a movie you are interested in. For example, if you
had a home movie containing some scattered footage of your son when he
was a child, and you wanted to play that footage repeatedly during his
21st birthday party on your big screen TV, then Skipmarks with looping
would offer a superb solution. No movie editing is required, but simply
setting up appropriate Skipmarks for the segments of the movie you want
played.
Note: You can transfer files to and
from a media server (using the controls on the Transfer Files panel) during media
searches, playlist creation and media playback.
Remote control
using a PDA with Wi-Fi
In addition to controlling media playback from a media control
computer, such as a laptop, you can now
remotely control media playback using a web browser on any PDA with
Wi-Fi, such as Pocket
PC, Nintendo DS, PSP (PlayStation Portable), PalmPilot, mobile phone,
etc. Of course, all these PDAs have backlit screens, making it easy to
remotely control movie playback in a darkened viewing room. You can
even remotely control multiple media servers using the same PDA, since
each media server has a unique wireless IP address and Wi-Fi works well
through walls. In fact, most users should be able to remotely control
media playback from anywhere in their homes with the PDA (possibly in
the back garden as well).
The web browsers available on the different PDA platforms vary
substantially in terms of their features and functionality. To get the
optimal remote control experience with your PDA (eg. display of
playback position, currently playing media, status information, etc),
it is recommended that
you use a web browser with excellent Javascript support. Currently, the
best PDA Web browser which supports Javascript is the Opera mobile
browser,
available from www.opera.com.
Non-Javascript browsers are also supported by Kenbushi, but they only
support simple remote control.
To setup to use a PDA with Wi-Fi for remote media control, you need to
activate the Wi-Fi on your PDA. Then check the Allow Remote Media Control and Enable Web Server checkboxes on the Preferences panel of the main
window. Underneath the Enable Web Server checkbox, you
should see the URL you need to enter into your PDA web browser eg.
'192.168.0.100:3300/'. Once you enter this URL, you should see the PDA
remote control interface come up in the web browser (see Figure 50 below). The picture shows
the screen of an HP IPaq rx1950 Pocket PC.
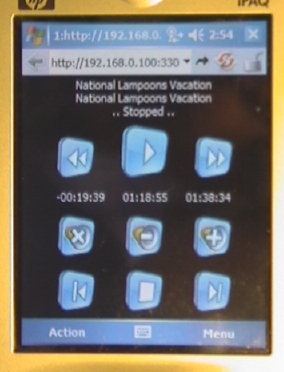 Figure 50. Remote control
interface on a PDA with Javascript
(portrait)
Figure 50. Remote control
interface on a PDA with Javascript
(portrait)
The playlist title is shown at the top of the Web page, and then the
media item name. The third line shows the status of media playback (eg.
playing, stopped, paused, etc).
When media playback is stopped, playing or paused, dots eminate from
the status
to show an active Wi-Fi connection to the media server. Thus, if dots
aren't continually being updated, you may need to wait until a Wi-Fi
network connection is made (this may occur if your PDA was switched
off, and you switched it on again to control media playback on the
server). If dots aren't being updated for a while (or you get a 'Could
not establish network connection' message, or similar), try refreshing
the page by pushing the browser's Refresh
button.
The Rewind, Play and Fast Forward buttons are displayed
below the
status line. The Play button
starts playing the media if no media is currently playing, and pauses
playback if media is playing - press the Play button again to unpause
(continue playing) the media, etc. Pressing the Fast Forward button once will start
fast forwarding at 8x the normal play speed. Pressing it repeatedly
will fast forward 16x, 64x, to the maximum of 256x. Pressing Play at any time during a fast
forward will play from that position. Rewind control is similar to fast
forward, but will rewind the play position. Pressing the Rewind button during a fast forward
will slow the fast forward rate, and vice versa.
The three time
values shown below these buttons are the amount of
time required to finish playing the current media item, the current
play
position, and the length of the media item respectively. The next set
of buttons are the Mute
button, and the Decrease Volume
and Increase Volume buttons
(the volume change with each button press is smaller at lower volumes,
giving you greater incremental control at low volumes).
Finally, the bottom row of buttons are the Previous, Stop and Next buttons. The Previous and Next buttons allow you to move
easily to the previous and next playable items on the playlist.
You can only control media playback
with a PDA after you have set up a playlist with the media control
computer, and started the playlist playing. At this time, the
media control computer sends the playlist and other information to the
media server, and the media server can then be fully and independently
controlled with the PDA. You can switch off the media control computer,
quit Kenbushi on the media control computer, etc. and the media server
will retain all the playlist information, and give you full PDA control.
For example, if you are watching a movie and decide to stop the movie,
pressing the Stop button the
PDA will stop the movie. If you decide later that you want to continue
watching the movie again, simply press the Play button on the PDA and the movie
will automatically start playing from the position at which it was
stopped. When the movie is playing again, you once again have full
control over volume, rewind and fast forward, going to the next and
previous media items in the playlist, etc. To provide more information
about which item in the playlist is playing (this is especially useful
if you are playing music), the item number and the total number of
items in the playlist is shown on the PDA display.
On many PDAs, you can also change from a protrait button layout to a
landscape button
layout (see Figure 51 below) -
simply refresh the Web page and you will find the button layout will
change
automatically.
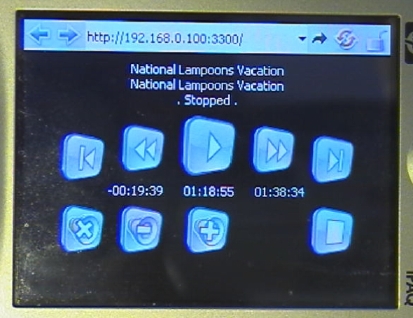 Figure 51. Remote control
interface on a PDA with Javascript
(landscape, 'Full Screen' mode)
Figure 51. Remote control
interface on a PDA with Javascript
(landscape, 'Full Screen' mode)
The basic information shown on the landscape button layout is the same,
but a wider arrangement of buttons
is used to better accommodate the dimensions of the PDA display. The
picture above also shows the Opera browser in 'Full Screen' mode, which
eliminates some browser controls to make more active area available.
Buttons on the PDA can be pressed using the PDA stylus, but they are
large enough for you to press directly with your finger or a finger
nail.
Note: If you normally switch off
your PDA when not actively controlling media playback, it could take
a few seconds for the Wi-Fi connection to the Kenbushi server to be
established after you switch it on again. Most PDAs have a Wi-Fi
connection indicator, which will show you when the Wi-Fi connection has
been re-established and you can control media playback again. If you
press a button before the Wi-Fi connection
has been re-established (for example, you
press the Play button to pause
a playing movie), the button press
will be queued and sent as soon as the Wi-Fi connection is active. Dots eminating from
the status on the PDA also indicate an active Wi-Fi
connection to the Kenbushi server (eg. the dots
on the left and right sides of the 'Stopped' status message above in Figure 57).
For
Web browsers which do not have Javascript support (or which offer poor
Javascript support), such as Internet Explorer, you still have all the
usual media playback controls, but no dynamic real-time display of play
progress. See Figure 52 below.
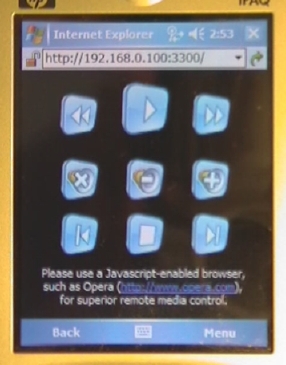 Figure 52. Remote control
interface on a PDA without
Javascript (portrait)
Figure 52. Remote control
interface on a PDA without
Javascript (portrait)
With these type of browsers, when you press a button, the entire web
page is refreshed. For superior remote media control experience, please
use a Javascript-enabled browser, such as Opera.
Note: Kenbushi will try to
automatically detect if your PDA's Web browser is Javascript-enabled,
as well as your PDA's screen orientation (portrait or landscape). However, sometimes
this detection doesn't work properly, and you may need to override the
automatic detection. There are a number of URLs you can use which force
Kenbushi to use a particular page format. Some sample URLs are shown
below in Table 4:
Type
of PDA remote control Web page
|
Sample
URL (the IP address shown is for illustration purposes only)
|
Automatic Javascript and layout
detection
|
http://192.168.0.100:3300 |
| Javascript-enabled, horizontal
button layout |
http://192.168.0.100:3300/jshindex.html |
| Javascript-enabled, vertical
button layout |
http://192.168.0.100:3300/jsvindex.html |
| No Javascript, horizontal button
layout |
http://192.168.0.100:3300/nojshindex.html |
| No Javascript, vertical button
layout |
http://192.168.0.100:3300/nojsvindex.html |
Table 4. Kenbushi web server URLs
If you are using wireless networking in your
home or office, it is
highly recommended that you use a password for access to that network
(using 'WEP', an acronym for Wired Equivalent Privacy). This protects
your network from intruders and eavesdroppers
getting into your network, as well as people
using your Internet connection without your knowledge or consent (and
possibly causing problems, such as making you go over your monthly
download limit).
Creating your own PDA
remote control 'Skins'
Advanced
users
may wish to create their own PDA remote control Web pages to control
media
playback on Kenbushi ie. create your own PDA remote control 'Skins'
with custom buttons. You can then change the background picture, button
layout, button graphics, button size, etc. This may be necessary, for
example, if you wish to tweak the button layout to fit the screensize
of the PDA you have.
All the master PDA remote control Javascript and non-Javascript web
pages are
located in the 'HTML' folder inside the main Kenbushi application
folder. The button graphics for the horizontal layout buttons
are located in the 'hori' folder, and the button graphics for
the vertical layout buttons are
located in the 'vert' folder. You'll need to modify the HTML code of the Web pages if
you change the button sizes, but all other functions (such as playback
position, etc.) should work if you use the master PDA remote control
web pages
as a template (make sure you backup the masters before making any
changes, so you can revert back to them if you need to!!!).
PDA trouble-shooting
* Make
sure you have Wi-Fi wireless networking enabled on your PDA. Most PDAs
allow you to switch off Wi-Fi to save battery power.
* If you
can't
get any web pages to load on your PDA Web browser, trying using one of
the other IP addresses shown on the list below the Enable Web Server checkbox on the Preferences panel on Kenbushi. Maybe
you are not using the IP address of the wireless network adaptor on
your server.
* If Web pages
are not displaying properly, try using a different Web browser on your
PDA. We highly recommend Opera for the remote
control function, due primarily to it's excellent Javascript support.
For the best wireless slideshows, use a Web browser which eliminates
all controls when set to 'Full Screen' mode.
* If you
find a Web page on your PDA doesn't refresh (eg. it simply
sits there and does nothing) after switching on your PDA again after it
automatically powers off, try clearing the browser cache and then
refreshing again. On Opera 8.x, clear the cache by selecting Tools -> Settings from the Menu, then selecting the History tab and pressing the Clear cache button. On Internet
Explorer, select Tools ->
Options... from the Menu,
then select the Memory tab and
press the Delete Files button.
* On
some PDAs,
browser cache memory may be quite limited. A
low-memory problem may exhibit itself as instability, failure to load
menus or pictures, etc. A soft reset may be required under some
circumstances (see your PDA user manual for more details).
* Try to avoid exotic characters in the URLs you use - the web server
in Kenbushi is quite simple and can't deal with unusual characters in
URLs.
Media
file compatibility
Some media file formats are not fully supported by the VLC media
player. This limits some features of Kenbushi
when playing these files.
DivX 5: If a movie encoded in
DivX5 format is played, the seek, rewind
and fast forward functions will not work correctly. In addition, the
position of a paused movie will not be saved correctly between launches
of Kenbushi (the movie will
always start playing at the
beginning again). The duration of the movie is also incorrect, and is
assumed to be 3 hours in length. This issue is due to limited DivX5
support in the VLC v0.8.4 media player.
MP4: When music and sound files
encoded in MP4 format (which use the m4a
file extension) are played, album and
artist information is not displayed on the media backdrop.
The
VLC media player
Kenbushi
integrates
the VLC media player (www.videolan.org)
to provide its media playback functions. This media player can
play a
very wide range of media formats, such as MP3, Ogg, AAC, Avi, DivX 5,
MPEG4, Quicktime, WMV2, Sorenson and H264. The only media types that
are not supported by VLC are those protected by DRM (Digital Rights
Management) systems, such as Apple's Fairplay.
The VLC source
code can be found at: http://www.videolan.org/vlc/download-sources.html
Note
to MacOS X users
VLC v0.8.6 (the
version bundled with Kenbushi) only
supports MacOS X 10.3.9 and up.
Note
to Windows users
Windows users generally have to be more mindful of viruses, spyware,
and other malware than MacOS and Linux users, to ensure their computers
work reliably and consistently. To ensure protection from malware,
Windows users generally run anti-virus and anti-spyware programs in the
background while they use their Windows computer to do useful tasks.
The problem with many anti-virus and anti-spyware programs on Windows
is that they slow down the effective computer speed, and introduce
unusual and unpredictable delays when performing operations such as
creating or modifying files (particularly large files eg. 700MB Divx
movies), moving data over networks, launching applications, etc.
Tests have shown that opening large files can effectively lock
up a Windows computer for a short time as anti-virus software scans the
file to ensure if it has not been infected. Folders full of movie files
can cause substantial lockup times when scanned by Kenbushi
as it gets information about these files for inclusion in the local
file list.
Anti-spyware software (including Microsoft's own anti-spyware product)
can noticably delay the launch of movies opened by Kenbushi
using the VLC media player.
Unfortunately, there is no way to get around this problem without
disabling anti-virus or anti-spyware products (which is not
recommended). However, if you wish to test if these products are
causing delays, you can disable them for a short time until the tests
are complete.
Note
to Linux Users
VLC is bundled with Kenbushi for MacOS and
Windows.
However, there are many Linux distributions and it would not be
practical to bundle all the different versions with Kenbushi
for Linux. Thus, you will need to install VLC on your particular Linux
distribution. You can download the latest builds from www.videolan.org.
The discussion below assumes you are using the 'Gutsy Gibbon'
version of Ubuntu Linux. This distribution is highly recommended,
especially for users new to Linux - it is a very solid build and
installation is very easy. On
some other Linux distributions (and older versions of Ubuntu), you will need to
install a library which Kenbushi
depends on, called libstdc++5.
You should visit the libstdc++5
resource
page to locate the correct version for your system.
On the 'Gutsy
Gibbon'
version of Ubuntu Linux, if you have a 'Universe'
repository already activated, VLC will be available simply by
using the 'Add/Remove...' applications function (the menu item at the
bottom of the Applications
menu). You should use VLC v0.8.6 with
Kenbushi.
To activate a
'Universe' repository, open Synaptic (System
-> Administration -> Synaptic Package Manager). In Settings
-> Repositories, check the checkbox
for 'Ubuntu 6.06 LTS (Binary) - Community
maintained (Universe)' and then close this window (see Figure
53
below). This 'Universe' is what most home users would want to activate,
as it contains a list of all the additional software you'll probably
ever need on your Linux computer.
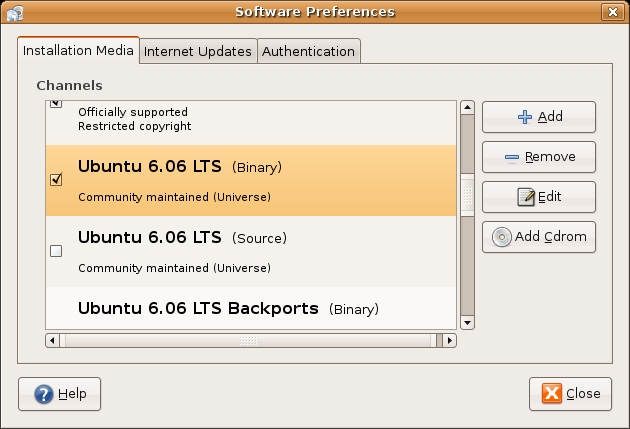
Figure 53. The Ubuntu 'Universe'
repository
Then on the Synaptic Package Manager window,
search for 'vlc' (use the Search
button) - you should then see the following 'vlc' entries (see Figure 54 below). Right-click 'vlc'
and select it for installation. Then press the Apply button to actually download
and install VLC v0.8.4.
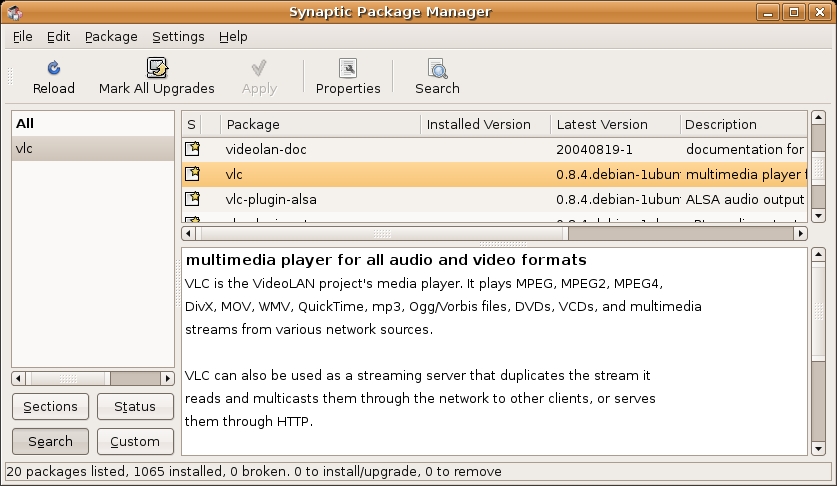
Figure 54. Selecting the 'vlc' media
player for installation
Kenbushi also
requires libssl0.9.7 to be
installed, otherwise it will bring up an error when you run it. Search
for and install libssl0.9.7 in a similar way to
VLC (see Figure 55 below).
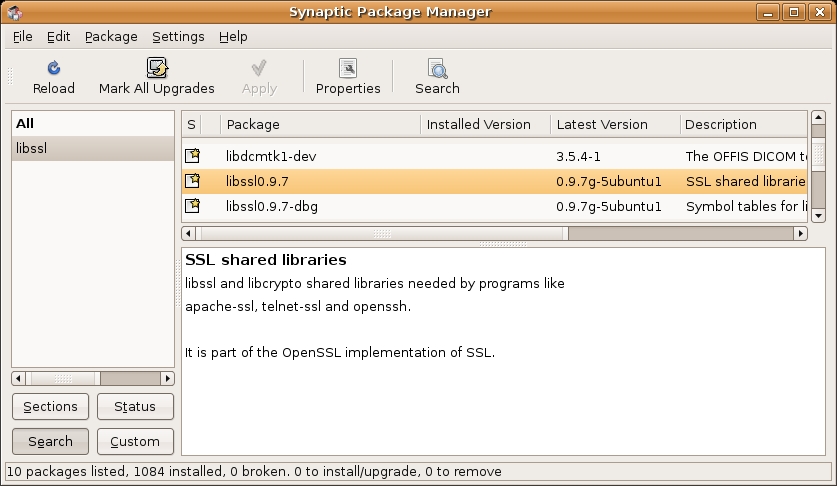 Figure 55. Selecting 'libssl0.9.7' for
installation
Figure 55. Selecting 'libssl0.9.7' for
installation
You should now find that you can run Kenbushi, and all the media
playback functions work.
Web server
A simple web server is integrated into Kenbushi, which allows you to
easily set up a folder of HTML documents for viewing using any Web
browser. This is especially useful over a LAN, where you may need to
make Web-based materials available to a number of users, but don't want
to go to the trouble of setting up a fully fledged Web server, such as
Apache. Of course, Web servers can also be
used for functions other than HTML document serving, such as simple
data distribution.
To 'Web-enable' a folder of HTML documents,
simply add the folder to the Shared
Folder listbox (on the Shared
Folders panel), check the Web-enable
checkbox on the left side of the folder, and ensure the Enable Web Server checkbox is
checked on the Preferences
panel.
You
will then be able to access documents in this folder from any web
browser using a URL made up of the shared folder name and the name of
the document to
load (if you only specify the shared folder name, and not the name of
the document, the server will attempt to load the default file called
'index.html'). For example, if you Web-enabled the 'Shared' folder and
your
computer's local IP address is '192.168.0.100', the 'index.html'
document could be accessed using the following URLs:
http://192.168.0.100:3300/shared/
http://192.168.0.100:3300/shared/index.html
To view the folders that are currently Web-enabled on Kenbushi (and
thus accessible using a web browser), use the main index URL eg.
'http://192.168.0.100:3300/index.html'. This will bring up a web page
similar to that shown in Figure 56
below. This page also shows the IP addresses from which this server
page is accessible (in the example below, a wireless network adaptor
[192.168.0.100] and an Ethernet adaptor [169.254.74.225] are available,
as well as an Internet IP address [58.160.131.80]).
Notice also that the state of the Allow
Remote Media Control checkbox on the media server is shown on
the Web page.
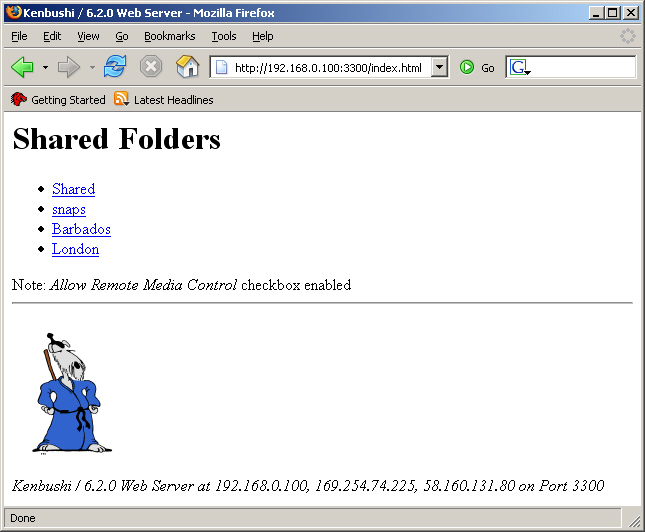 Figure 56. The main index page of
Kenbushi
Figure 56. The main index page of
Kenbushi
Note: the default IP
address of the
server is always shown below the Enable Web Server
checkbox (though, if you have more than one network adaptor in your
computer eg. Ethernet, Wi-Fi wireless, dialup modem, etc., you should
be able to access the Web server using the IP address of any of the
installed network adaptors) - the
port number used is the Base Port
Number set on the Network
panel, not the usual HTTP ports 80 or 8080.
You can
access the Kenbushi server over the Internet.
However, you need to ensure the Kenbushi default base port (usually
3300) is open ie. no firewalls exist between the web browser and the
server. You can check that the server is not blocked by an Internet
firewall by
using the firewall diagnostic
test built into Kenbushi. In addition, you need to have a static IP
address for your server's Internet connection (static IP addresses can
often be assigned to you by your ISP on request), and use this IP
address when trying to remotely access the server.
Advanced users
can add additional MIME types to the Kenbushi Web server by
adding them
to the 'MIMETypes.txt' file, located in the 'Data' folder. Simply add
the file extension followed by a space, and then the MIME type. If a
file is requested which has a file extension not in the MIME type list,
the server will return a '404 Not Found' HTTP error.
A range
of common document MIME types can be served by Kenbushi by
default, including:
jpg, gif and png: graphics files
htm, html: HTML files
js: Javascript files
txt, rtf: text document files
xml: XML files
Files up to 10MB will be served by the Kenbushi server. Any files
larger than 10MB will return a '404 Not Found' HTTP
error.
If you set a 'Web-enabled' folder as 'write-enabled' (by checking it's 'write-enabled' checkbox on the Shared Folders listbox), you will
also be able to upload HTML documents, etc. at any time to the shared
folder using a remote computer running Kenbushi. This allows you to
update and delete files in a HTML document set remotely.
If you are using wireless networking in your
home or office, it is
highly recommended that you use a password for access to that network
(using 'WEP', an acronym for Wired Equivalent Privacy). This protects
your network from intruders and eavesdroppers
getting into your network, as well as people
using your Internet connection without your knowledge or consent (and
possibly causing problems, such as making you go over your monthly
download limit).
Web slideshows
This powerful
feature of Kenbushi allows you to easily set up a JPEG photo slideshow
for viewing on all Web browsers on
laptops with Wi-Fi wireless networking, as well as all web
browsers on PDAs with Wi-Fi wireless
networking, such as the Pocket
PC, Nintendo DS, PSP (PlayStation Portable), PalmPilot, mobile phone,
etc. You can remotely view the slideshows anywhere within
wireless range, without ever actually storing the photos on these
devices. Photos are auto-scaled to fit any screensize from 30x20 pixels up
to 1920x1200 pixels, with superb quality
provided by automatic anti-aliasing, and update regularly at the set
interval.
Simply place the JPEG photos you wish to view as a slideshow into a
folder, add the
folder to the Shared Folder
listbox and check the folder's 'Web-enabled' checkbox (on the left side
of the Shared Folder listbox). Then check the Enable Web Slideshows checkbox on the Preferences panel, and set the
interval and screensize you want. If you wish to have the photos
automatically rotated (this is best on a PDA, since it maximizes
viewing area if you have a mixture of vertical and horizontal photos),
check the Auto-Rotate
checkbox. You can start the slideshow by
entering the special 'kb.ss.html' document name into your web browser.
For
example, if the folder you've prepared and added to the Shared Folders listbox is called
'snaps'
and your server's wireless IP address is 192.168.0.100:3300, the URL
you
need to enter
on your web browser to run the slideshow is:
http://192.168.0.100:3300/snaps/kb.ss.html
To list all the available slideshows on the
Kenbushi server, enter a URL made up of your server's wireless IP
address followed by the 'kb.ss.html' web page
name. To
start a slideshow on the list, simply click it's link. To go to the
next picture, hit your web
browser's Refresh button. To go back to the
list of available slideshows, hit your web browser's Back button. For example, if your server's
wireless IP address is 192.168.0.100:3300, the URL you
need to enter
on your web browser for the slideshow list is:
http://192.168.0.100:3300/kb.ss.html
Of course, once
you have entered a particular URL, you can set a bookmark on the Web
browser to conveniently access it again in the future. In fact, you can
set up any
number of slideshows for remote viewing, each with their own bookmark
for easy access. See the example PDA slideshow below, in Figure 57 (viewed with the
Internet Explorer Web browser on an iPaq rx1950. The iPaq is in portrait
mode, but the slideshow has auto-rotate enabled, so the pictures are
both scaled to the screen size and rotated appropriately).
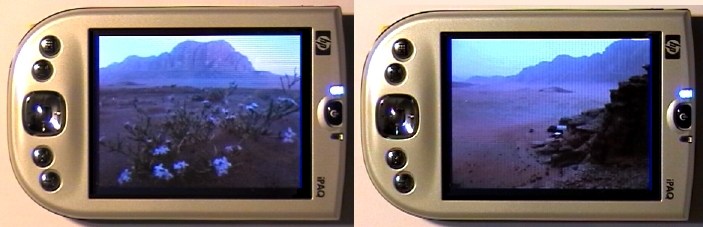 Figure 57. An example PDA slideshow
(portrait with auto-rotate, 'Full Screen' mode)
Figure 57. An example PDA slideshow
(portrait with auto-rotate, 'Full Screen' mode)
Viewing slideshows remotely via a Wi-Fi enabled PDA web browser has
significant advantages compared to storing them in the PDA memory:
pictures don't use up the available storage space on your PDA, setting
up a slideshow folder is very easy compared to resizing all pictures
for your particular PDA screensize and uploading them to the PDA, any
number of slideshows can be made available for convenient viewing, and
any PDA device or desktop computer with a web browser
can be used for viewing.
Slideshows have
the following additional features:
- Slideshows
automatically loop back to the beginning
after the last slide is displayed.
- You can
change the interval and
screensize during a slideshow - the settings will be used as soon as
the next slide is displayed, since the photo is dynamically resized on
the Kenbushi server.
- Refreshing
the web page on the PDA will move the slideshow immediately to the next
photo.
- If you change
the number of items in the slideshow folder (eg. by adding or removing
photos), the slideshow will reset itself and start showing slides again
from
the beginning.
- Photos are resized to
fit exactly into the specified screensize area, so you can set the
screensize to any pixel size you like. You can thus tweak the
screensize to eliminate any scrollbars, etc. and maximize viewing area.
- On some PDAs, you can
set a 'Full Screen' mode on the Web browser, which removes the
scrollbars, address bar and other controls and thus maximizes the viewing area.
- Pictures are
displayed in sorted alphabetical name order. Thus, you can control the
display order of pictures by changing their file names eg. '01.jpg',
'02.jpg', '03.jpg', etc. would be
displayed in sequence.
- Only one
user can view slideshows on a Kenbushi server at one time.
If you are using wireless networking in your
home or office, it is
highly recommended that you use a password for access to that network
(using 'WEP', an acronym for Wired Equivalent Privacy). This protects
your network from intruders and eavesdroppers
getting into your network, as well as people
using your Internet connection without your knowledge or consent (and
possibly causing problems, such as making you go over your monthly
download limit).
Note:
When viewing photos on a PDA,
please keep in mind that browser cache memory may be quite limited. A
low-memory problem may exhibit itself as instability, failure to load
menus or pictures, etc. A soft reset may be
required under some
circumstances (see your PDA user manual for more details).
Building your own
remotely controlled media center
Many
homes are
now set up with home theatre systems which feature large screen LCD or
plasma TVs and high-powered
multichannel 5.1 surround sound systems. They provide a superb way to
enjoy music and movies in a highly immersive environment.
However, storing and playing music and movies usually involves having
racks of CDs and DVDs, finding and loading disks that you wish to play,
and putting them away after use. Children can also put fingerprints and
scratches on disks (affecting their playback quality), and accidently
put them away in the wrong place (or not at all). It would be much
better to use a hard disk to store the music and movie files, and then
play these media directly from that hard disk.
Kenbushi provides the
functionality to convert existing computer
hardware (eg. an old Windows or Linux PC) into a media center and file
server. Simply install Kenbushi on the designated
media
computer and place it near a TV and sound system for easy video and
audio connection. Then use another computer, such as a laptop, to
remotely control the playback of music and movies. Typical applications
include piping movies to childrens’ rooms, playing movies and music on
the TV in the lounge, and managing music for a party.
Kenbushi works over wired and
wireless LANs, as well as over the
Internet. Thus, you can set up your media computer so it is near your
TV and sound system, and there are no wires snaking around your lounge
room. Most people try to set up media computers in this way.
Choosing
a suitable computer
Personal
computers have been available for
over two decades now, and many users upgrade every few years to newer
and
faster machines. The question is, what useful purpose can those old
computers be put to? Most often, they are passed down to other less
discriminating users in the household, given away to friends or
relatives, or dumped. Kenbushi provides a way to
use these old computers by converting them
into a media center suitable for playing music and movies.
Most
old
computers can play music, but you generally need a faster computer
(> 1GHz in speed) Windows or Linux PC
to
play video well. With Macs, an 800MHz G3 appears to be sufficient. The
best approach to finding out what your old
computer is capable of is to install Kenbushi on it, along with
some music and movie files, and then try
playing them using the remote media controls built into Kenbushi.
If the computer plays music well, then it could make a good music
center. If it also plays movies well (ie. without stuttering, freezing
or dropouts), then you have a fully fledged media center on your hands.
Of course, you may also be able to partially refurbish an old PC so it
can play music and movies properly, by purchasing and installing a
budget sound card and/or video card for it. Sound cards with 5.1
channel output can be purchased for as little as USD15.00, and video
cards with TV out capabilities can be had for as little as USD40.00.
You'll also need an Ethernet card or wireless network adaptor in the
old PC to connect to your home network, allowing media playback to be
controlled remotely.
If you
want to
set up your computer as a dedicated media center, you won't need to
connect a mouse or keyboard (see the example setups below for further
information about how to do this). Of course, the TV output at the back
of the computer will be connected directly to your TV, so you won't
need a monitor either.
Rather
than
recycling an old PC, you could build a new media computer using budget
PC components from a local PC store, or purchase a complete low-end
system from a catalog - only the computer box is required as Kenbushi works on computers
without a monitor (assuming it
has a TV output), keyboard or
mouse. Since a version of Kenbushi is also available
for
Linux, there is great flexibility when choosing a budget packaged PC to
use as a powerful media center.
If you are technically capable, you may save more money by installing
and using a free operating system, such as Linux. There are many
easy-to-install distributions of Linux available for download from the
Internet, such as Ubuntu. Ubuntu installs easily, detects
most computer hardware,
and has a
simple
installation system for additional software which works via download
over the Internet.
Example
Windows setup
If
you want to make your computer a dedicated media center (ie. no mouse
or keyboard connected to it), you need to set it up so that it boots
and runs Kenbushi automatically when
it's switched on. The following
description assumes that you are relatively familiar with the BIOS
built into PCs, navigating around the Windows desktop, and creating
shortcuts.
The first task is to set the BIOS so it continues even though it finds
no keyboard connected. This is often selectable in the 'Main' BIOS
menu, which will be displayed when you press the 'Delete' key during
computer startup. You need to set the 'All but Keyboard'
(or similar) option for 'Halt On'.
Once you
get through to booting into Windows, you need to ensure that a username
and password is not requested when it starts up (obviously, without a
keyboard attached, you can't type in any information). When you do a
fresh installation of Windows (which is recommended if you are creating
a media center PC), Windows will boot without asking for a username or
password. However, you can change the
user logon settings in the Windows control panels, if your Windows PC
has been used in the past and has multiple user accounts already on it.
Assuming you now have a Windows PC which you can switch on and which
will then boot fully into Windows without user intervention, you now
need to install Kenbushi,
create a shortcut to the Kenbushi application, and
place that shortcut in the Windows 'Startup'
folder. To create a shortcut, right-click the Kenbushi application (it
should be in C:\Program Files\Kenbushi\) and select 'Create
Shortcut' from the displayed contextual
menu.
The 'Startup' folder can be found in different locations, depending on
the type of Windows you are running. On Windows XP, you'll find the
'Startup' folder inside the 'Programs' folder, inside the 'Start Menu'
folder, inside the users folder, inside the 'Documents and Settings'
folder.
For example, if your account name was 'Michael' and you only had one
hard drive (ie. drive C:), the location of the 'Startup' folder would
be:
C:\Documents and Settings\Michael\Start Menu\Programs\Startup
Finally, make sure that Kenbushi is set up correctly.
By
default, it should have the Workgroup
Setup Method on the Network
panel set to Auto-Discovery
(with this setting, it should automatically connect to all computers on
your LAN running Kenbushi). In addition,
ensure the Allow
Remote Media Control checkbox is checked and that you know the Sharing Password set on it. Also,
set up a writeable shared folder to contain the movies and music you
want to remotely control (by default, a shared folder on the desktop
called 'Shared Folder' is created, but you need to check the Writeable checkbox next to it on the
Shared Folders panel - this
will allow you to upload movies and music to it from a remote computer).
It's also a good idea to disable any screensavers (these are often
switched on by default).
If everything is set up correctly, you'll find that when the PC is
switched on, it boots into Windows and runs Kenbushi automatically. You
should then
have immediate control of the PC from another computer.
Example
MacOS setup
The Mac Mini is an excellent choice for a media center, as it
is very compact and offers high-resolution video output for widescreen
TVs. However, any type of Mac would be suitable, as long as it runs
MacOS X.
If
you want to make your computer a dedicated media center (ie. no mouse
or keyboard connected to it), you need to set it up so that it boots
and runs Kenbushi automatically when
it's switched on. On MacOS computers, no
keyboard or mouse needs to be connected for it to boot up correctly, so
you don't need to take any special action to achieve this.
Once you
get through to booting into MacOS X, you need to ensure that a username
and password is not requested when it starts up (obviously, without a
keyboard attached, you can't type in any information). To do this, go
to the Accounts control panel,
select the main Admin account
and click the Login Options
selector. You should see a checkbox which allows you to set your Mac to
automatically log in as a particular user. Check this checkbox.
Assuming you now have a Mac which you can switch on and which
will then boot fully into MacOS without user intervention, you now
need to install Kenbushi
and add the Kenbushi
application to the login items list on the account you selected above
for automatic login. To do this, go to the
Accounts control panel, select
the main Admin account, select
the Login Items panel and add Kenbushi
to the list using the Add
button at the bottom of the
panel. Then check the checkbox next to the Kenbushi
application in the list.
Finally, make sure that Kenbushi is set up correctly.
By
default, it should have the Workgroup
Setup Method on the Network
panel set to Auto-Discovery
(with this setting, it should automatically connect to all computers on
your LAN running Kenbushi). In addition,
ensure the Allow
Remote Media Control checkbox is checked and that you know the Sharing Password set on it. Also,
set up a writeable shared folder to contain the movies and music you
want to remotely control (by default, a shared folder on the desktop
called 'Shared Folder' is created, but you need to check the Writeable checkbox next to it on the
Shared Folders panel - this
will allow you to upload movies and music to it from a remote computer).
It's also a good idea to disable any screensavers (these are often
switched on by default).
If everything is set up correctly, you'll find that when the Mac is
switched on, it boots into MacOS X and runs Kenbushi automatically. You
should then
have immediate control of the PC from another computer.
Example
Ubuntu Linux setup
There are
many
easy-to-install
distributions of Linux available for download from the Internet, such
as Ubuntu. Ubuntu installs
easily,
detects most computer hardware, and has a simple installation system
for additional software which works via download over the Internet. The
following discussion assumes that you wish to use the 'Dapper Drake'
Ubuntu Linux
distribution.
The first
step is to go to the Ubuntu website and download the 'Dapper Drake'
version of Ubuntu (most users get the PC (Intel x86) desktop CD .iso file). You then need to
burn the .iso file to CD, and use that CD to install Ubuntu on your
computer.
After installing the 'Dapper Drake' version of Ubuntu, please
follow the instructions shown in Notes
for Linux users above. This section explains in detail how to
install the VLC media player and a library you need to run Kenbushi.
After working through this section, you should find that
you can run Kenbushi, and all the media playback functions work.
If you
want to
make your computer a dedicated media center (ie. no mouse or keyboard
connected to it), you need to set it up so that it boots and runs Kenbushi automatically when
it's switched on. The following
description assumes that you are relatively familiar with the BIOS
built into PCs, and creating
shortcuts.
The first task is to set the BIOS so it continues even though it finds
no keyboard connected. This is often selectable in the 'Main' BIOS
menu, which will be displayed when you press the 'Delete' key during
computer startup. You need to set the 'All but Keyboard'
(or similar) option for 'Halt On'.
Once you
get through to booting into Ubuntu Linux, you need to ensure that a
username
and password is not requested when it starts up
(obviously,
without a keyboard attached, you can't type in any information). After
logging in, select Login Screen Setup
from the Administration item
of the System menu. On this
control panel, select Login a user
automatically on first bootup and close the control panel.
Assuming you now have a Ubuntu Linux PC which you can
switch on and which
will then boot fully into Ubuntu Linux without user
intervention, you now
need to install Kenbushi,
and make it so that Kenbushi is started
automatically.
To make Kenbushi start automatically,
select Sessions from the Preferences item of the System menu. On this control panel,
move to the Startup Programs
panel, press the Add button
and navigate to and select the Kenbushi application.
Important Note: the file path
to the Kenbushi application can
contain no spaces, otherwise Linux won't be
able to launch the application correctly (it always views a space as
the end of a command line, and processes text after the space as
control options). To fix this problem, replace all spaces in the path
to the Kenbushi
application
with underscores, '_'. After changing the path, make sure you update
the path in the Startup Programs
panel as described above.
Finally, make sure that Kenbushi is set up correctly.
By
default, it should have the Workgroup
Setup Method on the Network
panel set to Auto-Discovery
(with this setting, it should automatically connect to all computers on
your LAN running Kenbushi). In addition,
ensure the Allow
Remote Media Control checkbox is checked and that you know the Sharing Password
set on it. Also, set up a writeable shared folder to contain the movies
and music you want to remotely control (by default, a shared folder on
the desktop called 'Shared Folder' is created, but you need to check
the Writeable checkbox next to
it on the Shared Folders panel
- this will allow you to upload movies and music to it from a remote
computer).
It's also
a good idea to disable any screensavers (these are often switched on by
default).
If everything is
set up correctly, you'll find that when the PC is
switched on, it boots into Ubuntu Linux and runs Kenbushi automatically. You
should then
have immediate control of the PC from another computer.
Data Backup
Kenbushi provides powerful
data backup and recovery
functions to help protect users from losing important files. During a
backup, it
scans selected folders and adds recently modified files to the backup
store. Older versions of each file are also retained. To recover a
file, the user simply selects the date on which the desired file was
current and a file explorer interface (which accepts search criteria)
shows all files available at that date. Files and folders can then be
selected and restored to their original locations, or saved to a new
location. File data integrity is verified during storage and recovery
using MD5 digital signatures. Backup logs and restore logs provide
detailed information about all file transfers.
Backups can be scheduled to be performed monthly, weekly, daily or
hourly. When a backup schedule triggers, the backup operation can be
performed automatically, or optionally an alert displayed allowing the
user to start the backup when ready. This ‘Alert Only’ mode is
perfect for protecting users’ work whilst they are editing an important
document (eg. a thesis), or series of documents (eg. software source
code modules). Every hour, the backup alert will obediently pop up
reminding the user to save their work and start the incremental backup
process. At this time, the user can also enter a short note describing
the backup eg. ‘Just completed thesis abstract’. In this way, with
minimal effort, the user has a rolling series of versions of their
valuable documents backed up. Later, if they need to, they can easily
access any previous version of their files.
Notes:
- Kenbushi
is designed to backup your documents, photos, movies, music, etc. - it
is not designed to backup an entire hard drive, clone a hard drive, or
other similar function. Generally, to make each backup plan easily manageable, your should set it up
to backup less than 100,000 files.
Using
the Backup Plan Wizard
The easiest way
to set up a backup plan suitable for most users is to use the Backup
Plan Wizard.
This wizard can be displayed by selecting Backup
Plan Wizard... from the Wizard
menu (see Figure 58 below).
Simply pressing
the Backup Now button will
backup your data onto the local hard disk. The instructions on the Backup Plan Wizard dialog describe
the key information you need to do a basic but effective backup.
If you currently have other users on
the network running Kenbushi, these users should
be
displayed in the Remote User
popup menu on the Backup Plan Wizard
dialog. If you wish to backup to a
remote user, simply check the Backup
To 'Remote User' checkbox and select a remote user to
backup to, and the backup data will be stored on the remote computer as
well (this is safer than just backing up to your local hard disk).
This remote user may be your home media/backup server, or another
computer in your home which is connected via LAN or wireless networking.
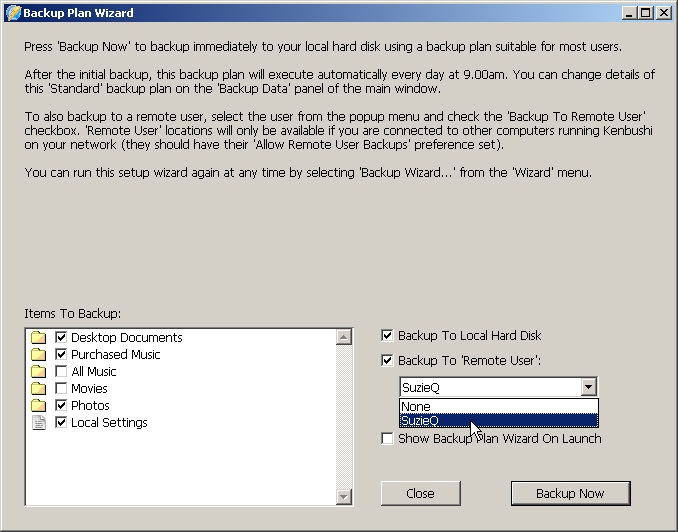 Figure 58.
 The
Backup Plan Wizard dialog
Desktop Documents includes all
documents on your desktop itself, as well as files within any folders
on
the desktop. Many users typically create folders on the desktop, named
after the person the folder belongs to. They then use this folder to
store their PDFs, Word documents, spreadsheets, Powerpoint
presentations, etc. Thus, this Desktop
Documents item will backup all
these folders correctly by default, which is what most users want.
Note: The 'Backups' and
'Shared' folders created and used by Kenbushi (and usually
located on the desktop) are never included in backups.
The Local Settings item on
Windows will include application settings and data from Outlook Express
(eg. mailboxes, etc) and various other installed applications. It's
very prudent to backup this information as well.
After you have used the Backup Plan
Wizard, you will find a backup plan called 'Standard' in the
backup plan listbox on the Backup Data
panel of the main window. You can edit this backup plan by
double-clicking it. Additional files and folders can then be added to
the backup plan, as well as additional remote destinations. You may
also like to change the backup schedule for a destination.
Deciding what files and folders to
backup
The key to
appreciating what files and folders to backup up is to
consider how you would feel if you lost the data forever. Please take a
moment to think about this...
There is also an important distinction between public and private
files. Public files are those which were produced by someone else and
which are quite widely available and accessible, such as software
installers (eg. Microsoft Office, Half-Life 2, Mozilla, etc).
Generally, the only reason to backup public files is to ensure
convenient access. Private files are those which are unique to yourself
or your organization, usually because you produced them. Thus, they are
totally unique and have intrinsic value to you.
For most users, there are three levels of private file value:
critical files, important files, and files which are vaguely needed but
you're not really sure why (eg. last years essay on Aristotle's
'Nicomachean Ethics'). You should use the most robust backup strategy
for critical files, and the least robust backup strategy for vaguely
needed files.
Robustness is an ability to recover gracefully from a whole range of
exceptional adverse situations. This may simply be your computer's hard
disk failing - a common problem when hard disks reach 3+ years in
service. Other examples of adverse situations include your home being
flooded, a power spike burning out your computer, your computer being
stolen (particularly common for laptops), a virus corrupting your
operating system and/or data files, a trojan horse being
surrupticiously installed on your computer and subsequently encrypting
your Word documents so a remote hacker can demand a ransom to recover
them (this occurred recently), your teenage daughter deleting files to
make more room for downloaded music, the local computer repair shop
accidently clearing your hard drive when you bring your computer in for
servicing, a hurricane, etc, etc.
Robustness can be increased in several ways:
- make
multiple redundant copies of files, so if the original file is lost,
another copy can be used in its place.
- storing
copies in different geographical locations, so a localized
exceptional adverse situation, such as your house burning down, doesn't
destroy all copies.
- use a
scheme to ensure the integrity of each backup copy - copies should be
exact duplicates of the original, and if one is corrupted, we should be
able to detect this and use a different copy.
For critical
files, consider storing AT LEAST two additional copies of each file. In
this way, when you lose the original file, even if one backup copy is
corrupted or inaccessible, you still have one good copy. For important
files, you need AT LEAST one additional copy of each file. For vaguely
needed files, you should aim for one additional copy. With Kenbushi, you can store
additional redundant copies of critical and
important files by simply using multiple destinations with each backup
plan.
Kenbushi can backup files to
the local hard disk, as well as to multiple remote
destinations via the inbuilt file transfer
system, whether the computers in your workgroup are on your LAN or
connected over the Internet. This allows you to backup all your
Windows PCs, Macs and Linux computers to your home
server, for example, or even a computer on the other side of the world.
Thus, it is now very easy to set up a multiple redundant backup system
for
your valuable files.
Choosing an appropriate schedule
The key to selecting a good backup schedule is to consider how you
would feel if you had to revert to your last backup...
It's great having a backup strategy, but if you did the last backup a
week ago and you lose your original file (for example, your thesis),
the file you revert to will be a week old! You could have done a lot of
work on the document in that week, which you have now lost.
For important files, such as purchased iTunes music, a daily or weekly
backup is sufficient. For critical files which are modified often (ie.
an important document you are actively working on), an hourly backup
may be required. For vaguely needed files, a weekly or monthly backup
may be sufficient.
Kenbushi implements a
powerful incremental
backup
system,
so only files modified since the last backup are copied. In other
words, if that Alanis Morissette music you purchased from iTunes has
already been backed up, it won't be copied again into the backup store
- only new music will be backed up. This clever scheme minimizes the
amount of storage needed for your backup data and reduces the time
needed to perform a backup.
Setting up a backup
plan
There are
a
number of available backup plan templates which make it easy to create
backup plans to suit your needs. They include templates to
backup music, photos and home folders (the default location where users
store their documents) on most platforms.
To use a template, simply
select it from the Backup Plan
Templates popup menu on the Backup
Data tab panel and press the Add
Backup Plan button (the large green cross). The Backup Plan dialog will be displayed
(shown in Figure 59 below),
allowing you select an appropriate schedule for the backup. When you
are finished editing the backup plan schedule, press the Save button to save the plan.
Each backup plan includes a list of files and folders to backup, the
backup destinations (eg. the 'local backup destination folder' selected
on the Backup Data panel, or a
remote user connected via your LAN or the Internet) and
it's backup schedule.
The Name of the backup plan is
shown at the top. The Files/Folders
to Backup
shows the list of files and folders which will be included in the
backup when this backup plan is executed. Items can be added to this
list by dragging and dropping them onto the listbox from the desktop,
or by selecting
them using the Add File and Add Folder buttons below the
listbox. Items can be removed using the Remove Item button.
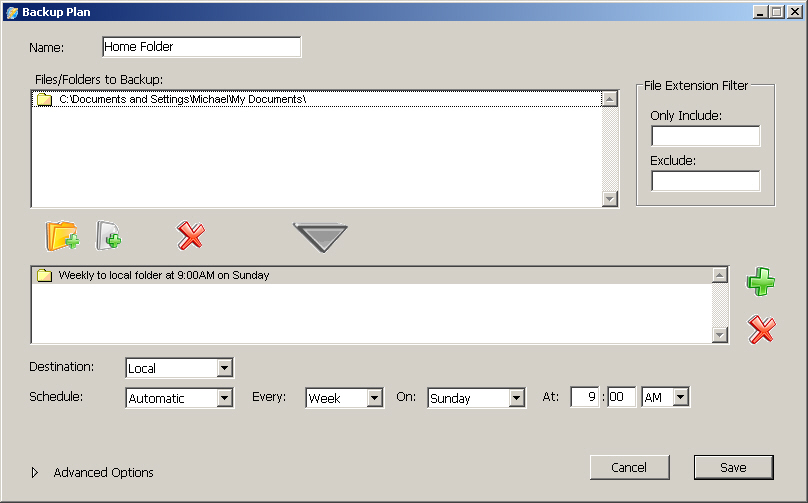 Figure 59.
 The
Backup Plan Dialog
Backup destinations
and schedules
Backup
destinations (each with their own custom schedule) can be added to a
backup plan using
the Add Destination button
(see Figure 28 above),
and removed using the Remove
Destination button, located on the right side of the Backup Destinations listbox. You can
set a backup destination to be 'Local' (eg. the 'local
backup destination folder' selected
on the Backup Data panel) or
'Remote'. Remote users who have connected to your computer (and are
thus shown in the Connect To
popup menu) will be available as 'Remote' destinations for your backup
files (Figure 39 below
which shows an example Computer Name
popup menu with a list of remote users).
Note: Only remote users who
have checked the Allow Remote User
Backups checkbox on their Preferences
panel will actually accept backup files from your computer, so you need
to ensure the remote computer has this checkbox set. If it is not set,
an error will be logged into the activity list when a backup it
attempted to that user.
Destinations each have a custom schedule, which can be set to Automatic, Alert Only or Manual. An automatic schedule will
execute even if you aren't at the computer at the time the backup is
scheduled. An 'Alert Only' schedule will display an alert and wait for
you to press the Ignore or Backup button on the alert before
starting the backup (see Figure 40
below), and the manual mode is triggered only when you highlight a
backup plan on the Backup Plan
listbox and press the Execute Backup
button on the Backup Data
panel
on the main window.
For each
backup plan, any
combination of hourly, daily, weekly and monthly schedules is allowed.
For example, you could back up at two particular times daily, or backup
weekly each Tuesday at 5.00pm and each Thursday at 9.00am. If two
backup
schedules
trigger at the same time (eg. a weekly backup on Thursday at 9.00am,
and a daily backup at 9.00am which occurs on a Thursday), then only one
backup will be executed.
Note: If 'Alert Only' backup
plans
are triggered at the same time as
automatic backup plans, the automatic backup plans will execute first.
If the
schedules of two or more different backup plans trigger at the same
time, they will each be listed on the Backup
Alert (see Figure 60
below). You can skip executing any backup plan on the list by
unchecking the
checkbox associated with the plan before it starts executing. Automatic
backups give you a 120 second (2 minute) countdown before executing,
during which time you can ignore them by pressing the Ignore button, make them wait by
pressing the Wait button, or
start them
executing immediately by pressing the Backup
button.
Note: New local or remote
backup destinations can be added to a backup plan at any time.
Subsequently, the next time that backup plan is executed, all the
backup files will be copied to the new destination and it will become
up-to-date in terms of the backup files stored there.
If you
click any of the backup plans in the list during an automatic
backup countdown, the backup will wait
(ie. it's as if you pressed the Wait
button), and you can then enter a
note to go with that backup. This note will be included in the backup
log, so
you can read it if you ever need to restore a file. For example, if you
are working on a thesis and you had just completed the abstract when
the backup alert was displayed, you could enter 'Just completed thesis
abstract' in the Backup Note
textbox. This note provides valuable guidance about the contents of a
backed up document, giving you information helpful in deciding which
version to restore. After you have entered any notes you like for each
backup plan, press the Backup
button to start the backup.
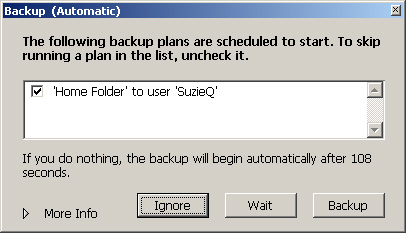 Figure 60.
 An 'Automatic'
Backup Alert
If a backup plan is set to backup automatically to a remote user, and
that remote user is not currently connected, then the backup will be
ignored unless you have the Queue
Automatic Backups When Offline checkbox set (this checkbox is
located on the Backup Data
panel on the main window). In this case, as soon as the remote user
is detected on the network, the automatic backup plan will execute.
This advanced function makes it very easy to automatically backup your
laptop to a home server when you get home
from your office or school.
Any backup plan (whether it is automatic, 'Alert Only' or manual) can
be triggered manually by highlighting the
backup plan on the Backup Plan
listbox on the main window's
Backup Data panel and pressing
the Execute Backup button.
If any backup plans trigger whilst another backup plan is currently
executing, they will be queued until it is finished or stopped. If any
files are being transferred when a backup plan triggers, the backup
plan will be queued until the transfer is completed or stopped.
After you have set up a backup plan, you will see it listed on the Backup Data panel on the main window
(shown in Figure 61 below).
The name of the backup plan is highlighted in bold at the top, and an
icon indicates whether each backup destination listed below the name is
a remote user or the 'local backup destination folder'. A short
description of the backup schedule is also shown, in addition to
whether the backup data is encrypted on remote destinations.
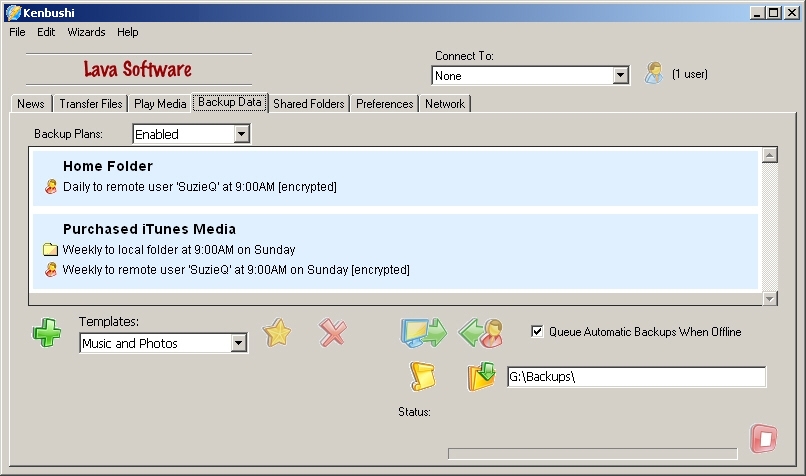 Figure 61.
 The
Backup Data panel
To edit a
backup plan in the Backup Plan Listbox,
double-click it or select it and press the Edit Backup Plan button (the star).
To remove a backup plan and all its stored backup data, press the Remove Backup Plan button (the red
cross).
Automatically
backing up your laptop to a home server when you get home
Many working people and students now bring their work with them
everywhere on their laptop computers. They leave home in the morning
with their laptops, do work during the day and then return home with
their laptops. Wouldn't it be great if you could get home, open your
laptop and have it automatically backup to your home server, or any
other desktop computer located at home? Kenbushi lets you
easily set up such a scheme, thereby ensuring your valuable work and
school documents are protected on a daily basis.
To implement this scheme, simply set up a backup plan on your laptop
containing the files and folders you wish to backup every day. Then set
an automatic schedule which triggers a few hours before you return
home, and which specifies your home server as the remote backup
destination (the server may be connected via wireless network to your
laptop for even greater convenience). Also, make sure you have the Queue Automatic Backups When Offline
checkbox set (this checkbox is
located on the Backup Data
panel on the main window), and leave the Kenbushi software
running on both your laptop and the home server. That's it!
Now, when you return home with your laptop, as soon as Kenbushi
detects the home server, it will start executing the backup plan. You
will thus have a fully automatic daily backup scheme for your laptop
with almost no effort!
Of course, you might also like to remotely
control movie or music playback on your home media server with your
laptop, whilst you have the laptop open... to help you relax after a
hard day at work.
Note: If you switch off your
laptop when you travel, make sure you check the Launch on Startup/Login checkbox on
the Preferences panel. In this
way, when you start up your laptop when you get home, Kenbushi will start
automatically and then do the automatic backup to
your home server.
Alternatively,
your company IT administrator might like you to automatically back up
your laptop when
you get to work every morning, thus storing those important document
updates you worked on overnight. An additional automatic backup at 5pm
every day would also back up all the files you updated during the day,
giving you even greater protection.
If backup data from multiple users is stored on the same backup server,
that backup data itself can be archived onto tape or other
high-capacity media, if required, to provide an additional level of
file protection.
'Alert Only' backups
This is a
special type of backup scheme midway between fully automatic backups
and manual backups, which is a unique and powerful feature of Kenbushi. This scheme
provides a profoundly effective way
of systematically backing up a valuable document or set of documents
you are currently working on, so that the progress of your work is
protected. For example, with an hourly 'Alert Only' backup schedule,
you can only ever lose an hour of work if something goes wrong with
your document file.
However, in addition to providing the peace of mind of having a rolling
backup of your work, you can also easily access any previous version of
your work. Sometimes during document editing, paragraphs, sections or
other parts of a document are edited out or changed. With the 'Alert
Only' backup scheme, you can easily recover any of these deleted
sections of work, or move back completely to a previous version.
When the 'Alert Only' backup alert is displayed when a backup plan
schedule triggers (see Figure 62
below), you can enter a
note to go with that backup. This note will be included in the backup
log, so
you can read it if you ever need to restore a file. For example, if you
are working on a thesis and you had just completed the abstract when
the backup alert was displayed, you could enter 'Just completed thesis
abstract' in the Backup Note
textbox. This note provides valuable guidance about the contents of a
backed up document, giving you information helpful in deciding which
version to restore. After you have
entered any notes you like for each backup plan, press the Backup button to start the backup.
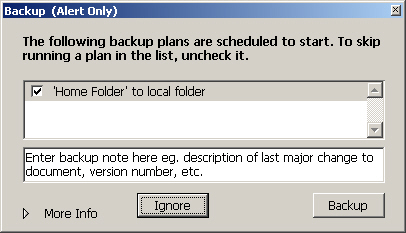 Figure 62.
 An 'Alert Only'
Backup Alert
Of course, you can also execute a backup plan immediately by
highlighting the
backup plan on the Backup Plan
listbox on the main window's
Backup Data panel and pressing
the Execute Backup button. You
might wish to
do this after you have completed a major milestone in your development
of a document, to ensure you have an exact copy of that version of the
document in the backup store.
File extension
filters
For each folder, you can set
a File Extension Filter to Only Include files with a particular
extension, or to Exclude
files with a particular extension. This could be used, for example, to
only include purchased iTunes music (which has a '.m4p' extension) in
the backed up files even though the iTunes Music folder contains MP3
music as well. Just enter the file extensions in the appropriate
textbox on the Backup Plan Dialog
eg. 'm4p m4v'.
Advanced backup plan
controls
Some additional controls are available for advanced users, including
the ability to send notification emails when a backup is performed,
encryption of remote backup data, and running pre-backup and
post-backup
scripts or batch files. The additional controls are shown at the bottom
of the backup dialog by clicking the Advanced
Options disclosure triangle. A dialog similar to that shown in Figure 63 will be displayed.
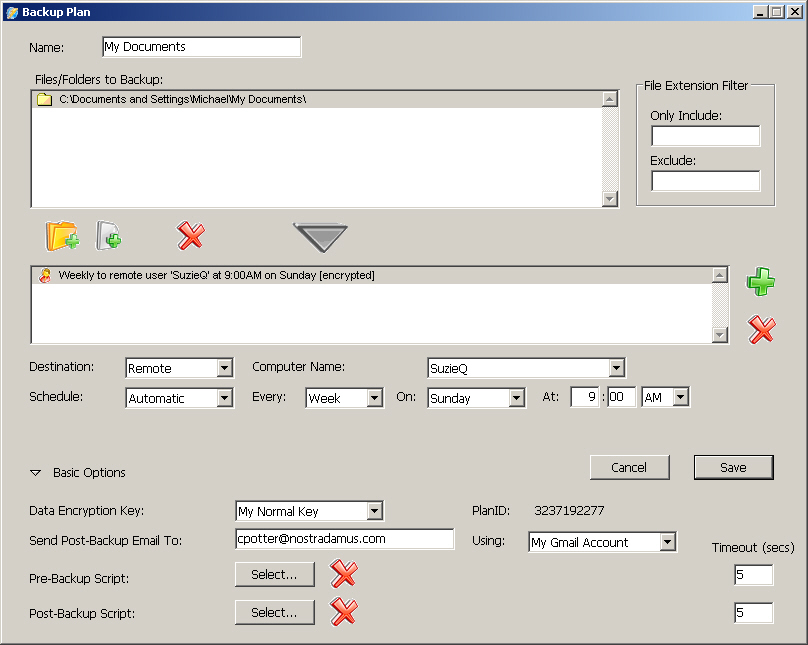 Figure 63.
 Advanced backup plan
controls
Data encryption keys can be set
using the Encryption Keys
controls on the Preferences
panel (see Figure 58 below).
Once an encryption key is created, it can be selected for use on the Backup Plan dialog. All backup data
sent to remote computers during backups using this backup plan will
then be stored in
encrypted form, making it effectively unreadable in any way on the
remote computer. Thus, you can safely backup to any computer on a
LAN or over the Internet and know the data is secure.
You can change the encryption key used for a backup plan at any time,
or choose no encryption, even if you have already backed up files with
it. All files already backed up will retain their encryption
characteristics (since these characteristics are stored with the
backup data itself). All new backup files will use the new key you've
selected Thus, if you have backed up files to a remote computer using
no encryption, you can simply enter and/or select an encryption key to
ensure all future backup data will be encrypted. Of course, it's not a
good idea to continually change encryption keys for a backup plan,
since it could increase the complexity when performing a future restore.
Note: Files up to 2GB in size
can be backed up in encrypted form. If you need to backup files larger
than 2GB, you must switch off encryption for that particular backup
plan.
Backup data stored locally (ie. in
the 'local backup destination folder') is not encrypted, as any
selected
encryption key is used only for remotely backed up data.
Email accounts can be set up using the Email Accounts controls on the Preferences
panel (see Figure 60 below).
Once an email
account is created, it can be selected for use on the Backup Plan dialog. Email accounts
can be used to send notification emails after backup
plans have
finished executing. These notification emails provide information about
the backup plan that was executed, the time of execution, a list of
files backed up, etc. See the example in Listing 1 below.
In this example, a GMail email account was used for sending the
notification email. The backup plan was called 'News Backup', and the
backup data was sent to remote user 'SopranoXP' from a computer named
'SuzieQ' at 10.31am (the email itself shows detailed timestamp
information). In addition, the user 'SopranoXP' is running on a Windows
(Win32) computer at IP address 192.168.2.10 with a Kenbushi
runtime key serial number of 3226587218 (thus, you can verify the
identity of the remote user
by their computer type, IP address and unique runtime key). The data
was
encrypted using the 'Normal' encryption key. The list of files and
their modification dates are then shown, as well as the time of
completion of the backup.
Envelope-to:
service@lavasoftware.com
Subject:
Backup 'News Backup' to user 'SopranoXP' on 'SuzieQ' at 10:31am
From:
suzieq@gmail.com
To:
service@lavasoftware.com
Real Name:
Suzie Quigley
Content-type:
text/plain;
Content-transfer-encoding:
7bit
Date: Fri, 14
Jul 2006 18:01:22 -0700 (PDT)
Message-ID:
<44b83e62.291a9031.4a4a.ffff8336@mx.gmail.com>
Backup 'News
Backup' started at 10:30:58am 15Jul2006
Destination
is user 'SopranoXP' (192.168.2.10, Win32, 3226587218)
Backup data
encrypted with 'Normal' encryption key
Copied new
file: (8:53am 7Jun2006) Firefly:Documents:News:Apple pushing Intel in
new directions.pdf
Copied new
file: (7:30am 23Jun2006) Firefly:Documents:News:How to burn ISO disc
images.pdf
Copied new
file: (6:22pm 21Jun2006) Firefly:Documents:News:iMac G5 - Technical
Specifications M9249X/A.pdf
Copied new
file: (9:19am 15Jul2006) Firefly:Documents:News:Symantec Says No
Viruses Exist for Apple OS X.pdf
Copied new
file: (8:47am 8Jun2006) Firefly:Documents:News:Video goggles turn iPod
into TV.pdf
Backup
finished at 10:31:01am 15Jul2006
Listing 1. An example backup
notification email
The pre-backup script is executed before the data backup itself is
started, so you can perform any necessary special operations to prepare
files used for the backup. The Timeout
(secs) value can be used to cap how long Kenbushi
will wait until the script is aborted (this ensures a script never
stops the backup process completely).
The
post-backup
script is executed after the data backup is finished, so you can
perform any necessary special operations to post-process files used for
the
backup. The Timeout (secs)
value can be used to cap how long Kenbushi will wait until
the script is aborted (this ensures a script never stops the backup
process completely).
To delete a script, press the appropriate Remove Script button.
The PlanID is the
identification number of the backup plan, and is used (amongst other
things) to specify where the backup data is stored on remote computers.
The main enclosing folder on the remote computer for the backup data is
named using the runtime key serial number of the
user doing the backup, and folders for the various plans (by PlanID) are contained within it. For
example, if the 'local backup destination folder' on a remote computer
is set to 'G:\Backups', the user doing the backup has a serial number
of '3222545456' and the PlanID
is '3228575872', the data for this plan will be stored at:
'G:\Backups\3222545456\3228575872'.
Setting up
encryption keys
Encrypting a file with an encryption key makes it an unreadable mash of
numbers, thus providing file data security. These encrypted files can
be safely stored on a remote computer, and can be later decrypted and
converted back to their normal readable form by using the same
encryption key originally used for encryption. Encryption keys thus
control the encryption and decryption process, which is performed only
on the computer backing up and restoring files.
To create an encryption key, press the Add
Encryption Key button on the Preferences
panel. The Encryption Key dialog
shown in Figure 64 will be
displayed. This
dialog allows you to set up encryption keys using a simple
'Clues2Key'(TM) system, or by using standard 'Literal Keys' represented
by a long number in hexadecimal format.
The innovative Clues2Key(TM) system allows you to
enter a series of clues made up of matching questions and answers, with
the
encryption
key generated automatically from the answers. The more clues you
add, the longer the encryption key becomes and the stronger the
security of the encryption process. You
should aim for encryption key lengths between 128 and 256 bits, though
shorter key lengths will work well too (keys shorter than 128 bits are
automatically padded out to 128 bits).
You should use clues which have very exact, explicit
answers, which will never change. For example, 'What was my puppy's
name
when I was 6?' is a good clue, because it is something you will
probably
never forget and which very few people would know. An example of a poor
clue is, 'Who is my best friend?'. The answer may change over time,
thus affecting successful recovery (ie. you may enter what you think is
the correct answer, but it may not be what you originally entered).
In the Clues2Key(TM) system, the encryption
key is generated from the answers, using only the alphabetic characters
(a-z) in the answers - uppercase
characters are converted to lowercase, numbers and punctation marks are
excluded, etc. This system
minimizes possible user entry errors when key recovery is necessary.
Most people can remember words very well, but fine details such as
punctuation marks or numeric values in answers are often forgotten over
time. For example, an answer to a question like, "What was my address
in 1986?" may be like "2/549 Smythe Street" - you may have forgotten
the apartment number or street number, but clearly recall the street
name, and so the encryption key will be recoverable.
Encryption
key
recovery is one of the major benefits of the Clues2Key(TM) system,
since the encryption key
is derived from your answers, which are
stored in your memory. Your questions and answers are also stored by Kenbushi on the computer
whose data is being backed up, to
make backup and restore simple and streamlined. However, only the
questions are stored with the backup data on the remote computer, so if
you ever lose the encryption key, it's still possible to recover your
data.
Losing the encryption key for backed up files might seem
like an unimportant issue when you perform the actual backup, but
backup data often
needs to be recoverable for months or years afterwards. It also needs
to be secure during that period, hence the need to encrypt it in the
first place. Over those months or years, you may have bought a new
computer, changed computer platforms, changed offices, or done a
thousand other things which could result in loss of the original
encryption key information. With the Clues2Key(TM) system, your
encryption key is effectively securely stored with your backup data, so
it simply cannot be lost. This is a profound benefit in using the
Clues2Key(TM) system.
In contrast, 'Literal Keys' are represented by a
long, confusing
number in hexadecimal format. If you ever lose the literal key, your
backup data is no longer recoverable. In other words, the encrypted
backup files may
still exist, but you can never convert them back to its normal readable
form, rendering them useless. The best way to store literal keys, if
you wish to use them, is to use a password manager product, such as PC-Mac
PasswordVault. This product can also generate long random
hexadecimal passwords, which is a very useful function for this purpose.
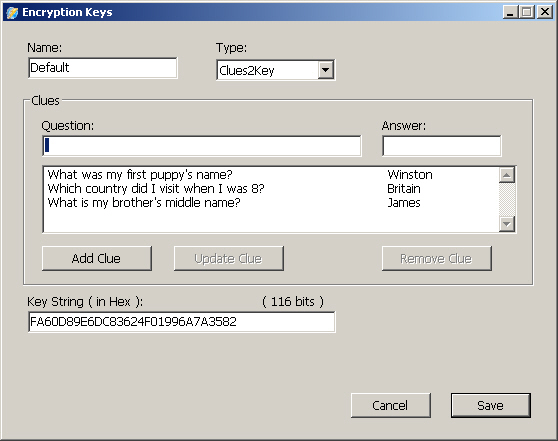 Figure 64.
 The
Encryption Key dialog showing the
Clues2Key(TM) system
To enter a new clue, enter it in the Question
and Answer textboxes and press
the Add Clue button. The clue
will then be added to the bottom of the list. If you wish to edit a
clue, select it in the Clues
listbox and it will be placed in the Question
and Answer textboxes. Edit the
question
and answer and then press the Update
Clue button to update the clue in the listbox. To remove a clue,
select it in the Clues listbox
and press the
Remove
Clue button.
Standard
'Literal Keys' are represented
by a long number in hexadecimal format. Keys of this type can be
entered manually, or pasted in from any password manager with a random
hexadecimal password generator
function, such as PC-Mac
PasswordVault. An example showing entry of a literal key in the Encryption Key dialog is shown below
in Figure 65.
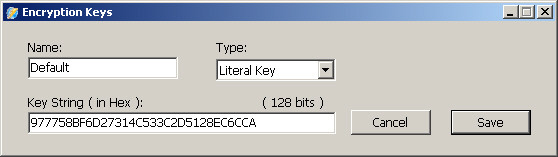 Figure 65.
 The
Encryption Key dialog show a literal
hexadecimal key
Setting
up email accounts
Email accounts can be used to send notification emails after backup
plans have
finished executing.
To create an email account, press the Add
Email Account button on the Preferences
panel. The Email Account dialog
shown in Figure 66 will be
displayed.
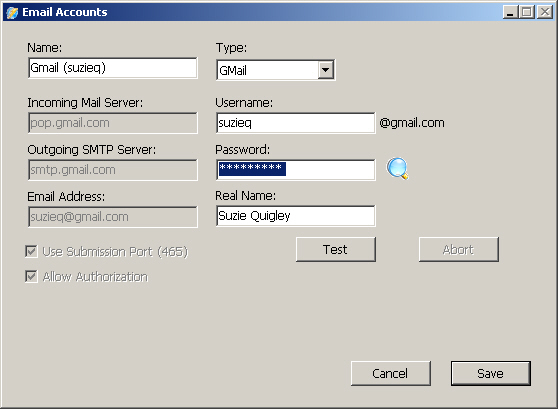 Figure 66.
 The
Email Account dialog
There are a number of templates available to simplify the setting up of
email
accounts for users of GMail, Yahoo Mail and .Mac. The 'Custom' type
gives you full freedom to set all characteristics of an email account.
Once you have entered your account information, you should send a test
email using this account by pressing the Test button. This will ensure that
email sending works before you use the account for sending real backup
email
notifications. If all goes well, you will receive an email similar to
that shown below in Listing 2
at the default email address for the account (ie. the email's 'From'
address). You should check that this email arrives in your email
account
inbox before proceeding to use the email account for any backup plans.
From: suzieq@gmail.com <suzieq@gmail.com>
Mailed-By: gmail.com
To: suzieq@gmail.com
Date: Jul 15,
2006 10:54 AM
Subject:
Kenbushi Test Email (10:53am)
This
is a test email sent to the 'GMail (suzieq)' email account
by user 'SuzieQ'.
Settings used:
Type: GMail
Incoming Mail
Server: pop.gmail.com
Outgoing SMTP
Server: smtp.gmail.com
Email
Address: suzieq@gmail.com
Username: suzieq
Password:
************
Real Name: Suzie Quigley
Use
Submission Port (465) = On
Allow
Authorization = On
The test email lists the settings used to send the email, so you
can refer back to them at any later time.
Enabling, disabling and suspending
backup plan execution
You can control the execution of backup plans using the Backup Plan Control popup menu at
the top left of the Backup Data
tab panel (see Figure 67 below).
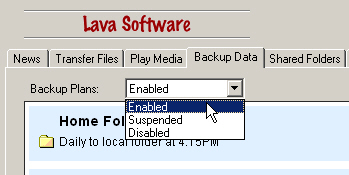 Figure 67.
 Backup plan
execution
control
Normally, this will be set to 'Enabled' so that automatic backups can
be performed. If you wish to disable backup plan execution, select
'Disabled' from this menu. If a backup plan trigger occurs when backup
execution is disabled, only a status message will be displayed. This
message helps ensure you are informed that execution of backup plans
has been disabled.
However, backup plan execution can also be 'Suspended'. This is a good
choice if you are doing something on your computer which should not be
disturbed by a backup, such as watching a full screen movie. Any backup
triggers which occur whilst execution is suspended are simply queued
and will immediately start when control is again set to 'Enabled'.
Thus, your data backup should not be affected, only delayed.
Checking backups and
restores via the
activity list
The activity
list shows all backups and restores which have been performed (and the
results of those activities), and provides easy access to all backup
and restore logs. For example, if you wish to get a list of files which
were copied during the last backup executed, simply display the Activity List dialog by pressing the
Activity List button on the Backup Data panel (shown in Figure 63 above) and then
double-click the entry at the bottom of the list. An example Activity List dialog is shown below
in Figure 68, with backups
colored
green and
restores colored purple.
A Log Icon in the first column
indicates that a backup or restore log is available for viewing. To
view a log, double-click the entry in the activity listbox, or
highlight the item and press the Show
Log button. If there is a red-colored oval in the first column,
an error occurred during the backup or restore operation. Any logs with
errors will include the error in the correct location at which it
occurred in the log relative to other file transfers, as well as
reproducing it again at the end of the log. Thus, to see any errors
immediately, scroll down to the end of the log.
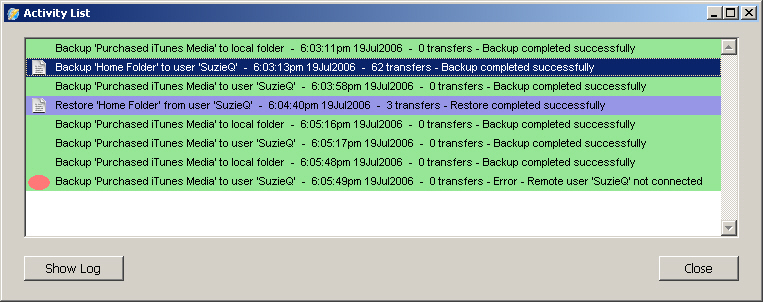 Figure 68.
 The
Activity List dialog
The example Activity List
dialog above shows a number of successful backups (marked in green) as
well as a successful restore (marked in purple). A Log Icon is shown in the first
column for
backups and restores which actually transferred files, and these can be
opened using the Show Log
button. A
manual backup was also attempted to a remote user named 'SuzieQ', but
this failed because 'SuzieQ' was not connected via the network at the
time
of the backup.
Restoring files from a backup
Kenbushi has a unique and
powerful data restore system
which makes it very easy to find and select files to restore. It uses a
file explorer interface which most computer users are familiar with, in
addition to a simple way to select the date on which the files of
interest were current. To display the Restore
Dialog (shown in Figure 69
below), select the backup
plan containing the data you wish to restore and press the Restore Button on the Backup Data tab panel.
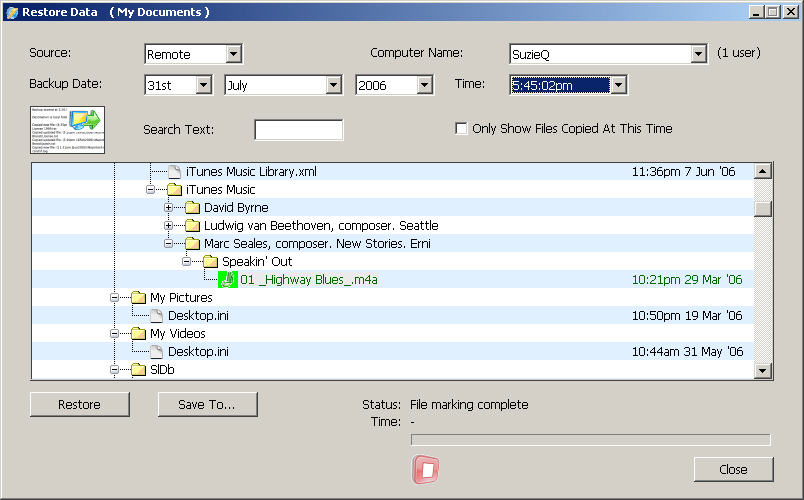 Figure 69.
 The
Restore dialog
On the Restore dialog, there
are a number of simple controls which will help you locate the files
you want to restore.
The Source allows you to
select where the backup files should be restored from: backup files may
be stored locally and/or on one or more remote computers, depending on
how the backup plan is set up. To restore from the local backup store,
select Local as the source. To
restore from a remote computer, first make sure it is connected (and
thus listed in the Connect To
popup menu) - otherwise it won't be available as a source. Then select Remote as the source and the remote Computer Name you wish to restore
from. If a remote computer has no backup files for the backup plan
selected, no files will be displayed in the file list.
Note: When choosing a restore
source, keep in mind that the incremental backup process is controlled
individually for each destination. For example, if a remote destination
could not be reached during the last automatic weekly backup, then the
backup store at that destination would not include any newer files.
Those newer files may have been successfully stored locally, however.
When you subsequently try to restore files, that remote destination
would be a poor choice as a restore source unless you could do nothing
else. Of course, Kenbushi tries very hard to
keep all
destinations up-to-date and synchronized, and if a remote destination
comes online after an absence, it will be detected, and data will be
backed up to it immediately.
The Backup Date is the date on
which the
files you are interested in were current. For example, if you wish to
get last Tuesday's version of a document you are working on, you simply
select last Tuesday's date using the Backup
Date popup menus. The files displayed in the file explorer
interface were current at that date. If there was a specific time on
that date the backup was performed, the Backup Time popup menu will show all
the
times of backups. Select the time of the backup you are interested in.
If no backups were performed on the selected date, the Backup Time popup menu will not be
visible.
You could try selecting an earlier date to find the closest actual
backup date.
If there are a lot of files displayed, you can search for specific
files or folders by entering text into the Search Text textbox. For example, if
there is a folder called 'Assignments', you could enter 'Assignments'
in this textbox and only that folder (and any files with the text
'Assignments'
somewhere in their name) will be displayed. This makes it very easy to
pinpoint the files you want. The search is triggered automatically
a second after you finish entering the search text.
You can further reduce the number of files displayed by checking the Only Show Files Copied At This Time
checkbox. This will show only the files which were actually backed up
at the selected time. All other files would have been backed up
earlier, so won't be displayed in this case.
Now click files and folders on the file explorer interface you wish to
restore. They will be highlighted in green when they are selected for a
restore, and displayed in black when they are deselected. If you select
a folder, all files and subfolders in that folder will be included in
the restore selection. You can deselect individual files and subfolders
inside the folder, if you wish. To deselect a folder and all its
contents, click it again.
Important Note: When performing
a
restore, it's best to quit all applications to ensure files being
restored are not in use. If they are in use,
it is very likely they will not be restored correctly.
When you
have finalized the selection of files you wish to restore,
press the Restore button to
have them restored to their original locations, overwriting any files
already at these locations. This type of restore is often used for
restoring application data, such as web browser bookmarks and email
data. Please be careful with this type of
restore, as it will write over existing files on your hard disk!!!!
A safer way to restore files
(especially your own documents) is to press the Save To...
button. You can then select a location on your hard disk to which the
restored files will be copied. You can then examine the files at your
leisure
and drag files around the desktop, replacing the originals if you wish.
If the encryption key used to encrypt remote backup data is not already
amongst the encryption keys stored in Kenbushi, the Restore Dialog will expand and show
the questions of the Clues2Key(TM) clues (shown in Figure 70 below) linked to the file
being restored. These questions
are stored with the encrypted backup data, and provide a way to
securely recover the encryption key. Enter the answers to each question
in it's listbox answer cell and then press the Submit button to continue. If you
can't enter the correct answers, you can skip all files which use these
Clues2Key(TM)
clues by pressing the Skip
button, or cancel the restore by pressing the Stop button.
When you enter the answers correctly, a new key (called 'Restore Key')
will be added to your list of encryption keys. This will be used to
decrypt any other restored files which used the same encryption key
when they were backed up. It's quite OK to have multiple and different
encryption keys (or no encryption) for different backed up files, since
each backed up file knows it's own encryption characteristics. Kenbushi will handle these
restore file differences
transparently for you.
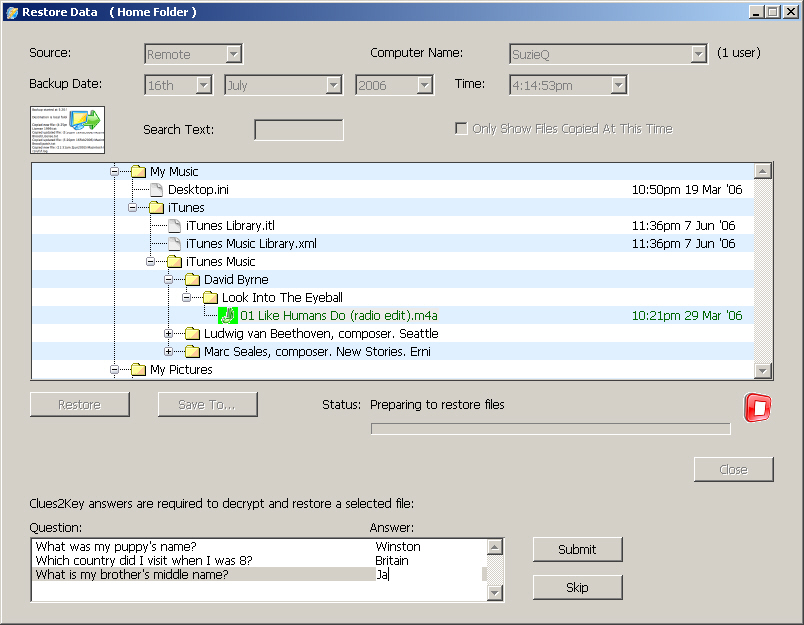 Figure 70.
 The
Restore Dialog with the
Clues2Key(TM) questions displayed (and partially entered answers)
The information shown on the Restore
Dialog can be changed by pressing the Information Mode button on the top
left (the large picture button). Pressing it once when the file
explorer interface is displayed
will change it to display the Backup
Log
associated with the selected backup date and time (see Figure 71 below). If no log exists
for this particular backup date and time, the log text area will be
blank.
The backup log shows the name of the backup plan, the execution start
time, the location where the files were backed up, a list of all files
which were copied and their file modification dates, and the execution
finish time. If there were any problems with the backup, these are also
shown on the log.
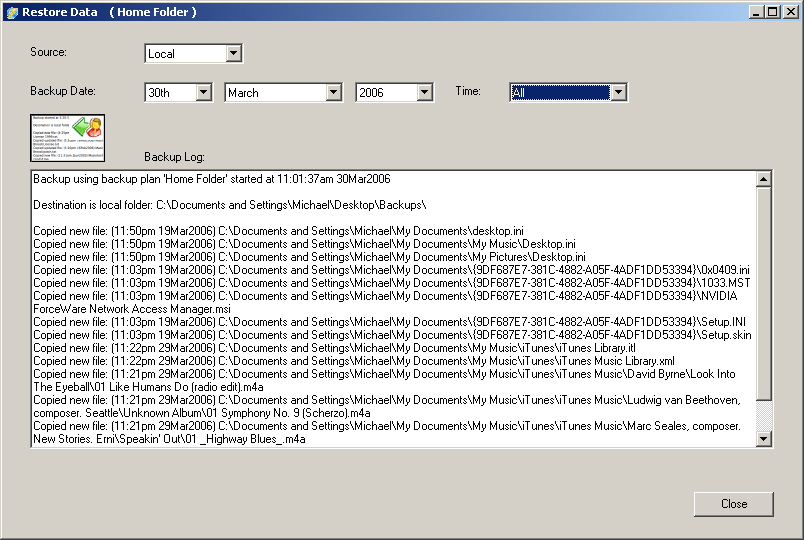 Figure 71.
 A sample
Backup Log
Pressing
the Information Mode button
again will display
the Restore Log
associated with the selected restore date and time (see Figure 72 below). If you restored
files on this date, there will be restore times shown on the popup
menu, and you will be able to
select a specific restore time.
If no
restores were performed on the selected date, the Time popup menu will not be visible.
You could try
selecting an earlier date to find the closest actual restore date.
The
restore log
shows the name of the backup plan, the execution start time, the
location where the files were restored to (eg. to their original
locations or to a particular Save
To... folder), a list of all files which were
copied and their file modification dates, and the execution finish
time. If there were any problems with the restore (such as an MD5
digital signature error), these are also shown
on the log. Errors are included both in the body of the file listing,
so you can
see where the file was in the restore sequence, as well as at the end
of the log, for convenient viewing (ie. so you won't have to carefully
scan the entire restore log to know if there was a file restore error).
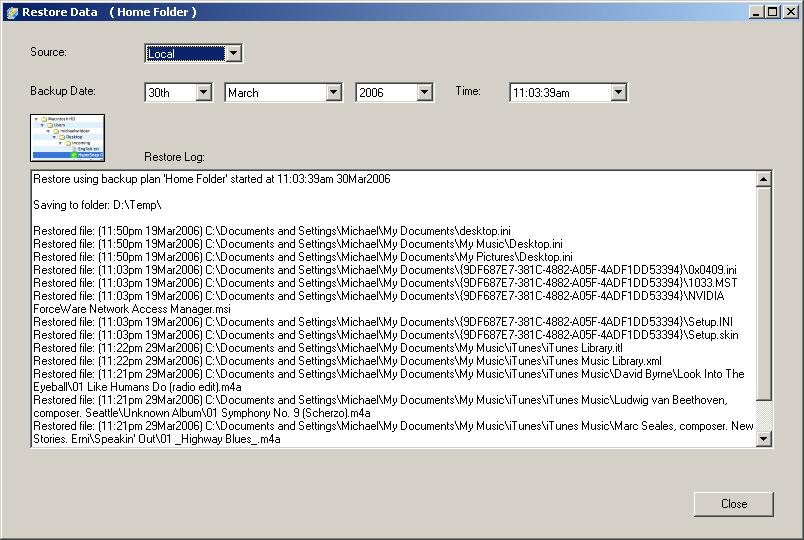 Figure 72.
 A sample
Restore Log
The backup and restore logs provide a full audit trail of file
transfers to keep you informed of what has been done.
Advanced techniques
You can do some clever things by combining the remote folder
synchronization function with automatic scheduled backups.
Backing up files
remotely
Your home computer could be set up to perform an automated backup each
evening at 8.00pm. Before this backup occurs, you could connect to this
computer using Kenbushi from anywhere in the
world and
perform a remote folder synchronization to a folder included in the
backup. Thus, when the home computer does it's backup, it would include
the new files you just uploaded.
Redundant backup of critical and important
files
With Kenbushi, you can easily
store redundant copies of critical and
important files by simply including them on a backup plan with multiple
destinations.
Using both a local destination and at least one
remote destination is a good choice, since then you have immediate
access to your backup data without requiring a network connection, and
you also have one or more additional copies of your files on a remote
computer
(which may even be offsite). If one of the backup
copies is lost (due to a failed hard disk, for example) or becomes
corrupted (as detected by an incorrect MD5 digitial
signature during restore), you can restore a redundant copy
instead.
Macintosh
file types and creators
You can also modify
the Macintosh files
types and creators assigned to a file which is transferred from a
Windows PC by pressing the MacOS file types
button. This will
bring up the MacOS file types dialog shown in Figure 73 below.
Using the dialog, you can add an entry by putting in the extension of a
file on the Windows PC (eg. 'pdf') and then pressing the Add file's
type... button. This will allow you to select an existing file on
your computer with the type and creator you want mapped to this file
extension.
Figure 73. The MacOS File
Types dialog
Localization
into other languages
Kenbushi
can now be easily localized
into any Unicode-based
language eg. German, Japanese, Hebrew, Spanish, Dutch, etc.
The default
language
is English, and the localization process works by enabling you to
easily enter a translation in a target language for all button names,
dymanic help text, tab panel titles, etc. used by Kenbushi.
Once a
language file has been created, it can then be selected for use (via
the Preferences panel)
and also distributed to other users. Language files are
saved in the Languages folder
in the Kenbushi
application folder.
To create a new
language file or edit an existing one, select Edit... from the Language popup menu in the Preferences panel. The dialog
shown in Figure 74 below will
be displayed.
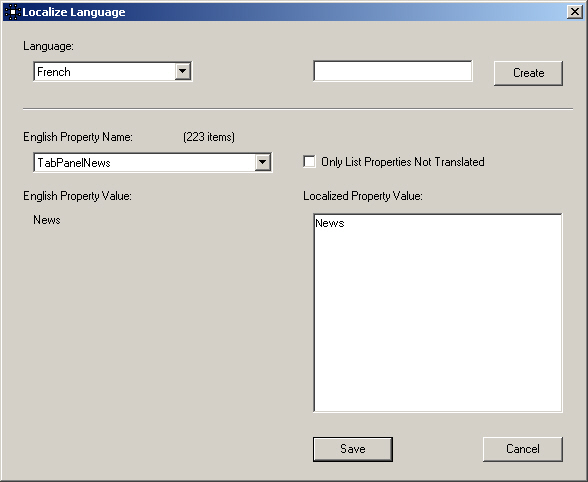
Figure 74. The Localize Language
dialog for the French language
To create a new
language file, enter the name of the language in the top-right textbox
and press
the Create button. If you
wish to edit an existing language file, select it from the Language popup menu. In the example
dialog above, a 'French' language file has been created.
A unique English Property Name is assigned to
each translatable item to identify
it. For example, 'TabPanelNews' is the name used to identify the title
of the News
panel.
On the left side of
the dialog, the English Property Value
is displayed. This value is built into Kenbushi
and cannot
be changed by the user. However, the Localized
Property Value can be changed. This textbox is where the
translated text is entered and/or edited.
The person
translating simply
works through the list of English
Property Names by selecting each in turn from the English Property Name popup menu and
entering the translation. The translation should be made using the same
style of expression, and the same length of text, as the English
property value. This
is because many buttons, etc. have limited room for text and must look
right after the translation process is complete.
To see which
properties have not yet been translated, check the Only List Properties Not Translated
checkbox. All localized properties which are different to their
equivalent English properties will be eliminated from the popup menu.
This helps translators work through all translations efficiently.
Press the Save button to save your entries
and/or edits to the language file.
News
and updates
The News
panel
(shown in Figure 75 below)
displays the latest
news from Lava Software, the edition and version number of the Kenbushi
application, and the runtime key used in the
installation.
If a news update
was released since you last launched Kenbushi
and your
computer is connected to the Internet, the News
panel will be automatically
selected and an alert sound will be played to inform you of the update.
To change the
runtime key of an existing installation, press the Key button and paste in the new
runtime key. This may be necessary, for example, if you accidently
enter
the same runtime key on two computers running Kenbushi
on
your network, or wish to convert an existing installation of Kenbushi
from the 'Standard Edition' to the 'Pro Edition'.
Figure 75. The News panel
Additional notes
If you get a message
saying that a computer is unreachable, try again. Sometimes network
packets get lost (especially in congested networks) and simply trying
again can result in success.
If your Internet
connection is
protected by a firewall and you will be transferring files across the
Internet, you may need to enable the port used by Kenbushi,
so that the software will work correctly on your system. The default
port used is 3300, but you can use another port if you wish. You can
set the base port number on the Preferences
panel
(quit and relaunch for the change to take effect).
If a control is
disabled, the dynamic help text associated with it will be displayed in
red. Normally, it is displayed in black.