Getting Started
Select 'Getting Started...' from the 'Help' menu to display this page
Kenbushi
Media Server
Overview
Kenbushi makes it easy to
convert an existing computer into a powerful dedicated media
server. Most users install Kenbushi on the computer,
place it near a TV and sound system (for easy video and
audio connection), and then use a wireless keyboard and mouse to
remotely control the playback of music and movies.
Of course, you can also use Kenbushi as a desktop media management
system, organizing and playing your media whilst performing other
computer tasks such as word processing or web browsing.
If
you have an older computer, consider purchasing an inexpensive video
card with composite video output and built-in MPEG4 decoding (this will
give you a very high quality picture without overloading the computer
processor). Also, building your media library with movies in MPEG4
format (ie. .mp4 or .m4v movie files) is
highly recommended - they provide the highest quality at the smallest
size, and play beautifully on video cards with built-in MPEG4 decoding.
Your local computer store should be able to provide you with help on
which card to purchase, and video cards of this type are usually
available for around USD30.
Setting
Up
To setup Kenbushi,
you need to:
- Ensure you
have the latest version of Quicktime
installed (ie. v7.2 or higher). Quicktime is used for
playback of music and some movie types.
- Tell Kenbushi which
folders on your computer
contain your movies, music and TV shows - these are called 'Media-Aware'
folders.
- Start the 'Kenbushi
Setup Wizard', so it will scan all media in 'Media-Aware' folders into
the
library and get cover artwork from Amazon.com.
- Optionally activate
and use the full-screen media
control system called KenbushiTV,
which works similarly to 'Apple TV'.
To
make Kenbushi aware that a particular folder on your computer is a
'Media-Aware' folder, add that
folder to the listbox on the Shared
Folders panel on the main
window (see Figure 1 below)
and check it's Media-Aware
checkbox (on the left side of the listbox). Folders can be dragged and
dropped directly from the desktop.
Windows Users: Generally users add the 'My
Music' and 'My Videos' folders to the listbox on the Shared Folders panel (these folders
can be found in your 'My Documents'
folder). This will also include your iTunes music in the media scanned
into the Kenbushi media library.
MacOS X Users: Generally users add your 'Music' and
'Movies' folders to the listbox on the
Shared Folders panel (these folders
can be found in your 'Home' folder). This will also
include your iTunes music in the media scanned into the Kenbushi media
library.
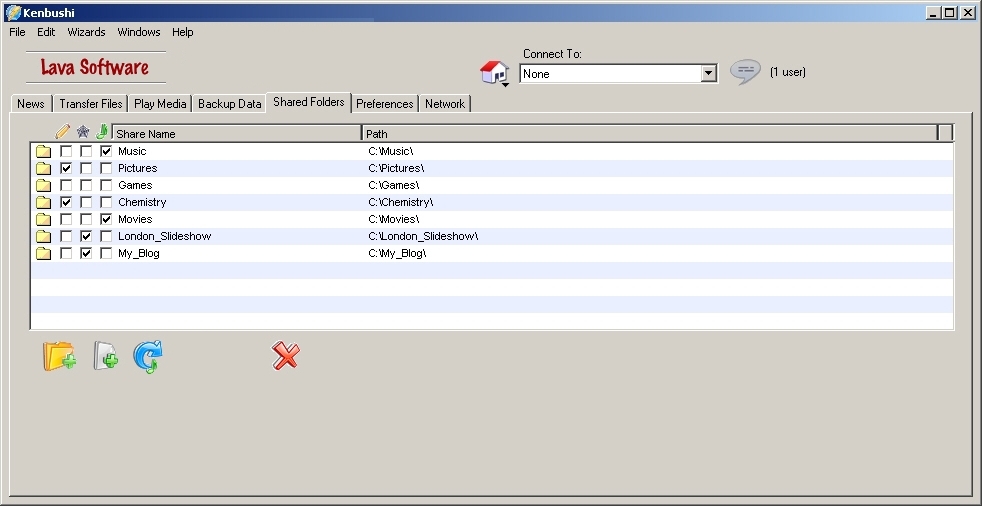
Figure 1. The Shared Folders panel
After
adding all your media
folders, press the Media Folder Scan button (the blue circular arrow)
and Kenbushi will scan
through all 'Media-Aware' folders and extract
various details about each media item, including 'Meta information'
(such as artist, album name, etc.) and technical information (such as
audio sampling rate, codec, etc). It will also set up your albums,
movies, etc. with cover artwork, movie actor lists, etc. The cover
artwork and other information will then be
displayed when
selecting albums or movies for playback, when browsing your media
library, to provide ways to search in your media library for movies by
actor, MPAA rating, etc, etc.
Your Kenbushi media library is now ready for use!! Simply select the Play Media tab to access the media
in your media library.
KenbushiTV
If you wish to go into KenbushiTV mode (a full-screen media control
mode similar to 'Apple
TV'), press 'Shift-Tab' or select 'Full-Screen Media Control' from the
'Windows' menu. When in full-screen media
control mode (see Figure 2 below), pressing
'Shift-Tab' will return you to
the main window on the desktop. When in full-screen media
control mode, help information
describing the function of each keyboard key can be found at the bottom
of the main menu on the Start Page.
Some additional help information is displayed in yellow (in the
screenshot below, the help information says, "Use the arrow keys to
navigate menus...") - the information displayed depends on what is
selected by the colored selection rectangle. Green arrows show when you
can move the selection rectangle left or right using the left and right
arrow keys.
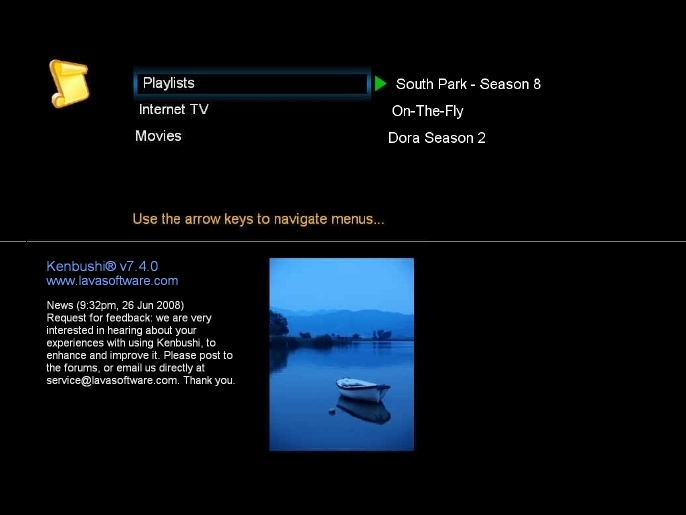 Figure 2. The Start Page on the Media Control Screen
A wireless keyboard
provides a superb way to remotely control media
playback on your Kenbushi media server - it is inexpensive, available
from any computer store, easily replaceable, won't get lost, and offers
a depth and ease of control which simply doesn't exist with hand-held
remote controls. Of course, any wired keyboard is also good, and you
may already have one of these.
The keys used for playback control are clustered together to make it
easy to locate them, even in a darkened viewing room. The arrow keys
form the center of the control key cluster, and are used for navigating
the full-screen media control interface, selecting media for playback,
and playback control. See Figure 3
below.
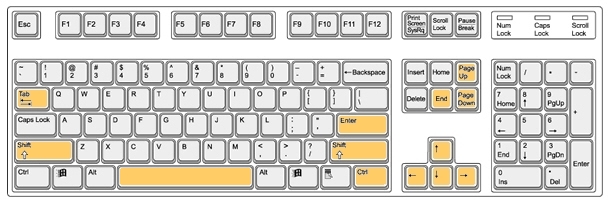 Figure 3. The keyboard keys used
for media control
Figure 3. The keyboard keys used
for media control
The 'Shift' and 'Ctrl' keys need to be held down for some of the
control
operations, but all of the most used functions require only a single
keypress eg. volume up and down, skip backwards or forwards by 10
seconds,
mute, etc. Some controls are only valid when using the VLC media player
to play media, such as changing the picture aspect ratio, and adjusting
audio and video synchronization (some movies suffer
from a lack of synchronization between the audio and
video streams, and setting an audio advance or audio delay can
alleviate this issue).
All the keyboard
combinations available when playing media through the
media control screen are shown below in Table 1. For easy access, you will
find these controls listed in the Help
menu at the bottom of the Home Page
(see Figure 3 above).
| Key |
Function
|
Return
|
Play
selected media item |
| Ctrl-Return,
Esc* |
Stop |
| Spacebar
|
Pause
/ Continue |
Up
arrow
|
Volume
up |
Down
arrow
|
Volume
down |
Left
arrow
|
Back
10 seconds |
Ctrl-Left
arrow
|
Back
1 minute
|
| Right
arrow |
Forward
10 seconds |
Ctrl-Right
arrow
|
Forward
1 minute |
End
|
Toggle
mute |
Page
Down
|
Show
playback position |
Shift-Right
arrow
|
Next
media item |
Shift-Left
arrow
|
Previous
media item |
Ctrl-s
|
Take
screenshot
|
| Shift-Tab |
Toggle full-screen
media control |
Page
up
|
Change
aspect ratio (VLC only) |
Ctrl-Up
arrow
|
Increase
audio delay (VLC only) |
Ctrl-Down
arrow
|
Decrease
audio delay (VLC only) |
Table 1. Full-screen media control
keys
* When
playing media
with VLC on MacOS X, the Stop
function is
activated only with the 'Ctrl-Return' key ('Esc' cannot be set to quit
VLC on MacOS X, due to a problem in VLC). When playing media
with VLC on Windows, the Stop
function is
activated only with the 'Esc' key. When playing media
with
Quicktime,
either key can be used.
Further
Information
Please read Kenbushi Media Center
for further
information about searching for media, setting up playlists, playing
media, full-screen media control, etc.
File
Transfers
Overview
The Kenbushi
application must be running on all computers you wish to
share files between. It only uses Internet Protocol (TCP/IP) for it's
operations, so you don't need other protocols such as NETBEUI,
AppleTalk, etc. to successfully share files.
In addition, you
don't need file sharing enabled on your computer, nor do you use the
Network Neighborhood, My Network Places, the Chooser, or any other
networking functions built into your operating system to use Kenbushi.
Setting
Up
Select the Preferences panel and enter a Sharing Password to ensure only
authorized users (ie. those people who know your password) can access
your shared files and folders. Then choose the Shared Folders panel
and add all the files and folders on your computer you wish to share.
If you wish to
share files with your friends over the Internet, select Internet
(Internet Workgroup) from the Workgroup
Setup Method popup menu on
the Preferences panel. Then
enter the Workgroup Name you
and your
friends have chosen to use, and press the Join button. Your friends'
computers should appear in the Connect
to popup menu on the Transfer
Files panel within a few seconds.
The fastest way
to set up a LAN workgroup (eg. a simple home network) is to select Auto-Discovery from the Workgroup Setup Method popup menu on
the Preferences panel. All
computers on the LAN should then be discovered
quickly and automatically. No further setup is required.
Operation
When you launch
Kenbushi, you should see other computers running Kenbushi listed in the
Connect to
popup menu on the Transfer Files
panel after a few seconds. They will also be shown in the Remote
User Connection List listbox on the Network panel, and you can
see their IP address, their computer name and what they are doing.
Select a
computer from the Connect to
popup menu to view it's shared files and
folders. You may need to enter a Sharing
Password to gain access to
files on this computer (once entered, the password will be stored and
automatically used for subsequent operations).
When you have
the remote file list displayed, simply double-click a file in this list
(or highlight it and press the Download
button - the left-pointing
arrow)
to begin transferring it to your computer. The file will be stored in
the folder displayed in the Local
File List listbox. You can also
highlight a range of files and/or folders in the remote file list and
press the Download button to
get them all.
To upload files
to a remote computer, the remote computer must be set up with a shared
folder which has been set to 'Writeable'. You can then navigate into
this folder via the Remote File List
listbox, select files in the Local
File List listbox and press the Upload
button to upload the
files
to it.
The Sync
button works similarly to the Upload
button, except that it transfers
(uploads and downloads) files so that the contents of the selected
folder is synchronized with the equivalent remote folder on the Remote
File List. If the remote folder doesn't exist, it is
automatically
created. Synchronization means: any files not at
both locations will be transferred, so that they exist at both
locations; any updated files will be transferred, overwriting the old
ones (if they exist).
Dynamic help
text (based on which button, textbox, etc. you have the cursor over) is
displayed at the bottom left side of most panels.
Notes
If you get a
message saying that a computer is unreachable, try again. Sometimes
network packets get lost (especially in congested networks) and simply
trying again can result in success.
A file shown in
the Local File List or Remote File List with an '*' in
front of it's
size value is a Macintosh file with a resource fork. When
transferring these types of files to another Macintosh, all file
information will be transferred correctly. However, when transferring
these types of files to a PC, only the data fork will be transferred
(thus, the file may be corrupted) unless you check the Transfer MacOS
Resource Forks checkbox in the Preferences
panel.
If a control is
disabled, the dynamic help text associated with it will be displayed in
red. Normally, it is displayed in black.
Further
Information
Please read the
section on Detailed
Operation
for further
information.