PasswordVault™
Enterprise Edition
User Manual
HTML
Edition: 1.0.2
Release date: 24 September 2014
Operation
Appendices
Operation
Introduction
The Enterprise Edition of PasswordVault is a unique password management system
which combines a secure centralized database server (for easy
data management, backup and disaster recovery) with a
PasswordVault client which securely stores data locally, and
which synchronizes regularly with the server. It features:
- very easy software installation and configuration,
enabling the PasswordVault (PV) Server to be set up in minutes
- automatically integrates existing data from
installations of other editions of PasswordVault (ie. Lite,
Standard or Pro)
- user data is encrypted on the client and
stored in encrypted form in the central database, maximizing
security
- use of a central database system provides easy
data management, backup and disaster recovery
- provides excellent monitoring and reporting
functions: user count, user list, last access timestamps, etc.
- leverages the user's network login name for
identification, and their master password for authentication
- company-specific security news and security
policy updates are shown to users when they log in
- easy user setup - on first launch, user enters
the IP address of the PV Server, connects and registers
- standard HTTPS protocol is used for
client-server communications, with additional layers of
encryption
- the PV Server is installed
inside the organization's intranet, keeping all network
traffic within the intranet
- an IP address filter on the server rejects any
connections from addresses outside the set IP address mask
- a selectable IP port for incoming connection
requests, which can be set by the administrator
- logging of various user activities in separate
daily activity log files, for auditing purposes
- selectable user data sync interval from 2 to 8
hours, with automated server load balancing
- user data is stored both locally and in the
database, ensuring maximum data availability
- data recovery to a fresh computer is simple,
requiring only PV Server validation, registration, and login
- each users' data is protected by their unique
master password, protecting data from cascade breaches
- custom builds can be made to customer's
requirements eg. extra reports, hardware authenticators, etc.
- in very large organizations (eg.
universities), PV Server nodes can be distributed eg.
organized by department
If you have an existing
installation of PasswordVault Lite, Std or Pro on your computer,
running the PasswordVault client bundled with the Enterprise
Edition will load up your existing data and then sync it with
the PV Server. Everything will work in the same way as the older
edition you were using, so upgrading to the Enterprise Edition is
incredibly easy and seamless. When all of your organization's
users have moved across to the PasswordVault client of the
Enterprise Edition,
their data will all be stored (in encrypted form) on the PV
Server as a single database file, greatly simplifying data back
up. This will
make disaster recovery much more straight forward, an important
issue for many organizations
trying to maximise business continuity.
Access to your password
data is also very robust. Once the data has synced to the PV
Server, if you ever need to recover your password data (eg. if
your computer hard disk dies), it's easy to restore from the PV
Server and be up and running again in minutes. Conversely, if
the network connection to the PV Server is ever cut (eg. the PV
Server is running on your office admin computer, and it's
switched off), you will still have full access to your local
data and can work as usual (eg. log in to websites, use
textclips in emails, etc). This type of reliability is exactly
what organizations need.
There are excellent
monitoring features built into the PV Server, enabling the admin
to know how many users are connecting in, as well as their most
up-to-date information (name, department and contact email
address). In addition, the admin can publish security news and
update policy information easily via the PV Server, and know
that as users connect in to the PV Server, they will have
immediate access to that critical information. Not only is the
communication link between the admin and users made more direct,
all dependencies on email security or reliance on the email
system working are eliminated. This could be very important in a
situation where a service failure or security breach occurs.
Installation
and setup
In a small office, the PV Server can be installed on the
computer of a user chosen to manage
the server. This user's computer should generally be left
switched on (ie. when they leave for the day, they just lock
their screen rather than power down), so that the services offered by the PV Server are
always available to other users on the network. However, if
the PV Server does go down, all users on the network will
automatically use their local PasswordVault data (so won't be
affected), and when the PV Server is back up again, all
changes made by users in the interim will be uploaded to the
server during the next sync. Also,
since all data stored inside the PV
Server database is encrypted on each
client's computer before transmission, the data always
remains secure even though it is stored on a particular
user's computer.
In larger organizations, the PV Server may be installed on dedicated
server hardware which is managed by a system administrator. The administrator will then manage
the server, monitor usage, perform auditing and reporting,
etc.
To install and setup PV Server, you'll need the
following information:
- your
'PasswordVault Server' runtime key (emailed
to you by Lava Software when you ordered).
This is not needed for the free 'Enterprise
Edition Lite'.
- a new
admin password (a password of more than 6 characters in
length which you have chosen)
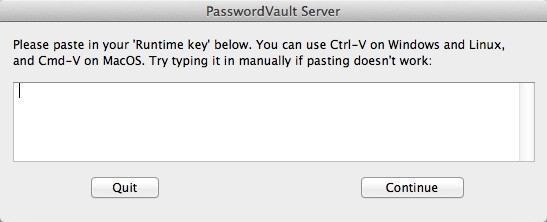
After installation and the first time
PV Server is launched,
it will display the 'Enter Runtime Key' dialog (see Figure 1
below). Paste in your PasswordVault Server runtime key and press
the Continue button.
Note:
The runtime key includes information about the number of users
licensed, and you should always ensure you have enough
headroom for new users (see updating
the runtime key below for information about expanding
your user count). If you're using the free 'Enterprise Edition
Lite', the included PV Server supports up to 15 users, and
each user can use up to 25 services.
Figure 1. The 'Enter
Runtime Key' dialog
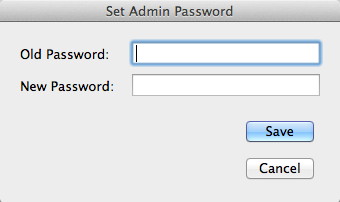
The 'Set
Admin Password' dialog will now be displayed, which is shown
below in Figure 2. Enter a new admin password,
which will be used to protect the software from unauthorized
use. Your admin password needs to be longer than 6 characters,
and it is recommended that you use a combination of lowercase
and uppercase characters, and one or more special characters
(eg. !@#$%^&*). You can always change the admin password
later by selecting the 'Change password...' menu item in the
'Admin' menu (see Changing
the admin password below).
Figure 2. The 'Set Admin
Password' dialog
The main 'PV
Server Settings' window will now be displayed (an example is
shown below in Figure 3). This window shows various
information about the server, is used to start and stop the
server, change various settings, etc. It will always be
displayed when the PV Server is running, though it can be
minimized to the taskbar. Closing this window by clicking its
closebox will also quit the PV Server application.
The 'Server Information' section shows some key information
about the PV Server, including the organization licensed, the
name of the computer it's running on, the computer's unique
signature, its local IP address, and licensing information (the
number of users, the total number of users licensed, and the
license lapse date). This important information is used for
setting up each PasswordVault client, as the IP address of the
PV Server needs to be communicated to each user when they are
setting up the PasswordVault client on their computer.
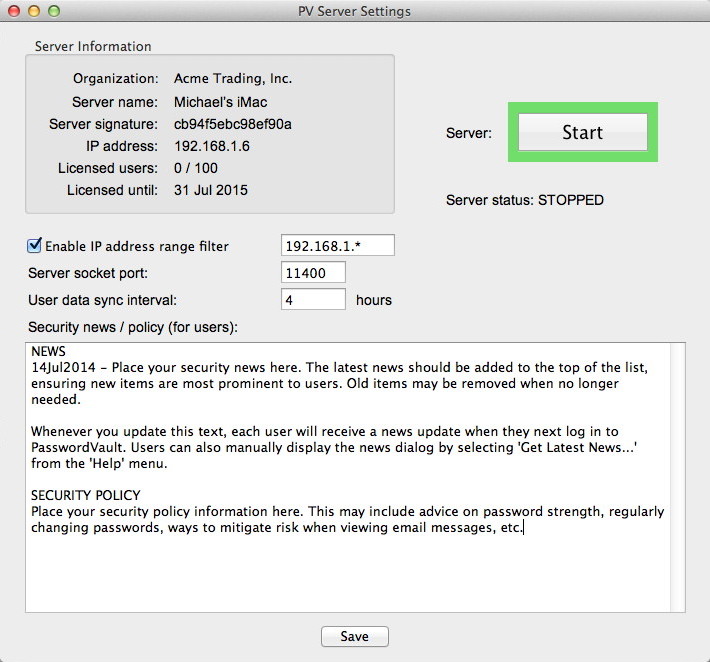
Figure 3. The main 'PV Server
Settings' window
The various
controls below the 'Server Information' section enable the
administrator to adjust the settings of PV Server. This includes
the ability to set up an IP address range filter, the server
socket port, the user data sync interval, and the security news.
After making changes, press the Save button to save the
changes to disk. Saving also invokes any changes, and there is
no need to stop the server to make changes.
The IP address range filter is used to prevent users whose
computers are outside an IP address range from accessing the PV
Server. For example, if the IP address range filter is set to
'192.168.1.*", a computer with an IP address of '192.168.3.45'
will be rejected by the server. The IP address range filter can
be switched on and off by using the Enable IP address
range filter checkbox. This filter adds further security
to client-server communications whilst making it easy for users
within an organization to connect to the PV Server easily.
The Server socket port textbox enables the admin to
change the port used by the PV Server. The default port is
11400. Using a port number other than the default port requires
users to include the port number with the IP address they input
when they first connect to the PV Server eg.
'192.168.1.6:33010', if the port is set to 33010.
The User data sync interval textbox is the number of
hours between syncs between the user and the PV Server. The
recommended interval is 4 hours. Values between 2 and 8 hours
are supported.
The big green
Start button is used to start the PV Server, enabling
users to connect in and sync to it. Once started, the button
changes to a Stop button. Press the big red Stop
button to stop the PV Server. The server status shows whether
the PV Server is running or stopped.
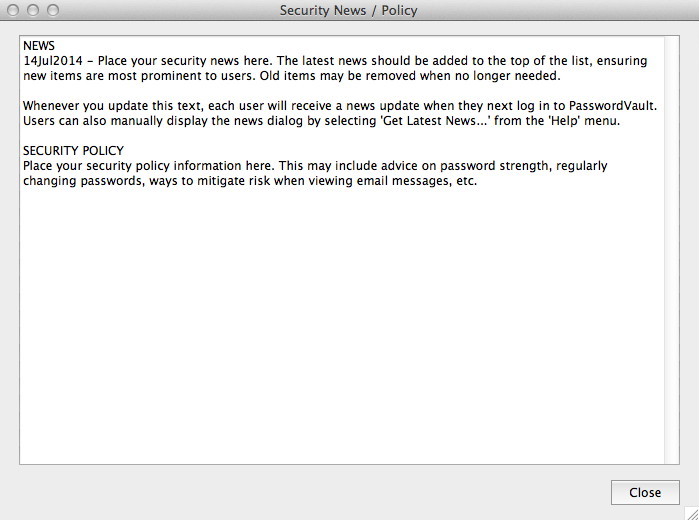
Publishing security news
The Security news / policy textbox on the main 'PV Server
Settings' window (see Figure 3 above) enables
the administrator to easily provide all PasswordVault users with
the latest security news and policy changes. When a change is
saved, whenever a user logs into PasswordVault, the 'Security
News / Policy' dialog will be displayed, ensuring users are kept
informed. Users can also display this dialog manually by
selecting 'Get Latest News...' from the 'Help' menu.
The recommended layout of the text is to place the latest
security news item at the top, along with each item's publish
date (see Figure 4 below for an example). This ensures
new items are most prominent to users,
which increases the likelihood that they will be read.
Old items may be removed when no
longer needed. Underneath the news, any specific security
policies can also be listed, to ensure the latest policy
information is quickly accessible to all users within your
organization.
Figure 4. An example 'Security
News / Policy' dialog, shown to users when they
login
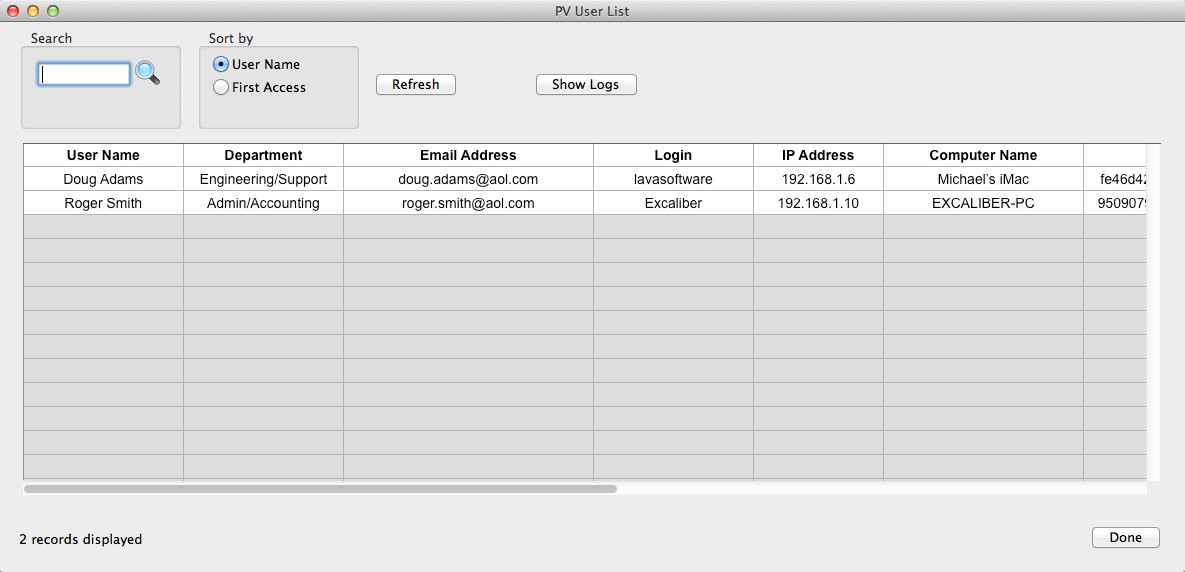
Monitoring
and reporting
There 3 primary ways that the activities
of the PV Server can be monitored: the 'PV User List' dialog,
the 'PV Activity Monitor' dialog, and the log files.
The 'PV User List' dialog (see Figure
5 below) shows detailed information
about each user, including the user name, department and email
address they've registered, their computer login, and
information about their computer, such as it's IP address,
computer name and computer signature (a unique code which
identifies the computer). The list can be sorted by user name or
first access by clicking the appropriate radio button and
pressing the Refresh button. The 'First Access' sort is
designed to show the newest users who have connected to the PV
Server at the top of the list. If you enter some text in the Search
textbox, that will be used to filter user names in the list. Any
partial name entry will work eg. entering 'ada' will filter in
Doug Adams and filter out Roger Smith.
Refreshing the list (without any search text) will show all
users registered with the PV Server, and thus the number of
active users of the system.
Figure 5. An example 'PV User
List' dialog, showing two users
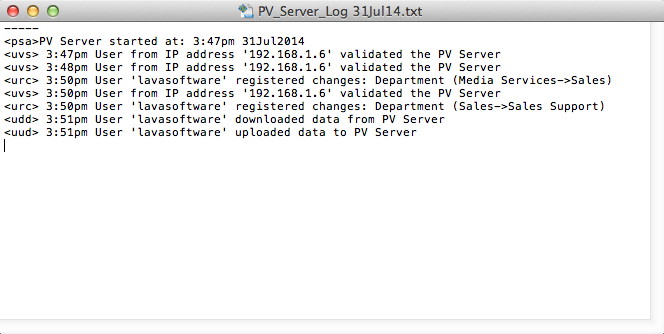
To show the
folder containing the text logs on the desktop, press the Show
Logs button, or select 'Open Logs Folder...' from the
'Admin' menu. From that folder, you can open any of the logs in
a text editor (such as WordPad or TextEdit) to view the
information they contain. An example log is shown below in Figure
6.
Figure 6. An example PV Server
log
Notice in this
log that there are identifying prefixes at the start of each log
line (within pairs of angle brackets), as well as the time that
the operation occurred (note that the date of the text log is
embedded in it's file name). These prefixes can assist in
isolating particular log entries quickly. The prefixes have the
meanings outlined in Table 1 below, making it possible
to audit the transactions occurring in the PV Server.
ufo
|
A
user's IP address was filtered out
|
uvs
|
A
user was validated by the PV Server
|
urc
|
A
user registered changes with server
|
uru
|
A
user registered unchanged details
|
alu
|
All
licenses used when this user registered
|
nra
|
New
record added to database for this user
|
udd
|
User
downloaded data from database
|
udf
|
User
performed first sync to database
|
uud
|
User
uploaded data to database
|
ufd
|
User
uploaded first data to database
|
|
|
|
|
Table 1. Text log file prefixes,
and their meanings
Changing the admin password
If you ever need to change the admin
password, select 'Change Password...' from the 'Admin menu'.
The 'Set Admin Password'
dialog (shown below in Figure 7) will be
displayed. Enter your old password (to authenticate that
you are the administrator) and then enter a new password
and press the Save button. Passwords must be at
least 6 characters in length.
Figure 7. The 'Set Admin
Password'
dialog
Updating
the runtime key
PV Server licensing details are
shown in the 'Server information' section on the 'PV Server
Settings' dialog (see Figure 3 above). Once the user
limit has been reached, no new users will be able to
register with the PV Server. To increase the number of
licensed users, simply email Lava Software to obtain a quote
for licensing additional users. If your license is about to
lapse or has lapsed, you can email Lava Software for
information about renewing your license.
When you wish to update your runtime key, select 'Update
Runtime Key...' from the 'Help' menu. The 'Enter
Runtime Key' dialog (shown above in Figure 1)
will be displayed, enabling you to paste in your new
runtime key and extend your licensing.
PasswordVault
client setup
Your
computer login forms the basis for your identification by the
PV Server, thus leveraging your organization's existing
identity infrastructure. In large organizations, this is
particularly helpful, as there is no additional identity setup
required for PasswordVault. Also, all user data is encrypted
on the user's computer before being transferred to the PV
Server, ensuring the data is kept secure.
The first time a new user launches the PasswordVault
client on their computer, the 'PV Server Connection' dialog will
be displayed (see Figure 8 below). Enter the IP
address of the PV Server (your PV Server administrator can
provide you with this information) into the IP Address
textbox and click the Connect button.
Figure
8. An emply 'PV
Server Connection' dialog
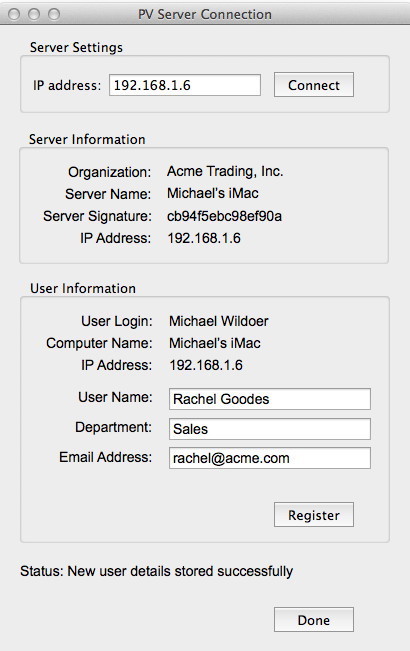
After
connecting to the PV Server, it's details will be displayed
in the 'Server Information' section of the dialog (see Figure
9 below). If a connection error occurs, check that you
have entered the correct IP address of the PV Server, or
contact your PV Server administrator for assistance.
After connecting successfully, check that the PV Server
information is correct (ie. that you are connecting to the
correct server). The most
important information to check is the organization name, and
the IP address. Your PV Server administrator may also have
given you the server's 'Server Name' and 'Server Signature'.
If so, you should also check that that is correct.
Figure 9. A 'PV Server Connection'
dialog, showing server information
If the PV Server details are correct, enter your
user name, department and email address into the
textboxes provided (see Figure 10
below). You can leave this information empty if you
wish, but entering these details will assist your PV
Server administrator in providing you with effective
support. When you have entered your details, press
the Register button and your details will be
registered with the PV Server. After successful
registration, you should see the Quit button
at the bottom of the dialog change to 'Done'. This
indicates that the PV Server registration has been
completed successfully, and you can begin using
PasswordVault on your computer.
Figure
10. A 'PV
Server Connection' dialog,
showing entered user
information
Note: If you have
been using any of the other editions of PasswordVault (ie. the
Lite, Standard or Pro Editions), your existing data will be
uploaded to the PV Server during the syncing process. This will
effectively back up your data to the PV Server, whilst retaining
your existing data on your local computer. Your existing data will
also work in exactly the same way as it always has with the
PasswordVault client of the Enterprise Edition. Thus, it is very
easy to upgrade to the Enterprise Edition from any existing
edition of PasswordVault.
For full details about using the PasswordVault client, please see
the PasswordVault client user manual.
PasswordVault
client recovery
If you are setting up a
new computer or recovering from a computer data loss caused by
disaster, but have previously been using the PasswordVault client
and already have data stored on the PV Server, you'll probably
want to simply restore your data to the new computer. This is
quite easy to do.
The PV Server uses your computer login to identify you, and your
unique data. Since you've already logged in to your computer to be
able to access your desktop and installed software (such as the
PasswordVault client), your computer login will already be
authenticated and ready to go.
When you subsequently launch the PasswordVault client and go
through the PV Server connection and registration process, the PV
Server will recognise your login, see that you have existing data,
and automatically restore your data. The
PasswordVault
client will then
load your services
as usual, making
them available for
immediate use.