License
Agreement
Appendices
Enterprise
Edition
This edition
of PasswordVault combines a secure centralized database
server (for easy data management, backup and disaster
recovery) with a PasswordVault client which securely stores
data locally, and which synchronizes regularly with the server.
Some functions in the PasswordVault client included with this
edition operate slightly differently to the other editions
available.
| Site Licensees: "The University of Illinois has purchased site licenses of PasswordVault for their campuses at Urbana-Champaign (UIUC), Chicago (UIC) and Springfield (UIS). They chose a customized build of the software which was preregistered, had a backdrop utilizing their University's official colors and logo design, and which included extended desktop licensing (so staff and students could also use PasswordVault on their own home and laptop computers)." Link... "The Regional Educational Media Center #1, located in Michigan state, is an organization whose role is to provide technology and instructional materials support to local school districts. They purchased an unlimited site license, and PasswordVault currently assists them in managing around 500 services throughout their organization." Individual Users: "I did a lot research in selecting a password program and thought yours was REALLY good. I especially like the memory stick feature." -- A. Turley, ME, USA "Your programme is one of the best pieces of software I bought last year, so keep up the good work!" -- L. Poll, Surrey, UK "I just put PasswordVault upgrade Ver 5 on my computer and thank you. In fact, I almost did not change because Ver 4.3 already was working so great. I deleted V 4.3 ... and the subsequent installation of Ver 5 was foolproof. It picked up all the passwords without flaw, even though I had backed up the pv files for insurance. Most importantly, after several years use, I continue to think Lava Software has an outstanding product in PasswordVault. I would not go without it, especially with computer security ringing so critically important nowadays." -- J. Davidson, WA, USA "You folks are great and thank you for a great product. I love the ease of use and ability the product gives me in creating very strong password protection." -- K. Ruth, UT, USA "I have been a user of PasswordVault for years and I love the product. I use it daily and would be lost without it." -- M. Holloway, UT, USA "Thank you very much for first class customer service and product. Be sure that I will recommend your product!" -- J. Sorensen, Denmark. "Thanks for your great program. I'm telling all my friends with thumb drives." -- T. Lopez, VA, USA "Thanks for an excellent product." -- K. Focht, NV, USA "This is a great little tool." -- B. Wesson, CA, USA "This is what I have been waiting for!! I hate Gator!" -- C. A. Saunders, NH, USA "I love the Mac and I love your utility." -- D. Barsocchini, CA, USA "It is a very good program and one that is essential in these days of requiring harder, more robust passwords for adequate computer security." -- J. Davidson, WA, USA "Your product PasswordVault Lite 4.2 has been awarded by us with 5 stars and the SoftPedia Pick Award !" -- Softpedia |
Security considerations
PasswordVault was designed from the ground up with security in
mind. All your information is protected by highly secure 256-bit
double-AES encryption, and the only time this information is in a
form which can be easily accessed is when you are running
PasswordVault. Even if a hacker manages to access the data file
which stores your information, it cannot be read without knowing
the master password or by using the master password recovery
system.
PasswordVault includes an automatic news system to inform users of software updates and special offers, etc., and it can be enabled and disabled in the preferences. We do offer a periodic email newletter, but user email addresses do not generally offer a reliable, long term method of reaching users with software update information. The HTTP GET request made by PasswordVault during the news download process is only performed when it is launched and, of course, does not include any user service information stored inside PasswordVault. This HTTP GET request also validates the runtime key.
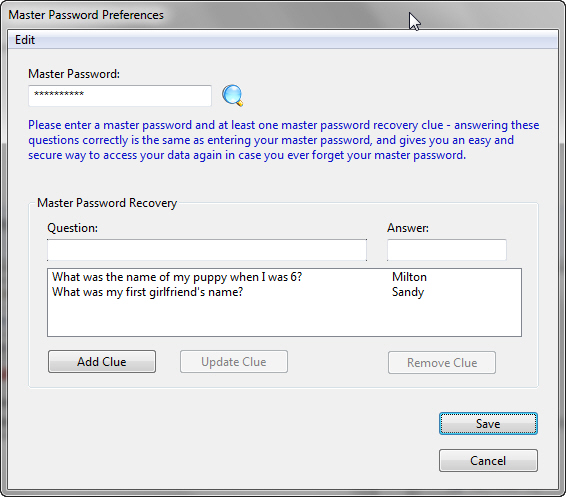
Choosing a master password
When you launch PasswordVault for the first time, an empty Master Password Preferences
dialog will be displayed. A sample of this dialog is shown below
in Figure 1, containing
an example master password and master password recovery clues.
The first step
is to choose and enter a master password. Your choice of a good
master password is important in ensuring the security of your
data. With PasswordVault, the master password is the only password
you need to remember, so it is a good idea to make it reasonably
long and include some numbers. For example, 'yukonmoose597' is a
good master password since it combines two unusual words and
includes numbers as well.
The Unmask Password button next to
the master password unmasks the password for 15 seconds. Thus, the
master password is usually hidden, protecting it from the view of
anyone looking over your shoulder.
The Help button is a custom build
option, and thus not visible in the mainstream version of
PasswordVault. Pressing this button displays a specified web page
which contains organization-specific information about
PasswordVault, such as advice about selecting a good master
password.
Setting up Master Password
Recovery
The 'Master Password Recovery System' (MPRS) is a powerful and
unique feature of PasswordVault, which allows you to recover
elegantly if you ever forget your master password. Forgetting a
master password is relatively easy to do. This can occur, for
example, if you go for a holiday and don't use your master
password for a few weeks. Maybe you chose a particularly complex
master password and one day you accidently transpose two numbers
in the password. Without the master password recovery system built
into PasswordVault, you would have lost you data forever!!!
The master
password recovery system works by allowing you to enter a series
of personal questions (ie. clues), to which only you know the
answers. Any number of clues can be used, so you can make the
recovery system at least as secure as the master password itself -
the more clues used, the better the security. You should use clues
which have very exact, explicit answers, which will never change.
For example, 'What was my puppy's name when I was 6?' is a good
clue, because it is something you will probably never forget and
which very few people would know. An example of a poor clue is,
'Who is my best friend?'. The answer may change over time, thus
affecting successful recovery (ie. you may enter what you think is
the correct answer, but it may not be what you originally
entered).
Setting up master password recovery is easy and is highly
recommended for all users - if you forget your master password and
do not have the master password recovery system set up, you have
permanently lost the data stored inside PasswordVault! On the
other hand, if you have set up master password recovery, you just
need to answer some simple questions to get back to the main
screen. From there, you can re-familiarize yourself with your
master password or change it to something else.
To add a new
clue, enter the question in the Question
textbox and the answer in the Answer
textbox. Then press the Add
Clue button to add it to the list.
To update a
clue, select it in the list and it will be placed in the top
textboxes. Make any changes you wish and then press the Update Clue button to update
the clue in the list. Then press the Save button to save
the list of clues.
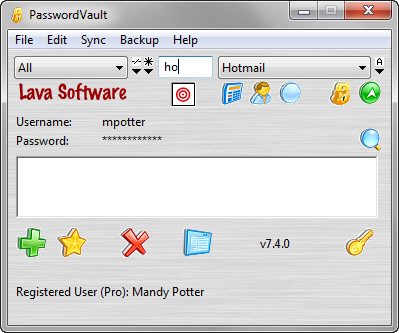
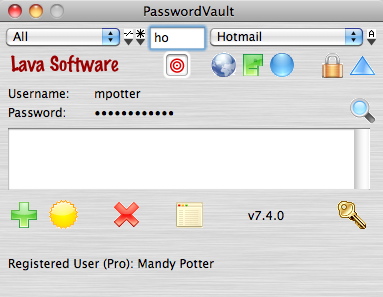
The Global Floating Window is the
compact form of the Main Window
(shown below in Figure 3,
containing a sample 'Hotmail' service) and is a great way to make
your information easily accessible for any application whilst
using the absolute minimum amount of screen area. It floats above
all windows of all applications on the screen (on all platform
versions, except on Linux).
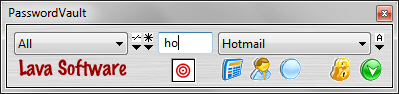

Figure 3. The Global Floating Window (Win32, MacOS X), the compact form of the main window
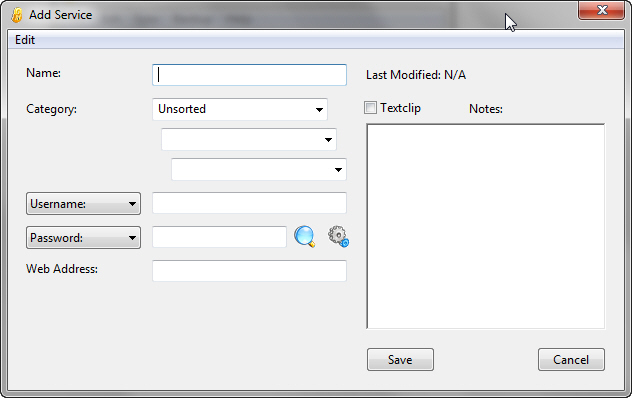
Adding a new service
A 'service'
is simply a collection of information (username, password, web
address, etc.) linked to a service name. For example, a service
called 'Hotmail' might have a username of 'mpotter', a password
of 'grootburger' and a web address of 'www.hotmail.com'.
You can create a
new service by pressing the Add
Service button on the main window - the Add Service dialog (shown
below in Figure 4) will
be displayed. Enter the service name, select the service category
and subcategory from the groupbox menu (or type new
category/subcategory names into these comboboxes), enter the
username, password and web address (if applicable). You can also
add additional notes, if required. You can change the type of
service using the 'Username' and 'Password' title popup menus. For
example, if you are entering Internet banking information, you
might select 'Account No' and 'PIN' from these title popup menus.
Advanced
Shortcut: Hold down the 'Ctrl' key when pressing the Add Service button to open the
Add Service dialog with
the password already unmasked for 15 seconds. You can then type in
the password on the Add Service
dialog and see it as you type it. This shortcut is for advanced
users who wish to add a number of services quickly.
You can also
drag and drop the URL from a web browser (eg. 'http://google.com')
directly onto the URL Dropbox
on the global floating window (the target on Figure 3 above).
Alternatively, you can copy URL text into the clipboard and right
click the URL Dropbox to
paste it in. Doing this will open the Add Service dialog (shown below in Figure 5), fill the Web Address textbox with the
URL text, and set the category to 'Bookmark'. PasswordVault will
also load the page associated with the web bookmark, and try to
extract it's title, to use as the service name.
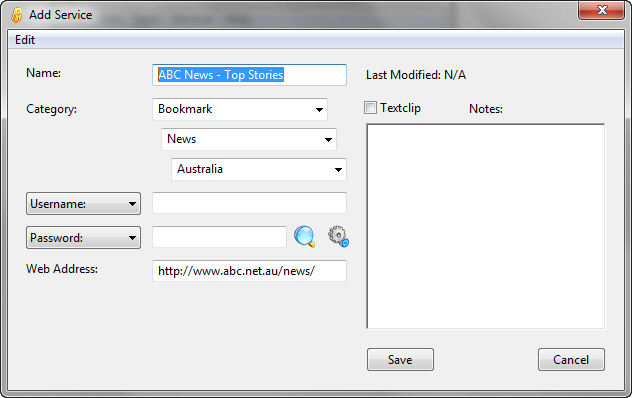
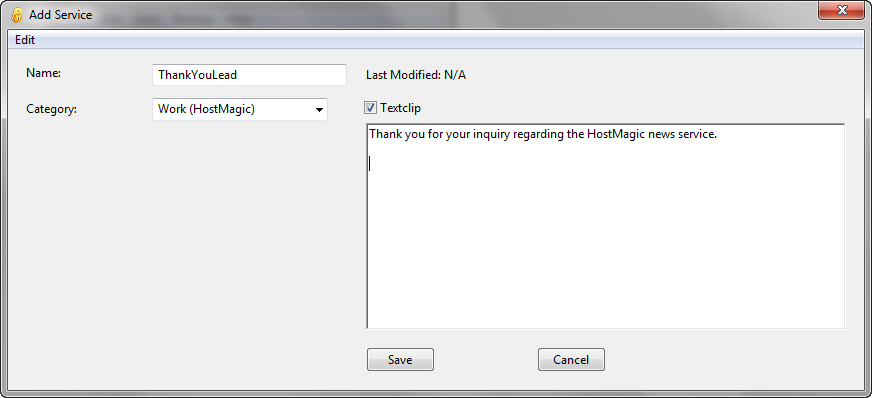
Figure 6. The Add Service dialog, showing a 'Textclip' being added
Note: The maximum length of
category names is 30 characters, and the maximum length of service
names is 60 characters.
The Unmask Password button (next to the Password textbox) unmasks the password for 15 seconds. Thus, the password is usually hidden, protecting it from the view of anyone looking over your shoulder.
To generate a
random password, press the Generate
Password button (this button is shown as two linked
cogs). A high-quality password conforming to the type
(alphanumeric, numeric or hexadecimal) and size set on the Preferences dialog will be
generated and placed in the Password
textbox.
When the
information is complete, press the Save button to save the information - the service
will now be added to the Service
Selection popup menu on the main window, and the Add Service dialog will be
cleared (ready for you to enter information for a new service).
This automatic clearing after saving makes it easier and faster to
enter a list of services.
To return to the
main window, press the Cancel button.
To use the auto-fill function with automatic submission, select Timed Paste as the Username/Password Transfer method on the Preferences dialog. Timed paste works by placing text into the clipboard and simulating key presses. For example, pressing the Password button on the global floating window actually copies the password data from PasswordVault into the clipboard, and then simulates a keyboard paste operation (ie. 'Ctrl-v' on Windows, 'Command-v' on MacOS X). By including the special characters, ' # ' (ie. space hash space), in the Username textbox on the Add Service dialog (see Figure 5 above), pressing of the 'Tab' key can be simulated - this key is used by Web browsers to move the cursor to the next textbox or control.
For example,
signing into a GMail account is normally done by entering the
username, pressing the 'Tab' key, entering the password, and then
pressing the 'Enter/Return' key. Thus, to set up auto-fill for
GMail (assuming your username is 'mpotter' and password is
'phoenix12'), bring up the Add
Service dialog and enter the username, 'mpotter # ', and
the password 'phoenix12' (we assume you have already checked the Auto-Enter Key Press checkbox
in the preferences). That's it!!!
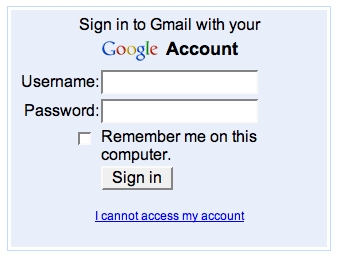
Figure 7.
Auto-fill used on a GMail login screen
Now when you
want to sign into GMail, press the Go To Web Address button on the global floating
window (see Figure 3
above) to open the GMail Web page in your browser, and once it's
loaded, click the Username
button on PasswordVault and then immediately position the cursor
into the 'Username' textbox on the Web page (before the timed
paste operation starts). PasswordVault will then auto-fill and
submit the Web page in one streamlined operation.
Important
Note: It's a good idea to test out the auto-fill of a new
service you are adding by first unchecking the Auto-Enter Key Press checkbox
(or use the advanced shortcut below) and then testing the
auto-fill information you have created. Some Websites limit the
number of login retries before they lock out the user, and you
probably want to avoid that.
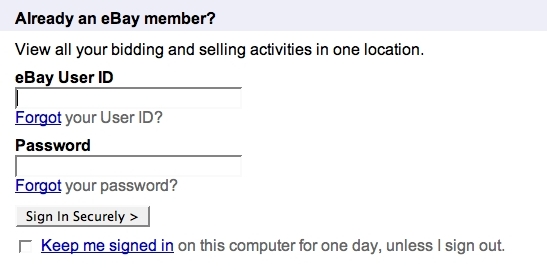
On services
like GMail, eBay, etc., it's a good idea not to check the Remember me on this computer or Keep me signed in checkboxes
on the Web page (see Figure 8
below). If you share your computer with another user and they go
to these websites, they will be logged into your account
automatically, and thus have access to your online account. You
should always log out of these accounts when you're finished with
them, to ensure the next user has to log in properly.
If there is more
than two textboxes on a Web page to fill in, you can place
additional information in the Username
textbox in PasswordVault, separated by the special ' # '
combination. In the example below in Figure 9, there are 3 sets of information which
need to be entered. In this case (assuming your 'Card/Access
Number' is '73856583855', 'Security Number' is '7844' and
'Internet Password' is 'jdugh7d7'), bring up the Add Service dialog and enter
the username, '73856583855 # 7844 # ', and the password
'jdugh7d7'.
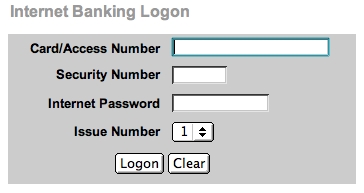
Figure 9.
Auto-fill used with an online banking account
Now when you
want to sign into your Internet bank, press the Go To Web Address button on
the global floating window to open the bank's Web page in your
browser, and once it's loaded, click the Username button on
PasswordVault and then immediately position the cursor into the
'Card/Access Number' textbox on the Web page. PasswordVault will
then auto-fill and submit the Web page in one streamlined
operation ie. it will paste in '73856583855', simulate pressing
the 'Tab' key, paste in the 'Security Number', simulate pressing
the 'Tab' key, paste in the 'Internet Password', and simulate
pressing the 'Enter/Return' key.
Note: On some banking Web
pages, textboxes may only accept a specific number of characters,
so you should remove any spaces in the text to ensure the form
gets filled in properly.
Sometimes other controls, such as popup menus, may be selected when you are trying to auto-fill textboxes on a Web page. The example in Figure 10 shows this type of problem. In this case, placing one special ' # ' combination at the end of the username will 'Tab' the browser to the '@bigpond.com' popup menu, rather than the 'Password' textbox. In this case (assuming your username is 'mpotter' and password is 'phoenix12'), bring up the Add Service dialog and enter the username, 'mpotter # # ', and the password 'phoenix12'. Note that there are two 'Tab' keys simulated between the username and password, and thus when you trigger an auto-fill, the cursor will jump over the popup menu and correctly fill the 'Password' textbox.
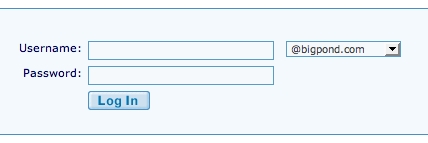
Figure 10.
Auto-fill used when other controls are present
With a bit of
experimentation, you should be able to auto-fill almost any Web
form. The good thing is, once you've got auto-fill set up for a
particular service, logging into that service becomes very
streamlined.
Note: You can't set up
PasswordVault to automatically select from popup menus, set or
clear checkboxes, etc., on web forms during an auto-paste sequence
- only textboxes can be auto-filled. If you wish to auto-fill and
auto-submit this type of web form, you first need to set these
other controls and then trigger the auto-fill on PasswordVault.
Note: If you set up
multiple text items in the Username
textbox for auto-fill but then select a Username/Password Transfer method other
than 'Timed Paste' on the Preferences dialog, such as 'Copy
To Clipboard', only the first text item will be copied to the
clipboard.
Editing a service
To edit an existing service, first select it from the service
selection popup menu on the main window. Then press the Edit Service button to
display the Edit Service
dialog (shown below in Figure 11).
Make any necessary changes and then press the Update button. You will be
returned to the main window immediately.
Advanced Shortcut: Hold down the 'Ctrl' key when pressing the Star button to open the Edit Service dialog with the password already unmasked for 15 seconds. You can then check the password as soon as the Edit Service dialog is displayed. This shortcut is for advanced users who wish to edit a number of services quickly.
The Unmask Password button (next to the Password textbox) unmasks the password for 15 seconds. Thus, the password is usually hidden, protecting it from the view of anyone looking over your shoulder.
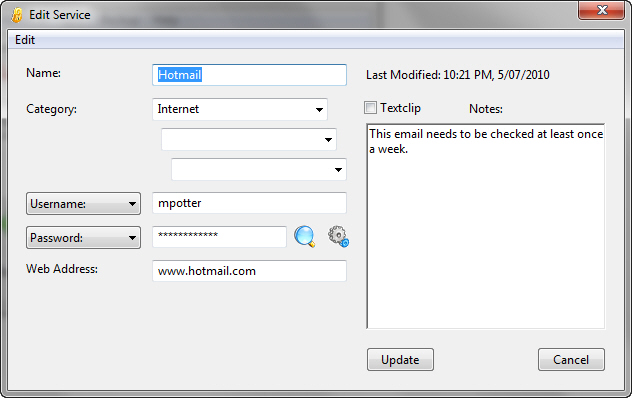
Figure
11. The Edit Service
dialog
Every time you
update service information (ie. using the Edit Service dialog), such as
changing the password or adding a web address, a time/date stamp
is made on the service data. If you subsequently import this newer
service data on another computer, it will replace any existing
older service data stored under the same service name. In this
way, you can easily synchronize the service data on a number of
computers. This is especially useful on a home or office network.
Note: All unused categories
are automatically removed when PasswordVault is next launched.
Removing a service
To remove an existing service, first select it from the service
selection popup menu on the main window. Then press the Remove Service button to remove it. The Remove Service Confirmation alert
shown
in Figure 12 below will
be displayed. Confirm the removal and the service will be deleted
from the service selection popup menu.

Figure
12. The Remove Service
Confirmation alert
Note: When you remove a
service, it actually blanks out the service information,
timestamps the service and hides it. If you subsequently
synchronize your passwords with PasswordVault2Go, or create an
auto-export which is auto-imported by other users (ie. distribute
an update via the auto-distribution system), the removed service
will also be removed from these downstream password collections as
well. This method ensures that a removed service does not simply
get restored again after the next synchronization. If a new
service is subsequently added with the name of the removed
service, it overwrites the previously removed service and
correctly propagates to downstream password collections again.
Advanced Tip: To permanently delete all
services previously marked as removed (and thus hidden), hold down
the Control (Ctrl) and Shift keys and press the Cross button. You'll hear a
beep confirming the permanent deletion.
Accessing service information
Selecting a category from the Service
Category popup menu will show a list of services in the
category, sorted alphabetically. Select the service from the Service Selection popup menu
at the top right of the window, and the username, password and
notes for this service will be displayed on the main window. This
is basically how services are accessed, though additional filters
(subcategories, service types, and searching by service name) can
help find services faster.
If a service
category has subcategories, clicking the SubCategory popup menu will
display them. In Figure 13
below, the 'Bookmark' category has been selected, and the 'Home
Selection' subcategory shows a number of lower level
subcategories. Selecting a subcategory will store it in 'Recent
Subcategories' for easy reselection, as shown at the top of the
subcategory list in Figure 13
below. As you can see, two levels of subcategory can be set in
each category, giving you deep control over the grouping of
services.
If you want all services to be listed in the Service Selection popup menu, select 'All' from the Service Category popup menu. This 'All' setting is very useful when used in conjunction with the Search textbox, since only services beginning with the entered search text will be displayed.
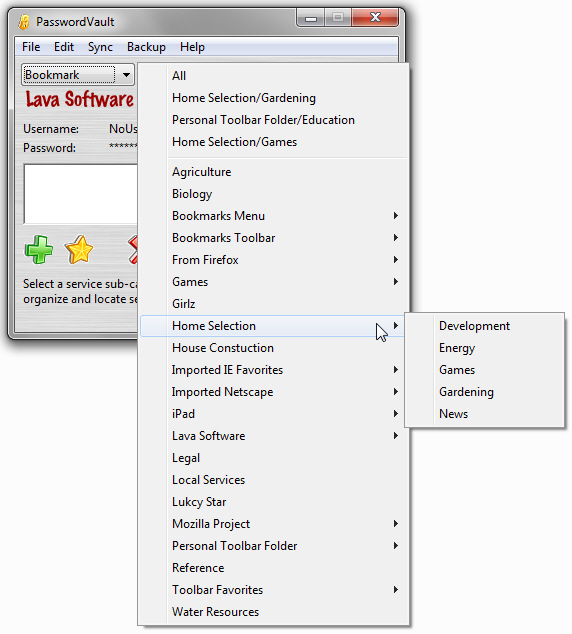
Figure 13. Selecting a
subcategory of the 'Bookmark' category
You can type text into the Search textbox (in the top center of the window in Figure 14 below) to only show services whose names start with those letters. Placing the wildcard character, '%', at the start of the search text will return all results which the substring matches eg. entering '%foru' will return all services containing the text 'foru' somewhere in their name, such as 'Kenbushi user forum', 'Yahoo forum', etc.
You can also
select only certain types of services, such as 'Web Logins',
'Bookmarks', 'Textclips' or 'Others', using the Service Type popup menu (on
the left side of the SubCategory
popup menu). Selecting 'Show All' shows all services, irrespective
of type.
To sort the
displayed services in various ways, use the Sort By popup menu, located on
the right side of the Service
Selection popop menu. You can sort services
alphabetically, by most used, or by recently used.
Figure
14. The main window with a service selected and displayed
(Win32, MacOS X)
If there is a
web address set for this service, you can press the Go To Web Address button (on
the top left side) and your web browser will immediately load in
the correct web page from the Internet. If no web address is set,
this button will not be visible.
Advanced Tip: You can copy the web address into the clipboard (rather than telling your default web browser to go to it) by holding down the Control (Ctrl) key whilst pressing the Go To Web Address button. You can then paste the URL into an alternate web browser or other application. Some websites (such as banking websites) only support particular web browsers, so you may need to use an alternate web browser to access it.
You can either
press the Username button
(the little man) or Password
button (the glass dot) to copy the respective information into the
clipboard, ready to paste in where required on the web page, or
manually type in the username and password where required for the
service (ie. in textboxes on a web page requesting your username
and password).
Username/password
transfer
methods other than Copy To
Clipboard are also available, including Drag And Drop (click and hold
the mouse button down on the Username
or Password button and
drag it to the Web form) and Timed
Paste (the username and password information is
auto-pasted after the selected delay time). Timed Paste mode is also used
by the powerful Auto-fill Web
form feature in PasswordVault. The Username/Password Transfer
method to be used can be set in the preferences (see Figure 15 below).
You can also copy text into the clipboard from the additional notes area, if required.
Organizing services
Once you're added a number of services, you'll probably want to
get them organized into categories to make it easier to find them
or to group together services for a particular purpose. For
example, there may be a group of services (login information, web
bookmarks, textclips, etc.) which relate to your work, games,
financial services, news, banking, etc. that you wish to keep
together. PasswordVault makes it easier to move services between
categories and get them organized. This is done using the Organize Services dialog (see
the example in Figure 15
below), which can be displayed by pressing the Organize Services button on
the main window (centre bottom in Figure 14).
Note: When organizing web
bookmarks, an additional two levels of subcategories are
available. This level of subcategorization is needed when you're
trying to effectively manage the 1000s of bookmarks most active
Internet users accumulate over time.
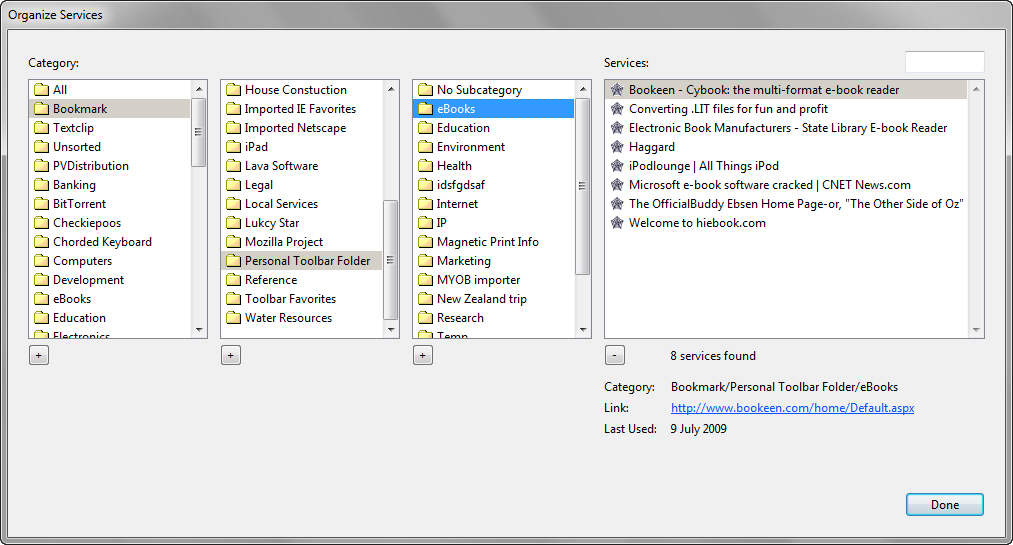
Figure 15. The Organize Services dialog
To display the
services in a particular category, click the category (in the Category panel on the far
left) and they will be displayed in the rightmost Services panel. If you
highlight a service, some information about the service will be
shown on the bottom of the window, including it's category and
subcategories, web link (if there is one) and the last time the
service was used. Clicking on the web link will immediately launch
your web browser and load the page associated with the link, so
you can view it.
You can also
instantly filter the displayed services using the Service Name Search textbox at
the top right side of the dialog. Enter a few letters of the start
of a service name, and only services starting with those letters
will be displayed. Enter a leading percentage symbol ('%'), and
any service names containing the entered characters in any part of
the name will be found. This search function allows you to find
services easily, even from amongst 1000s of web bookmarks.
When displaying
web bookmarks, you can select a service and delete it by pressing
the Delete Service button
on the bottom of the panel (the small '-' sign). Thus, old web
bookmarks can be easily removed.
To change a
category or subcategory name, highlight it and then click it again
to enter edit mode. Make the changes and then click elsewhere on
the dialog and the name will be set. When a category name is
editable, the cursor will change to an 'I-Beam' text editing
cursor when the cursor is positioned above it. Categories which
cannot be edited will show a normal selection arrow even when the
cursor is positioned above it.
To create a new category or subcategory, press the respective Add Category button underneath any of the category panels (the small '+' sign). A new entry will be added to the respectivepanel, which you can then rename to the new category name you want.
If you add a
category or subcategory and subsequently don't move a service to
it, the category or subcategory will be automatically deleted when
you next relaunch PasswordVault. Thus, there is no need to delete
category names.
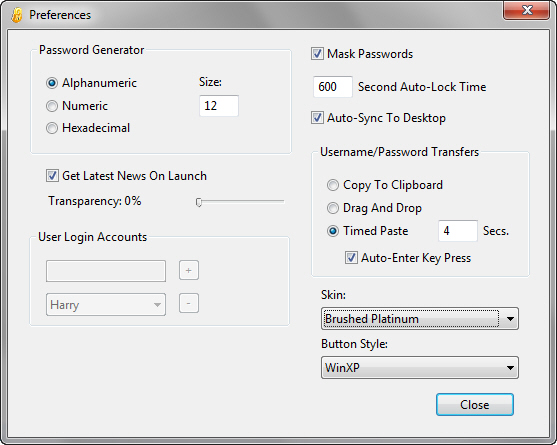
Preferences
The Preferences dialog
(see Figure 16 below) is
displayed when you select Preferences...
from the menu on the main window.
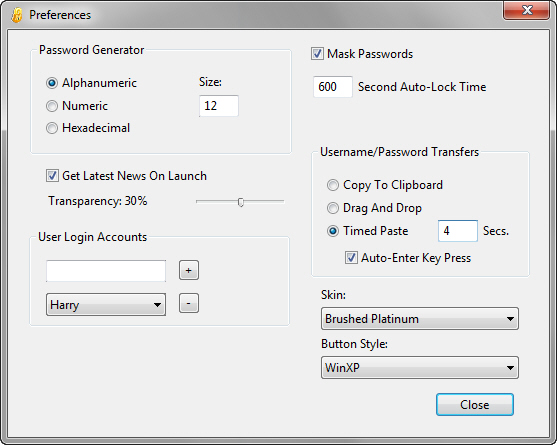
Figure
16. The Prefences
dialog
Skins are used
for the backdrop of the main window, allowing you to personalize
PasswordVault to your tastes. To choose a skin, simply select it
the Skin popup menu -
the main window backdrop will update immediately with the new
skin.
Several styles
are available from the Button
Style popup menu, allowing you to choose the one you
prefer. The 'Win32' button style is consistent with Windows
graphics, whilst 'Aqua' is a style which many MacOS X users may
like. The 'Sketch' button style is an interesting casual art style
for all platforms. As soon as you select a button style, buttons
on the main window are changed, so you can easily see what they
look like in use.
Note: Customized versions of PasswordVault (such as those created especially for site licensees) do not support additional skins, but have a fixed 'Custom' skin.
Check the Master Passwords checkbox to
have passwords on the main window replaced by asterixes. This
prevents others from seeing your passwords if you have the main
window expanded.
The Auto-Lock Time is the time (in
seconds) from the last activity before the automatic lock is
activated, and this can be set by entering a number between 20 and
1800 (ie. 1800 seconds = 30 minutes) in the textbox. Enter '0' to
disable the auto-lock function. You can also lock PasswordVault
manually by pressing the Lock button
on the main window.
To rename a
service category, select it from the popup menu and it's name will
be entered in the textbox. Change the category name in the textbox
and then press the Rename button
to rename the category to the new name entered.
The password
generator can be customized by selecting the type of password to
generate and it's size. Select 'Alphanumeric' if you want
passwords to contain uppercase (A-Z) and lowercase (a-z)
characters as well as numbers (0-9). Select 'Numeric' if you just
want numbers included, and select 'Hexadecimal' to include only
hexadecimal characters (0-9, A-F). Passwords from 1-1000
characters can be generated by typing a size into the Size textbox. Thus, you can
generate and store large, unique hexadecimal encryption keys in
PasswordVault, which can be used in other encryption products,
such as file encrypters.
Transfers of
username and password information from PasswordVault into your Web
browser (or other application) can be made in several ways.
Copy To Clipboard simply
copies the username or password into the clipboard when the Username or Password button, respectively,
is pressed. You can then paste it into the correct position on the
Web page.
Selecting Drag And Drop allows you to
drag the username or password directly from the Username or Password button, respectively,
to the correct position on the Web page. You may need to place the
cursor in the appropriate textbox on the Web page before dragging.
Timed Paste will wait the
specified number of seconds after the Username or Password
button is pressed, before performing an automatic paste operation.
To use this method, press the button and then place the cursor in
the appropriate textbox, ready for the automatic paste.
You can set up
services in PasswordVault to auto-fill Web forms using the Timed Paste method. This
advanced feature greatly simplifies entry into Websites protected
by a login screen. Setting up a service to use this feature is
quite simple, and the way data is entered can be fully tailored to
the login screen. The 'Return/Enter' key can even be automatically
pressed after the timed paste (ie. to submit the pasted
information), if you check the Auto-Enter
Key Press checkbox on the Preferences dialog. See Adding
a new service above for further information.
Note: The Linux version of PasswordVault only supports the Copy To Clipboard method.
You can control if PasswordVault automatically gets the latest news on launch with the Get Latest News On Launch checkbox. If you uncheck this checkbox, you can manually check for PasswordVault program updates and special offers by selecting Get Latest News... from the Help menu.
On Windows
2000/XP/Vista and MacOS X, the global floating window can be made
up to 60% transparent, thus allowing the windows underneath it to
be viewed. The floating window loses transparency when the mouse
pointer passes across it, so that it can be used easily when
needed. To set the amount of transparency, set the Transparency slider from 0% to
60% (0% transparency means the window will be fully opaque, which
is the default setting).
The controls in
the User Login Account
groupbox allow you to add and remove user accounts.
Setting up multiple user accounts
Starting with PasswordVault v7.4, multiple users can now have
their own separate, secure user login accounts and service data in
Passwordvault, even though they share a computer with only a
single login account. This arrangement is common in many
households and small businesses, as it eliminates problems for
users, such as restrictions on the ability to install software or
use certain programs.
The user who
installs PasswordVault and sets themselves up as the 'Default'
user is the administrator of all user accounts in PasswordVault.
'Default' users can create and delete user accounts, but they can
never see the data stored in a user account without knowing its
master password. Thus, users can be assured that if they keep
their master password safe, no other users can see their service
data.
To set up a new user, the 'Default' user simply enters the name of the user in the Username textbox on the Preferences dialog (see Figure 16 above), and presses the '+' button. A login account will be created for the new user, and the initial password will be the same as the username entered eg. creating an account with a username of 'Susan' will have an initial password of 'Susan'. To remove an existing user account, select it in the Remove User popup menu and press the '-' button.
The first time the new user logs into PasswordVault (by selecting their username from the popup menu and entering their initial password), they will be prompted to change their password and to enter clues for the Master Password Recovery System (MPRS). They should do this without the 'Default' user (or anyone else) seeing the master password and MPRS clues they enter. Any service data they subsequently enter will then be secure from other users.
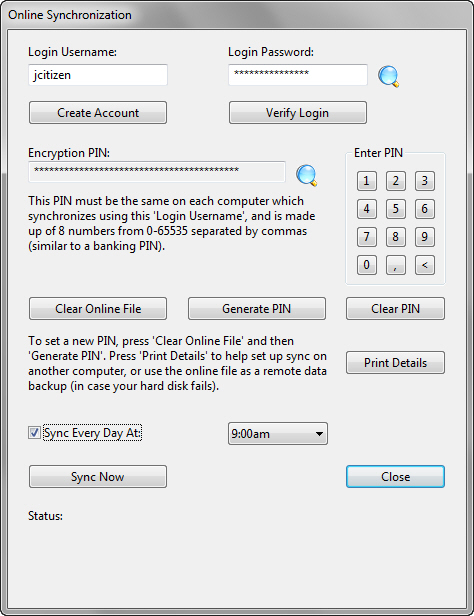
Each user can
set up and use online synchronization in the normal way.
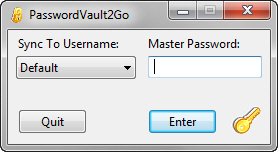
To switch users, simply press the Lock button (see Figure 14 above) to display the Enter Master Password dialog (see Figure 17 below), select a new username from the Username popup menu, enter the master password for that username, and press the Enter button.
Only the
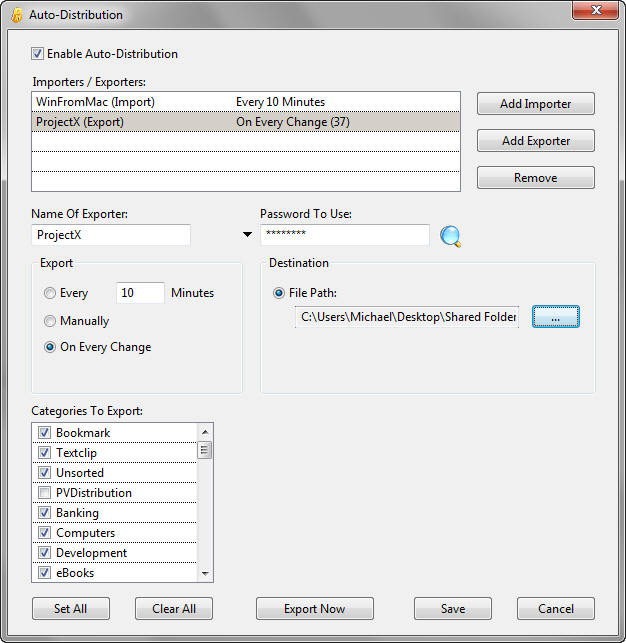
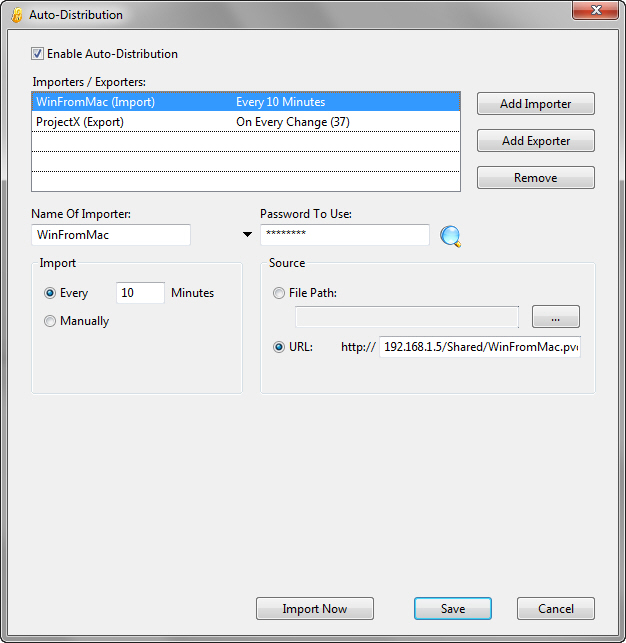
'Default' user can set up and use the auto-distribution features
in PasswordVault - these features will not be accessible to normal
users.
Positioning the main window
It is recommended that the main PasswordVault be contracted and
placed on the top right-hand-side of the screen. In this way, you
can easily access the service selection popup menu as well as the
copy-to-clipboard buttons, whilst requiring very little screen
area.
Entering your master password
When you launch PasswordVault (and have set a master password),
you will see the dialog in Figure
17 displayed. If master password recovery has been set
up, the Recovery button
(the Key) will also be
visible. If the Recovery button
is not visible, it means that master password recovery has
not been set up and is not available.
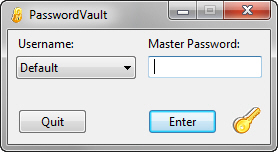
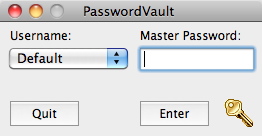
Select your
username (see Setting up
multiple user login accounts above for more details about
creating additional accounts), type in your master password, and
press the Enter button
to display the main PasswordVault window. If you get the master
password wrong, you can try again. If you have forgotten your
master password, press the Recovery
button to begin master password recovery. The dialog shown in Figure 18 will then be
displayed.
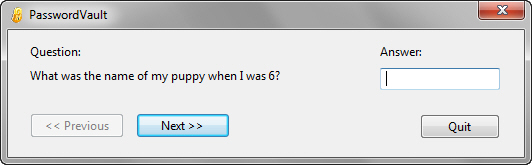
Figure
18. The Recover Master
Password dialog
Simply enter the
answer to each question in the Answer
textbox and press the Next
>> button. After you have worked through the series
of questions and answers, the main window will be displayed. If
you can't remember the answer to a particular question, think
about it for a while before trying again. If you cannot remember
either the master password or the answers to the questions for
master password recovery, you cannot access the service
information stored inside PasswordVault.
If you can't
recover, you should quit PasswordVault and move the 'Prefs.txt'
file (in the PasswordVault preferences folder - see the FAQ) to a safe place on your hard disk
(such as a backup folder) and then run PasswordVault again. Your
master password will now be cleared, in addition to your previous
service information. The 'Prefs.txt' file contains your
master password, master password recovery information and service
data.
If you have
previously backed up your service data using the export function
in PasswordVault (possibly in PV tab-text file format, a clear
text format without a master password), you can import this data
file and your service data will be recovered.
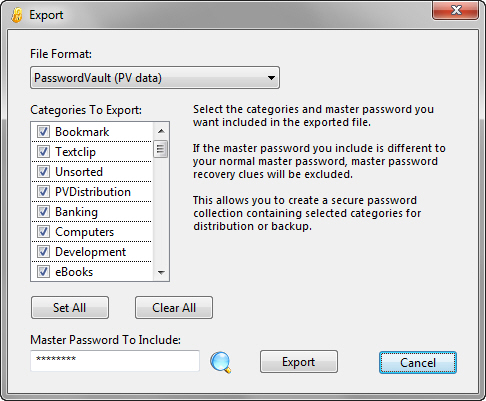
Figure
19. The Export dialog
(PV data file format)
When exporting in PasswordVault (PV data) format, the exported file is encrypted and is thus safe to store anywhere. You can choose which categories you want to include in the exported file, and you can also change the master password stored with the data. If the master password you include is different to your normal master password, your master password recovery clues will be excluded from the exported file. See Using PasswordVault in large organizations for further information about using this feature.
When exporting
in PasswordVault (tab-text)
format (see Figure 20
below), the service data is exported in clear tab-text format with
the field order displayed in the Fields
Included listbox. This file format is compatible to
version 2.x of PasswordVault and is basically provided for legacy
compatibility to the older version. It is recommended that you use
the PV data file format
described above, as it provides protection from hackers via its
strong encryption.
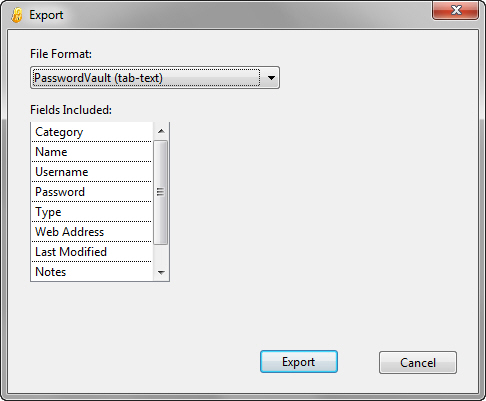
Figure
20. The Export dialog
(PV tab-text file format)
When exporting in PasswordWallet (tab-text) format (see Figure 21 below), the service data is exported in clear tab-text format with the field order displayed in the Fields Included listbox. This file format is compatible to 'PasswordWallet', a program available to users of MacOS.
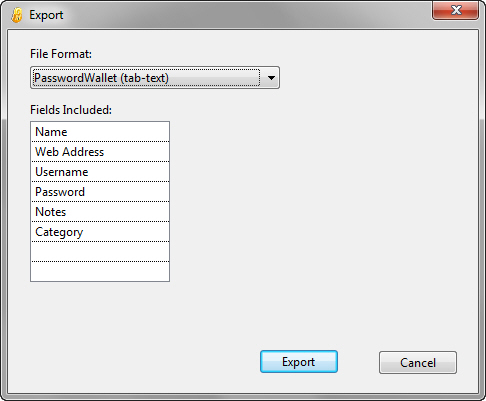
Figure 21. The Export dialog (PW tab-text file format)
When exporting
in Printable (text file)
format (see Figure 22
below), the service data is exported in a clear text format with
the field order displayed in the Fields
Included listbox. This text file can then be printed off
on your printer and filed as a hardcopy reference of your password
information.

Figure
22. The Export dialog
(Printable tab-text file format)
When exporting in Custom (tab-text) format (see Figure 23 below), you can select which fields to include in the exported file, as well as the order of the fields. This allows you to export your data in any format you like. You can also include a blank (or filler) field in the exported data as well. The custom export option is for advanced users only.
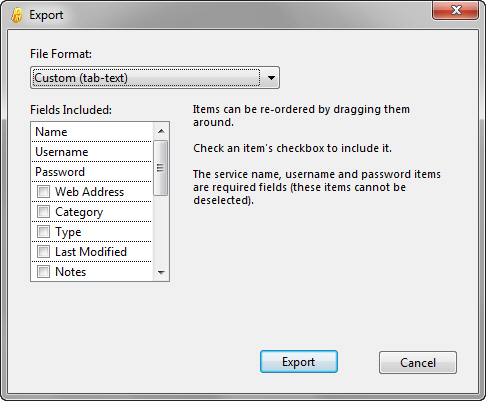
Figure 23. The Export dialog (Custom tab-text format)
Note: Please keep in mind that
files exported in tab-text format are unencrypted, and they should
be deleted immediately after you have backed up the text file,
printed out your service data (by opening the text file in a word
processor and then subsequently printing it), or transferred and
imported the text file to another computer. This will ensure
maximum protection of your service data from hackers.
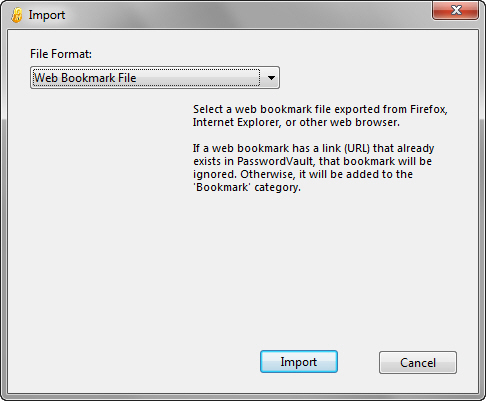
Importing service data
To import a service data file, press the Import button on the main
window or select Import...
from the File menu. The
dialog shown in Figure 24
below will be displayed. Use the File
Format popup menu to select the format of the file you
want to import. You can import data in either encrypted PV data
format, or in several clear (unencrypted) tab-text formats (ie.
tab characters delimit the various fields in each service record).
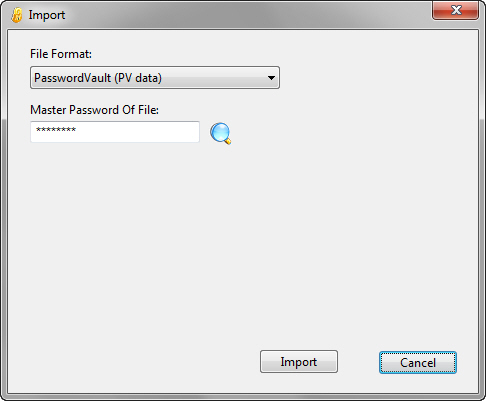
Figure
24. The Import dialog
(PV data file format)
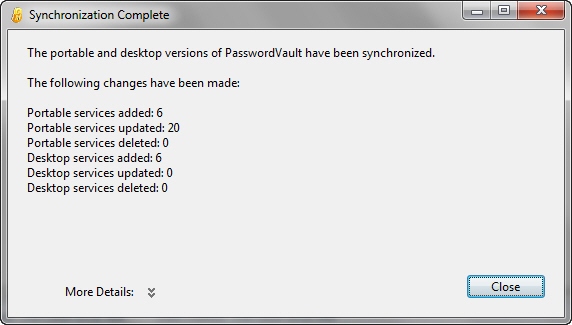
When importing
in PasswordVault (PV data)
format, enter the master password of the file you wish to import
and then press the Import button
to
select the file to be imported. If the master password you entered
matches the master password in the file, the data will be imported
and a message will be displayed showing how many services were
updated and added (see Figure 25
below). This information is also added to the distribution log, so
you can refer to it at any later time.
If you press the
disclosure triangle at the bottom of the Import Complete dialog, more
detailed information will be displayed, including the service's
category and name, as well as the date on which the service was
originally added or updated. This allows you to track changes to
service information. Pressing the Copy To Clipboard button will copy the text in the
textbox to the clipboard, so you can paste it into any text
document editor.
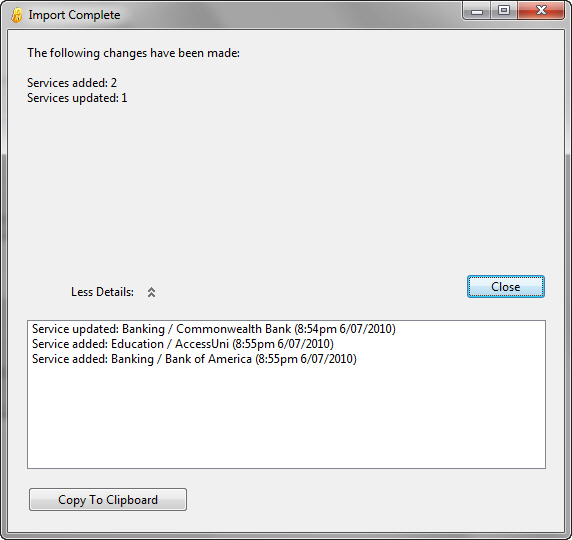
Figure 25. The Import Complete dialog
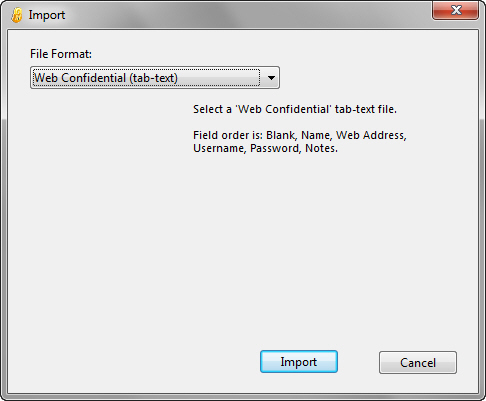
When importing in PasswordVault (tab-text) format (see Figure 26 below), the service data is imported in clear tab-text format with the field order displayed in the Fields Included listbox. This file format is compatible to version 2.x of PasswordVault and is basically provided for legacy compatibility to the older version. It is recommended that you use the PV data file format described above, as it provides protection from hackers via its strong encryption.
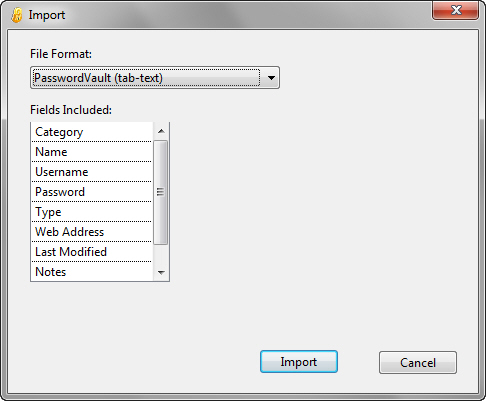
Figure 26. The Import dialog (PV tab-text file format)
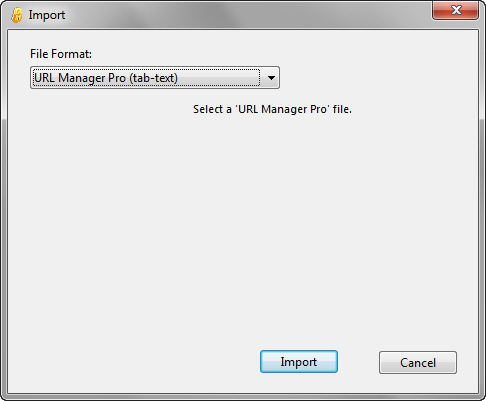
When importing in PasswordWallet (tab-text) format (see Figure 27 below), the service data is imported in clear tab-text format with the field order displayed in the Fields Included listbox. This file format is compatible to 'PasswordWallet™', a program available to users of MacOS. To export your data from PasswordWallet, simply select Export to Text File... from the File menu when running PasswordWallet.
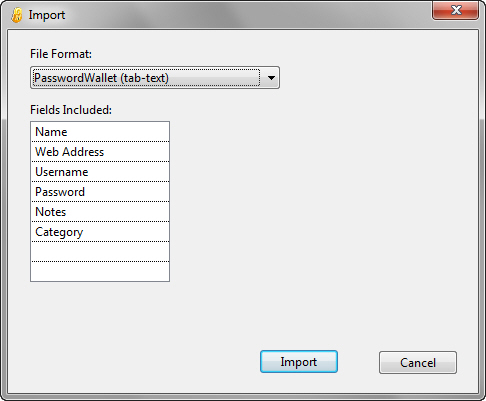
Figure 27. The Import dialog (PasswordWallet tab-text file format)
When importing
in Password Depot (csv-text)
format (see Figure 28
below), the service data is imported in clear csv-text format with
the field order displayed in the Fields
Included listbox. This file format is compatible to
'Password Depot', a
program available to users of Windows. To export your data from
Password Depot, select Export
list... from the Tools
menu when running Password Depot. Then set the Save as Type to Comma separated file (*.csv).
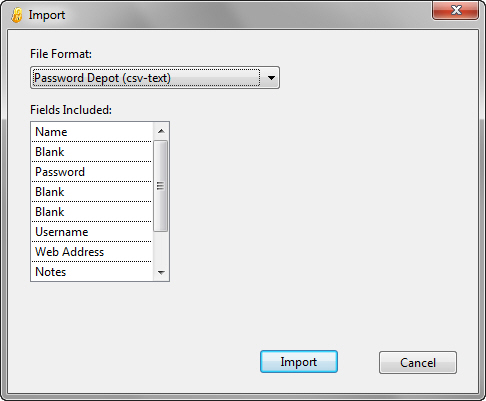
Figure
28. The Import dialog
(Password Depot csv-text file format)
When importing
in Custom (tab, csv-text)
format (see Figure 29 below),
you can select which fields to include in the imported file, the
order of the fields, and the character used to separate the fields
(' ; ' - semicolon, ' , ' - comma, <tab> - horizontal tab
[control-code 9], or ' |
' - bar). This allows you to import your data in any format you
like.
Important
Note: PasswordVault now performs an automatic backup of
your service data before performing a manual import. This ensures
that if anything goes wrong with the import, that you can easily
restore the service data you had previously. This automatic backup
is stored in the Backup
folder inside the PasswordVault preferences folder. To open the
PasswordVault preferences folder, hold down the Control (Ctrl) and
Shift keys while selecting Preferences...
from the menu when running PasswordVault. You will then
find a folder named 'PC-Mac PasswordVault v2.x' opened on the
desktop. To restore a backup file, quit
PasswordVault and copy the backup file into the 'PC-Mac
PasswordVault 2.x' preferences folder. Then move the
existing 'Prefs.txt' file somewhere safe, and rename the
backup file to 'Prefs.txt'. When you
next launch PasswordVault, it will use this file.
You can clear
out the automatic backup files (to make more space on your hard
drive), by selecting Clear
Auto-Backup Files from the File menu. Generally, backup files are only about
30k in size, so it shouldn't be necessary to clear them very
often.
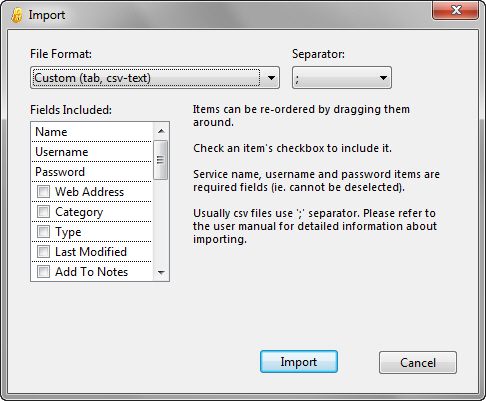
The service name, username and password items are required fields (these items cannot be deselected). To include any other fields, however, simply check the checkbox on it's left side. Note: If a field is not checked, it will not be included, even if it is located near the top of the listbox, and other included fields surround it.
The type of
data that can be successfully imported is now quite extensive.
You can include a Blank item to ignore
a particular field in the data, and there are 6 Blank items
available for this purpose. There are also 6 Add to Notes items
available. This item is incredibly useful as it allows you to
bundle any data you wish to keep, and which doesn't properly
correlate with another field type, into the Notes for the
service. For example, a field may contain entries such as Street Address, Email Address, Card Number, Description, Mobile Phone, ICQ, etc. Using an Add To Notes item for these
fields will correctly bundle this information into the Notes section of the service.
To change the
order of the fields, simply drag them up or down the listbox until
they are in the order you want.
The Separator popup menu allows you to select a number of separator character types. Most files in .csv format which can be imported actually use the ' ; ' character to separate fields, even though CSV means 'Comma-Separated Value' (CSV files are a common format used for database data interchange).
Hint: You can easily examine
the record format of the text file you are trying to import by
opening the text file using a text editor. You should then be able
to see how many fields are included in each record, their size,
order and location, and what field separator (ie. the spacer
character placed between fields) is being used. The field
separator is most often the 'horizontal tab' character, which is
control-code 9 in the ASCII table. You can also then 'massage' the
data using the text editor eg. remove the first line if it
contains the field names, convert an unusual separator to a ' ; '
(semicolon) or ' | ' (bar) separator using a global
search-and-replace on the text file (so it will import correctly
into PasswordVault), or break the text file into pieces and import
each piece separately (this may be necessary if the field order is
different in different parts of the original import file).
For example,
suppose you are trying to import the following data:
The field order
in this case that you would probably set in the Fields Included listbox is:
Name,
Username, Password, Web Address, Add To Notes, Blank, Category,
Add to Notes
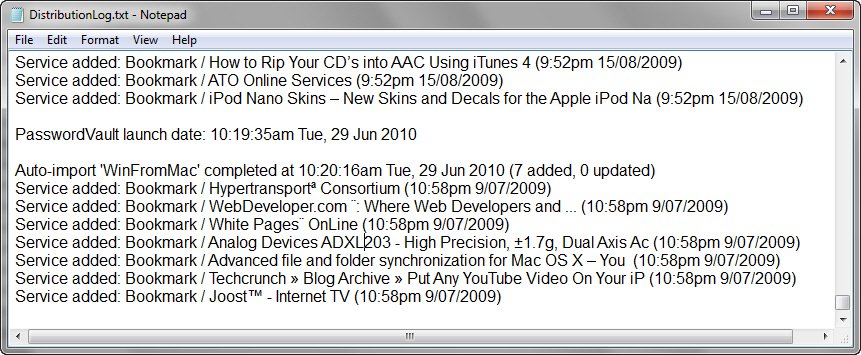
After you have
completed the import, be sure to check that the data imported
correctly. You can check what services were imported by opening
the distribution log by selecting Open Distribution Log... from the File menu. This log shows the
names of all the services which were imported, the categories they
were placed in, and the update date associated with the service.
Thus, you can always remove these services, if you need to.
In some password managers, you can set which fields are included in an export file, as well as the field separator character - this allows you to export in a format which can then be imported easily by PasswordVault. For example, with Password Manager XP, a program available to users of Windows, you can Export to file..., set the Columns data delimiter to ' ; ', and then Export chosen columns (eg. Title, User name, URL, Description, and Password would correlate to the Name, Username, Web Address, Add To Notes and Password items in a custom PasswordVault importer).
Note: If a mandatory field
(such as Username) is
blank, it will automatically be filled with a default value, to
ensure the data is imported in a usable form.
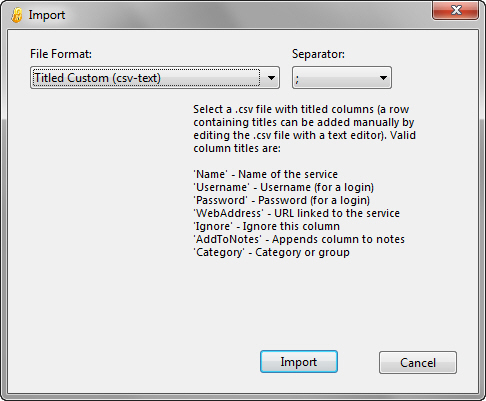
| Column Title |
Column Description |
| Name |
Name of the service |
| Username |
Username (for a login) |
| Password |
Password (for a login) |
| WebAddress |
URL linked to the service |
| Ignore |
Ignore this column |
| AddToNotes |
Appends column to notes |
| Category |
Category or group |
If you wish to
create separate category groups for different locations (eg. work
and home), you can do this by adding a prefix to the basic
category name. For example, 'Home-Banking' and 'Work-Banking',
'Home-Network' and 'Work-Network', etc. This makes it clear which
location the category refers to. You might also use a prefix if
you need the same basic category name for different company
environments eg. 'UDV-Vendor sites', 'Megatronic-Vendor sites',
etc. A company may use two (or more) levels of subcategory, such
as 'UDV-Network','UDV-Vendor sites', 'UDV-Email Accounts', etc. to
segregate category groups.
Overview
(Enterprise Edition)
The
Enterprise Edition of PasswordVault is a unique password management system
which combines a secure centralized database server (for easy
data management, backup and disaster recovery) with a
PasswordVault client which securely stores data locally, and
which synchronizes regularly with the server. It features:
For further
details about the Enterprise
Edition of PasswordVault, please
visit the Lava
Software website.