Notices
OperationIntroduction Security considerations Choosing a master password Setting up master password recovery Entering your master password The layout of the main window How to use the daily journal Managing your documents Backup your data!!!
Security considerations
PC-Mac SecureJournal was designed from the ground up with security
in mind. All your information is protected by highly secure 896-bit
encryption, and the only time this information is in a form which can be
easily accessed is when you are running PC-Mac SecureJournal. Even
if a hacker manages to access the data files which store your
information, they cannot be read without the master password or by using
'Master Password Recovery'.
Choosing a master password
Your choice of master password is important in ensuring the security of
your data. With PC-Mac SecureJournal, the master password is the only
password you need to remember, so it is a good idea to make it
reasonably long and include some numbers. For example, 'yukonmoose597'
is a good master password since it combines two unusual words and
includes numbers as well.
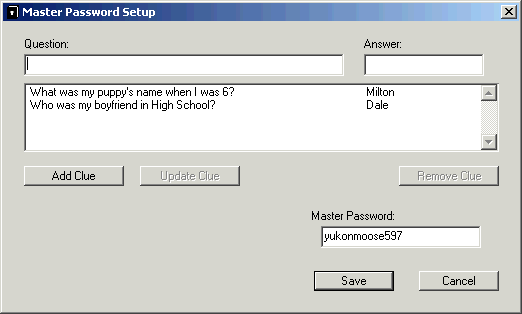
Enter you password
into the Master Password textbox
on the Master Password Setup
dialog (see Figure 1 below).
This dialog will be displayed when you press the Key button on the main window.
Figure 1. The Master Password Setup dialog
Setting up master password recovery
This powerful and unique feature of PC-Mac SecureJournal allows you to
recover elegantly if you ever forget your master password.
The master password
recovery system works by allowing you to enter a series of personal
questions (ie. clues), to which only you know the answers. Any number of
clues can be used, so you can make the recovery system at least as
secure as the master password itself - the more clues used, the better
the security. You should use clues which have very exact, explicit
answers, which will never change. For example, 'What was my puppy's name
when I was 6?' is a good clue, because it is something you will probably
never forget and which very few people would know. An example of a poor
clue is, 'Who is my best friend?'. The answer may change over time, thus
affecting successful recovery (ie. you may enter what you think is the
correct answer, but it may not be what you originally entered).
Setting up master password recovery is easy and is strongly recommended
for all users - if you forget your master password and do not have
master password recovery set up, you have permanently lost the data
stored inside PC-Mac SecureJournal! On the other hand, if you have set
up master password recovery, you just need to answer some simple
questions to get back to the main screen. From there, you can
re-familiarize yourself with your master password or change it to
something else.
To display the Master Password Setup dialog (shown
above in Figure 1), press the Key button on the main window.
To add a new clue,
enter the question in the Question
textbox and the answer in the Answer textbox.
Then press the Add Clue button
to add it to the list. After you have added all the clues you want to
add, press the Save button to
save the list of clues.
To update a clue,
select it in the list and it will be placed in the textboxes. Make any
changes you wish and then press the Update
Clue button to update the clue in the list. Then press the Save button to save the list of clues.
To remove a clue,
select it in the list and press the Remove
Clue button.
Entering
your master password
The great thing about PC-Mac SecureJournal is that you only have to
enter your master password, and then all your important data becomes
conveniently accessible. When you launch PC-Mac SecureJournal (and
have set a master password), you will see the dialog in Figure 2 displayed. If master
password recovery has been set up, the Key
button will also be visible. If the Key
button is not visible, it means that master password recovery has
not been set up and is not available.
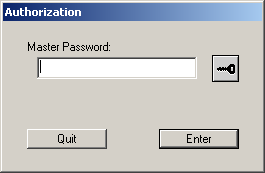
Enter your master
password and press the Enter button
to display the main PC-Mac SecureJournal window. If you get the master
password wrong, you can try again. If you have forgotten your master
password, press the Key button
to begin master password recovery. The dialog shown in Figure 3 will then be displayed.
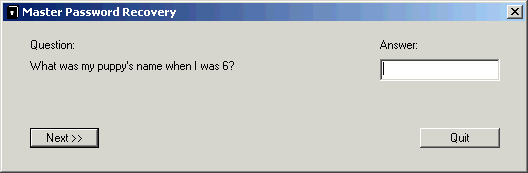
Figure 3. The Master Password Recovery dialog
Simply enter the
answer to each question in the Answer textbox
and press the Next >>
button. After you have worked through the series of questions and
answers, the main window will be displayed. If you can't remember the
answer to a particular question, think about it for a while before
trying again. If you cannot remember either the master password or the
answers to the questions for master password recovery (ie. you can't
recover), you cannot access the data stored inside PC-Mac SecureJournal.
If you can't
recover, you should quit PC-Mac SecureJournal and move the PC-Mac
SecureJournal preferences folder (see the FAQ)
to a safe place on your hard disk (such as a backup folder) and then
run PC-Mac SecureJournal again. Your master password will now be cleared
and all your previous data will be safely stored away in case you
remember enough information to recover.
The layout of the main window
As soon as you launch PC-Mac SecureJournal and enter your master
password (if you have set one), the main window will be displayed (see Figure 4 below). On the left is the
monthly calendar used to manage journal entries, and on the right are
the controls for managing documents. The Key button under the document
controls allows you to set the master password and enter the master
password recovery questions and answers.
The main text
editing area is located at the bottom of the window, along with the
usual types of text attribute controls found in any word processor, such
as font style (the Bold, Italic, Underline and Normal buttons), font size (the Font Larger and Font Smaller buttons) and font color
(the Red, Green, Blue and Black buttons). To select a
different font type, use the Font menu
on the menu bar.
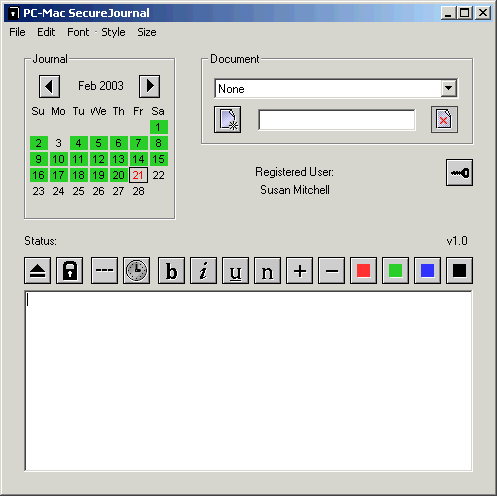
Figure 4. The main window
The four buttons on the left, under the status message (from left to right) are the Minimize button, the Display Lock-Out button, the Line Separator button and the Time/Date stamp button.
The Minimize button allows you to use the most of your screen space by hiding the calender and document controls. Pressing the button once hides the controls, pressing it again reveals the controls.
The Display Lock-Out button (also
activated by pressing the Esc key
on your keyboard) instantly makes the main window invisible and
displays the master password dialog. This function helps prevent someone
from walking by your computer and reading your notes whilst you are
editing them. You can also activate this function to protect your
information when you are temporarily away from the computer. To display
the main window again, enter the master password.
The Line Separator button inserts a line
of dashes into your document, and can be used to separate sections of
text.
The Time/Date stamp button inserts the current time
and date into your document. This is useful if you want to timestamp
your journal entries during the day or if you want to place a time/date
stamp into your documents.
How to use the daily
journal
The monthly calendar is used to manage your journal entries (see Figure 5 below). To change the
month displayed, press the Next Month
or Previous Month buttons. The
month is formatted in such a way that it shows the day-of-the-week of
each day. The current day-of-the-month is also drawn in red (ie.
today's date), whilst all other dates are drawn in black.
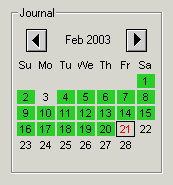
Figure 5. The monthly calendar
When PC-Mac SecureJournal is launched, the current day's journal entry will be opened immediately and made ready for you to edit.
To select a
different day, click on it in the calendar. A black rectangle will be
drawn around it to show it is selected. The main text editing area will
also become active (if it was inactive), ready for you to input your
journal entry. If you've selected a day without a journal entry (ie. one
which is not highlighted in green on the calendar), a journal entry for
the day will be created automatically when you start typing. Since
days which have a journal entry are highlighted in green, it's easy to
see which days have journal entries and which days you have missed in
the month.
The journal is designed to be sleek, fast and efficient, even with years of daily journal entries. Thus, you can rely on PC-Mac SecureJournal to help you maintain a secure and thorough diary of your personal experiences, thoughts and ideas well into the future.
You also need never
worry about saving your data to disk, as you would with a word processor
- this is all done automatically by PC-Mac SecureJournal. Whenever
you select a new date in the calendar, create or open a document, or
quit PC-Mac SecureJournal, any journal entry you have open will be
saved. Whilst you are editing a journal entry, your updated text will
also be auto-saved every five minutes.
Special note: To remove the
journal entry for a particular date, click on it in the calendar (to
load it from disk), delete it's text in the main text editing area and
then select a different day. You will find the journal entry will be
deleted (as indicated by the removal of the green highlighting for that
date).
Managing your
documents
The Document popup menu (see Figure 6 below) is used to select
from the documents you have available for editing. Selecting a document
in the popup menu will load it from disk and display it in the main text
area, ready for editing. To create a new document, enter it's name in
the textbox and press the New Document
button - the new document will be created, it's name added it to the Document popup menu, and the main
text area made ready for you to edit. To delete a document, select it
from the Document popup menu
and then press the Delete Document
button (as a precaution, you will be asked to confirm the deletion).
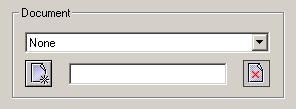
Figure 6. The document controls
You also need never
worry about saving your data to disk, as you would with a word processor
- this is all done automatically by PC-Mac SecureJournal. Whenever
you select a date in the calendar, create a new document, select a
different document, or quit PC-Mac SecureJournal, any document you have
open will be saved. Whilst you are editing a document, your updated text
will also be auto-saved every five minutes.
Backup your data!!!
It would be very sad if you spent considerable time and effort writing
a diary/journal or editing private notes and then lost them due to a
hard disk crash or similar catastrophe. It is strongly recommended that
you backup your data regularly (at least once per week) by copying it
onto backup media such as a zip disk, a networked hard disk, or other
storage. Avoid floppy disks, unless you are desperate - they have very
limited capacity and are unreliable.
To do a backup of your PC-Mac SecureJournal data, include the 'PC-Mac SecureJournal' preferences folder in your regular backup. This folder is in the 'Preferences' folder inside the 'Library' folder in your user folder on MacOS X, in the 'Preferences' folder inside the 'System' folder on MacOS Classic, in the 'WinNT' folder in Windows 2000, and in the 'Windows' folder in Windows 9.x.